

Many people are switching over to cloud-based services. If you’re moving from Microsoft Outlook over to your Windows Live Mail account, you may want to take your Outlook Contacts with you. We’ll show you how to import your Contacts from Outlook into your Windows Live Mail account.
Windows Live Mail was, until its end of life, one of the best freeware email clients that you could install on Microsoft Windows PCs and link Hotmail email or other emails. It was available in both desktop and cloud app versions. It offered excellent expert-user features like metadata search for local email files, storing email as a separate .eml file on the local storage, backup sub-folder, and so on.
Though new downloads and installations are no longer available, existing Windows Live Mail desktop users can still use the app by setting up email via POP3 and IMAP protocols. If you need to stick to this email client for work or personal reasons, you may want to import contacts from Outlook easily if you follow these quick methods:
Contents
Is Windows Live Mail Available?
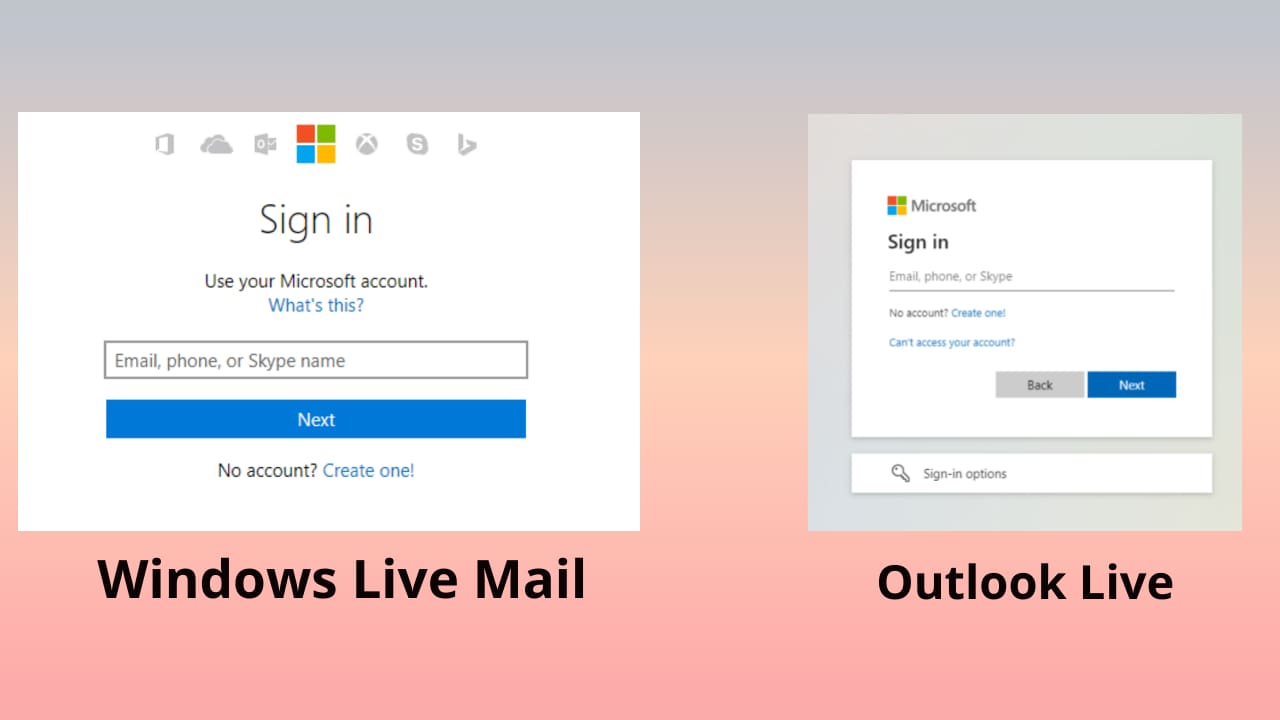
Microsoft discontinued the download and support for Windows Live Mail desktop and web version in 2017. If you’re a new user, you can’t download and install the desktop app anymore. On the other hand, Microsoft migrated the Windows Live Mail domain to the Outlook Live domain email server. Thus, if you try to log in to the web version of Windows Live Mail, you’ll arrive at Outlook on the Web cloud app, the free email from Microsoft.
When you’ll enter the URL mail.live.com, Microsoft DNS resolver will redirect the URL to outlook.live.com. Find below the log-in page difference between Windows Live Mail and Outlook:
Though Windows Live Mail desktop and web apps are no longer available, legacy Windows Live Mail desktop users can still use their apps. If you’re one, you must note that Microsoft will no longer push any over-the-air (OTA) updates or security patches for the email client. Microsoft also disconnected the DeltaSync protocol support from all Windows Live Mail desktop clients. Thus, email service providers and email servers that support POP3 and IMAP are only compatible with the Windows Live Mail app.
Also read: Fix Windows Live Kernel Event Error 193
Consider, you need to use both the Outlook app and Windows Live Mail app for work, school, or personal reasons. Then, you might find it highly inconvenient to switch between mail apps to do your job. There’s an effortless way to export Outlook contacts in a CSV file format. Then, you can import the CSV file format into the Windows Live Mail desktop app to get all the Outlook app contacts. Find below the methods you must try:
How to Import Outlook Contacts Into Windows Live Mail
First off, you need to process the Outlook contact exports in the Outlook desktop app. Once that’s done, you can move over to the Windows Live Mail app for the contacts import processing.
Outlook Export Steps
- Open the Outlook app and click the File tab on the Outlook ribbon menu.
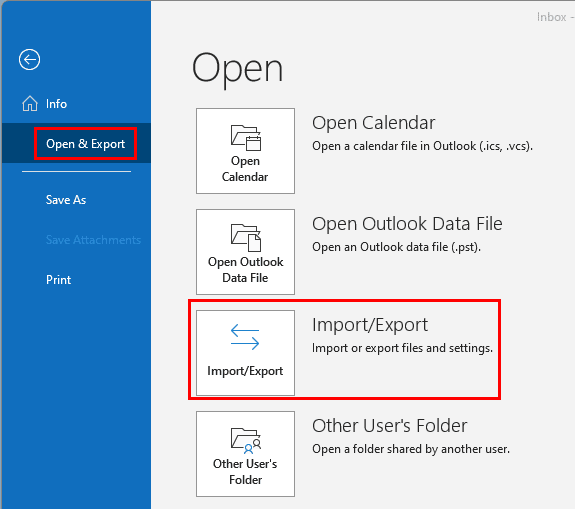
- Click on Open & Export on the left-side sidebar.
- On the right-side list of Open options, you should see Import/Export button.
- Now, the Import and Export wizard will open on the Outlook Home Screen.
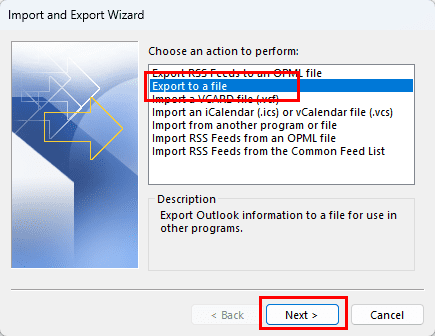
- Select the Export to a file option in the dialog box.

- In the Export to a file screen, choose Comma Separated Values.

- On the next screen, you should see a tree of directories and folders. Here, choose the folder from which you want to export Outlook contacts.

- Click Next and select the Browse button.
- Now, you need to save the exported file in a location that you remember.
- It’s best to select short addresses like Desktop, Downloads, Documents, etc.
- Also, ensure you rename the exported file to something that you’d remember.
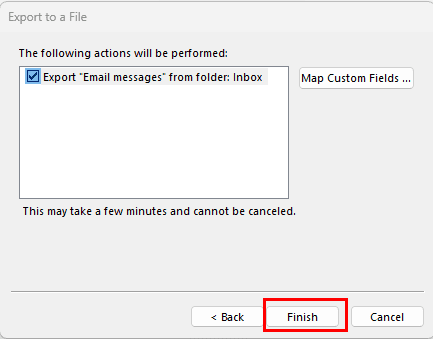
- Click Finish on the final dialog box to successfully complete the export contacts from Outlook task.
Now that you’ve got the CSV file database of Outlook contacts, you can perform the following steps to import the contacts into the Windows Live Mail app:
Import Outlook Contacts Into Windows Live Mail Desktop App
Importing a CSV file with Outlook contacts into Windows Live Mail app is quite straightforward. Follow these steps to try it out on your own:
- Open the Windows Live Mail desktop app.

- Once you’re on the Home Screen, select Contacts from the bottom left corner of the left-side navigation panel.
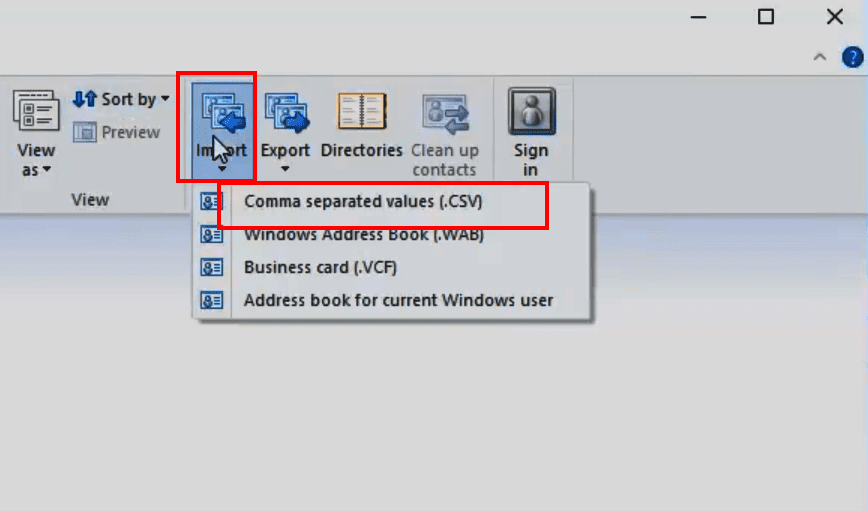
- Now, look in the Windows Live Mail ribbon menu for the Import button and click on it.
- A drop down list or context menu will open. There, you need to choose the Comma separated values (.CSV) option.
- Then, you arrive at the CSV Import wizard.
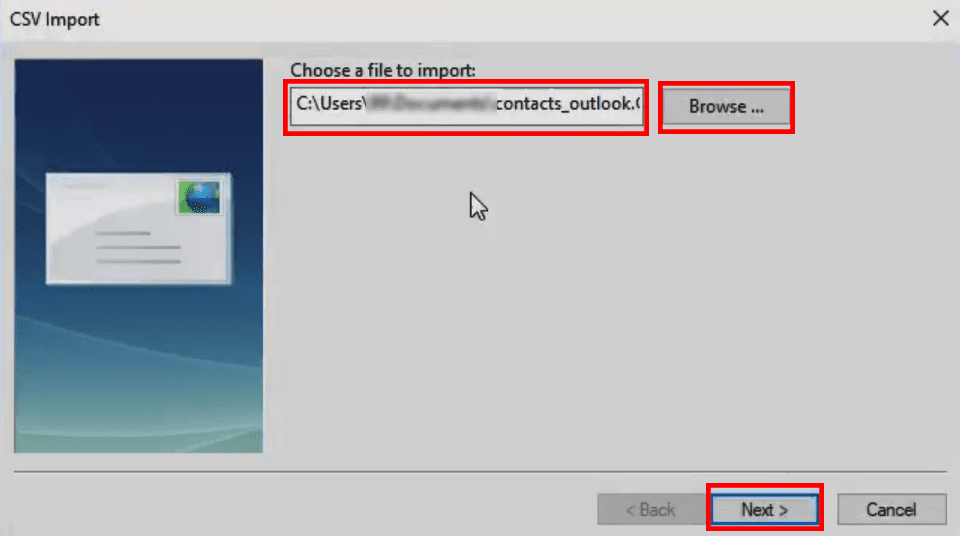
- Click Browse and locate the Outlook contacts CSV file that you downloaded from the Outlook app earlier.
- Double-click the CSV file to add it to the CSV Import wizard.
- Select Next and you’ll see the Map fields screen.
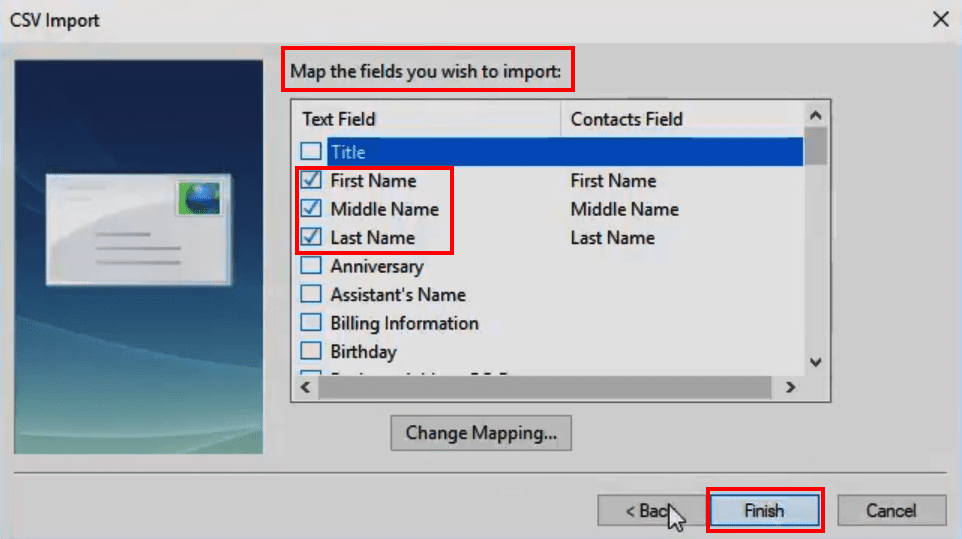
- Here, you can choose the fields that you want to import along with the name and email of the contacts.
- Once done, click Finish to finalize the process.
Perfect! Now you should find all the Outlook contacts also in your Windows Live Mail desktop app.
Windows Live Mail Import Steps
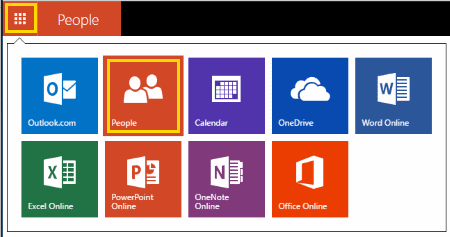
- Login to your Windows Live Mail account using Google Chrome, Microsoft Edge, or Safari.
- Select the apps button at the upper-left corner of the screen and choose People.

- Select Manage and then choose Add People.
Note: You may not need to do this if you’re already on the Add People screen.
- Select Start import.
- Choose Other.
- Select Choose File and select the CSV file you exported.
- Select Upload.
After a few seconds, the contacts should import to Windows Live Mail successfully. This is a legacy step to import Outlook contacts into Windows Live Mail cloud app. At present, Microsoft will redirect all traffic to the above domain to Outlook Live portal.
FAQ
Why don’t I have the option to Export in Outlook?
If you’re using Outlook on a work or school computer, the option to export from Outlook may be restricted by the Systems Administrator. You will need to contact your IT department to see if there is a way to enable it. Otherwise, you can use a workaround to export contacts as VCF files so that you may import them one by one.
Conclusion
That’s pretty much it if you want to import Outlook Contacts into Windows Live Mail. Though you can’t import Outlook contacts to Windows Live Mail web app, if you hadn’t done it already, you can surely do it for the desktop app. Give the above method a try and share your experience in the comment box below. If you also know any other ways to export Outlook contacts to the Windows Live Mail app, you’re most welcome to leave your comments in this post.
Next up, how to export Outlook contacts to Excel.


This did not work. The contact in the csv file was not added to People
My (new) version of MS Mail doesn’t offer the “Import” option, other than from the suggested platforms.
no because the options are not available
Select “Manage” > “Add People“. Note: You may not need to do this if you’re already on the “Add People” screen.
Select “Start import“.
Choose “Other“.
Select “Choose File” and select the CSV file you exported.
Select “Upload“.