It may sound odd to want to stop updates on your Windows 11 computer. After all, updates are usually related to new features and bug fixes. Many may even check for new updates daily, hoping to see an update. So why would anyone want to pause them? Well, may the update you haven’t received yet have caused other users problems you want to avoid. Or, maybe your computer doesn’t have the space the update needs. Whatever your reason, the steps to pause the updates are easy and can be reversed anytime. You can even specify how you want to pause the updates.
Contents
How to Easily Pause Updates on Windows 11
If you don’t set a specific time, Windows will pause the updates for one week. But, if that time is unsuitable for you, you can change it. Since you don’t know what effect an update will have on your computer, it may be a good idea to pause them and have them installed when you’re ready. You can pause the update by going to Settings. You can access Settings by pressing the Win + I keys. But you can also access it by clicking the Windows Start icon and choosing Settings. You can also right-click the Windows Start icon and select Settings from the listed options.
Once you’re in Settings, click on Windows Update at the bottom left, and you should see the Pause updates option at the top. The default option will be set for one week, as previously mentioned.
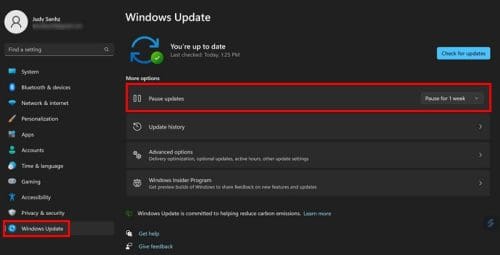
Click on the arrow pointing down for more options. You can choose from times such as:

- Pause for One week
- Pause for Two weeks
- Three weeks
- Four weeks
- Five weeks
You can apply this change even if the download is underway. The download will resume when you unpause the option. But remember that the update can’t be stopped when it has reached a certain point. If you see a message not to turn off your computer because the system updates are being added, then it’s too late. If you turn off your laptop hoping this will stop the update, you’ll only be running the risk of corrupting your files, which will only result in problems you can avoid.
How to Resume Windows 11 Updates
If you’re ready to continue with the Windows 11 updates, restarting them is easy. Go to Setting > Windows Update > Resume Updates.

Your computer will automatically check for pending updates as soon as you resume the updates. The update will be downloaded but not installed. If you want to install it later, you can do so. You can also have Windows notify you when you need to restart your computer to finish an update. To set this up, go to the Advanced option in the Windows Update section.

Toggle on the option that says Notify me when a restart is required to finish updating. That’s all there is to it. If you ever want Windows to stop notifying you, toggle off the option.
Further Reading
As long as we’re on the subject of stopping updates, if you still feel like reading, you might be interested in reading about how to check for updates on your Android device. In using a Windows 10 computer, you can also see how you can stop updates on that version. You can read plenty of other topics; for example, you can see what you can do when the widgets on your Windows 11 computer stop working. You can search for many other articles using the search bar.
Conclusion
When you see an update pending on your computer, your first impulse might be to install it immediately. But what if it’s an update that’s received bad reviews, and you want to hold off on it? If you need more time to decide if you want the update or not, you can choose from different times. When you disable these options, your computer will start looking for updates automatically, but you control if you want to install them immediately or later. Do you install updates right away, or do you wait? Share your thoughts in the comments below, and don’t forget to share your thoughts in the comments below.