

Google Chrome is the most popular web browser globally, with a loyal user base of 2.7 billion users. When users may temporarily switch to a different browser, the only time when Chrome’s not working properly. Google’s browser may sometimes throw the annoying ERR_NAME_NOT_RESOLVED error code. In other words, Chrome can’t load the web pages you’re trying to visit, and you need to switch to a different browser to access them. This error code affects both Windows and Android devices. Let’s see how you can fix it.
Contents
How Do I Fix Err Name Not Resolved on Chrome?
Clear the Cache and Cookies
If your cache and cookies interfere with the web pages you’re visiting, clear them, refresh your browser and try again.
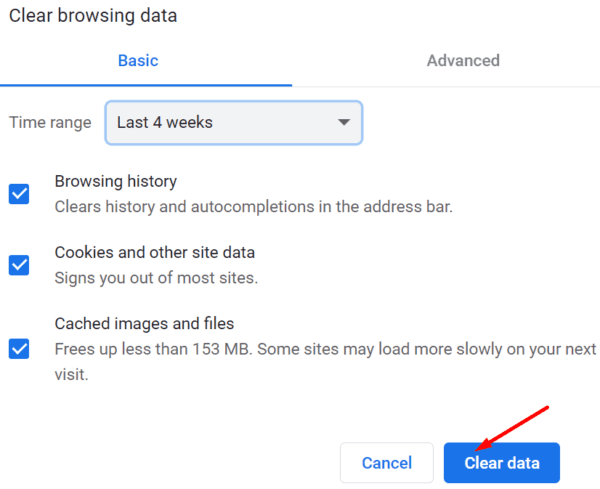
On PC, click on Chrome’s three-dot icon, and select History twice. Then click on Clear browsing data, select the 4-week time range option, and hit the Clear data button. Additionally, disable all of your extensions and check if the error persists.
On Android, click on More options and select Settings. Go to Privacy and Security and tap Clear browsing data.
Then, go to Settings, tap Apps, select Storage, and hit the Clear cache button if it’s not greyed out already.

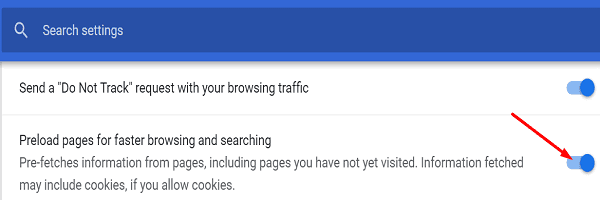
Disable the Preload Feature
- Go to Chrome’s Settings, select Privacy and Security and go to Cookies and other site data.
- Scroll down to Preload pages for faster browsing and searching and toggle off this option.

- Refresh your browser and check if the issue is gone.
Change Your DNS Settings
If the issue affects only Chrome, change your browser’s DNS settings. If the problem persists, change your system’s DNS settings.
Chrome
- Open a new Chrome tab and go to chrome://settings/security.
- Scroll down to Advanced and disable Use Secure DNS.
- Refresh your browser and check if the issue is gone.
- If you still can’t use the browser, go to Custom settings and select a different DNS from the drop-down menu. Try out all the options and check which one works for you.

Windows 10
Launch Command Prompt with admin rights, and run the ipconfig/flushdns command. Check if this quick command solved the problem. If it didn’t, change your DNS settings.
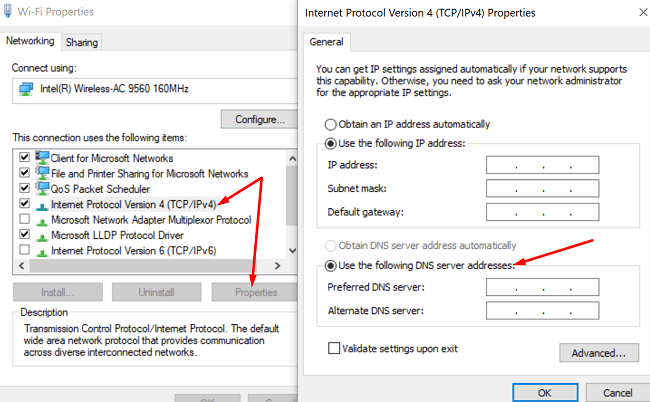
- Go to Control Panel → Network and Internet →Network and Sharing Center.
- Select Change adapter settings.
- Right-click on your connection and select Properties.
- Select IPv4 (TCP/IPv4) and click the Properties button.
- Under Use the following DNS server addresses, enter one of the options below.

- Google Public DNS: 8.8.8.8 and 8.8.4.4
- Cloudflare: 1.1.1.1 and 1.0.0.1
- OpenDNS: 208.67.222.222 and 208.67.220.220
- Save the settings and check the results.
Android
- Navigate to Settings, go to the Network settings, and select Private DNS server.
- Select the custom server option and enter the new DNS settings.
- If you want to use Google’s Public DNS, enter dns.google.
- If you want to use CloudFlare’s DNS, type in 1dot1dot1dot1.cloudflare-dns.com.
- Save the settings and check if the error persists.
Note: The steps to follow on Android may be slightly different, depending on your phone model and Android version.
Additional Solutions
- If you’re running Avast Antivirus, disable the HTTPS scanning option. Navigate to Settings → Protection → Core Shields → Web shields → untick Enable HTTPS scanning.
- If you’re on Android, launch the Google Play Store app, search for Chrome, and hit the Update button to install the latest Chrome app version.
- Unplug your router’s power cable and let the device unplugged for two or three minutes. Power on your router and check if the issue is gone.
- If you’re on Android, restart your device three times in a row and switch to a different connection.
Conclusion
If the Name Not Resolved error prevents Chrome from loading webpages, clear your cache and cookies, disable the preload website feature and restart your device. If the error persists, change your DNS settings. Hit the comments below and let us know if you managed to fix the problem with the help of this guide.


Thanks soooo much I was not able to access it before now I can!!!!!!
Hi