

Are you facing website loading issues or worried about data privacy offline and online? You must know how to flush and reset the DNS cache in your Windows 11 or earlier PCs!
When you browse websites, the Windows 11 PC plays a major role in helping your web browser load the queried pages faster by caching the Domain Name System (DNS) addresses of the websites you visit. Problems in this DNS cache file can stop you from visiting an updated website, cloud app, or other online resources that rely on DNS addresses.
Flushing the DNS resolver cache can help resolve DNS-related problems in Microsoft Windows 11 and previous versions. Issues would include website not found errors or not being able to view certain web pages that have changed. Read on to learn the methods to flush and reset the DNS resolver cache in Windows 11.
Contents
What Is DNS Cache?
While you recognize a website by its URL like technipages.com, the web browser or computer recognizes the same website using its IP address, which is 172.67.69.195. Now, all these IP addresses for billions of websites are available in various DNS servers around the world. Your Internet Service Provider (ISP) also maintains a secondary DNS server cache as a backup to the primary DNS servers.
When you type an URL in the address bar of Chrome or Mozilla web browser for the first time, it requests the IP address from a nearby DNS server to open the web page. The Windows 11 PC copies the resolved IP from the first query and saves it in a DNS resolver cache.
The next time you open the same web page, the web browser no longer requests a DNS server to translate the URL to an IP address. It takes help from the DNS resolver cache in your operating system. This is known as a DNS cache of a local computer like Windows 11. Similar to Windows PCs, macOS, Linux, etc., computers also maintain a local cache copy of all the websites that you visit.
Also read: What Is a DNS Record?
What Is Flush DNS and What Does It Do?
Flush DNS is a common Command Prompt code for all modern Windows operating systems since Windows 2000. You can use this code to force the Windows PC to clear the records in its DNS resolver cache. Operating system developers allow the users to do this manually to avoid data security issues, website loading problems, and other DNS address-related issues.
After you use the Flush DNS command, Windows wipes the entire DNS cache that it built since the recent clean installation of Windows 11 or any other Windows operating system. The web browsers from now on need to send a DNS resolver query to the nearest DNS server to get the latest IP of the URL you’re trying to access. Soon, Windows 11 will record these resolved IPs in the local DNS resolver cache.
Also read: How to Reinstall Windows 11 for Free: 3 Easy Methods for Everyone
Reasons to Flush DNS on Your Computer

If you’re unable to clear or reset the data in the local DNS cache then you’ll be in serious trouble when trying to access websites or use apps that fetch data from the internet using the operating system. Thus, most operating systems let you flush the DNS resolver cache so that it can update itself. Here are the reasons why you might want to use the Flush DNS command on your Windows 11 PC:
- When you try to access a website you know exists but repeatedly get the 404 error, you can reset the local DNS cache.
- You’re trying to access a website and the browser is taking you to the dated version of it. In this situation, you must flush and reset the DNS cache.
- The local copy of the DNS resolver cache is also a privacy concern. If you browse websites, online apps, internet banking portals, and run business apps from a public or third-party Windows PC, you may want to flush the DNS before leaving. It helps you to wipe clean your online activities on a public PC.
- If you think you have become a victim of DNS spoofing or DNS cache poisoning, you must flush the DNS resolver cache of your computer.
- You use business apps like enterprise resource planning (ERP), customer relationship management (CRM), online SQL database, etc., and these apps are unable to fetch the latest data from the cloud or on-site server.
How to Flush and Reset the DNS Resolver Cache
Find below the simple and quick methods to flush the DNS resolver cache and push Windows 11 to build a new DNS cache for future online activities. You can perform most of these methods on earlier Windows PCs that run on Windows 10, 8, 7, XP, 2008, and 2003.
Option 1: Using Windows Command Prompt
To reset the DNS resolver cache, perform the following steps on a Windows 11 PC:
- Select the Start button, then type CMD on your keyboard.
- Right-click Command Prompt and choose Run as Administrator.
- Alternatively, you can click the Run as administrator hyperlink on the right-side panel of the Start Menu that show the Command Prompt app.
- Copy and paste the following command into the Command Prompt and hit Enter:
ipconfig /flushdns
- You must include the space before the forward slash.
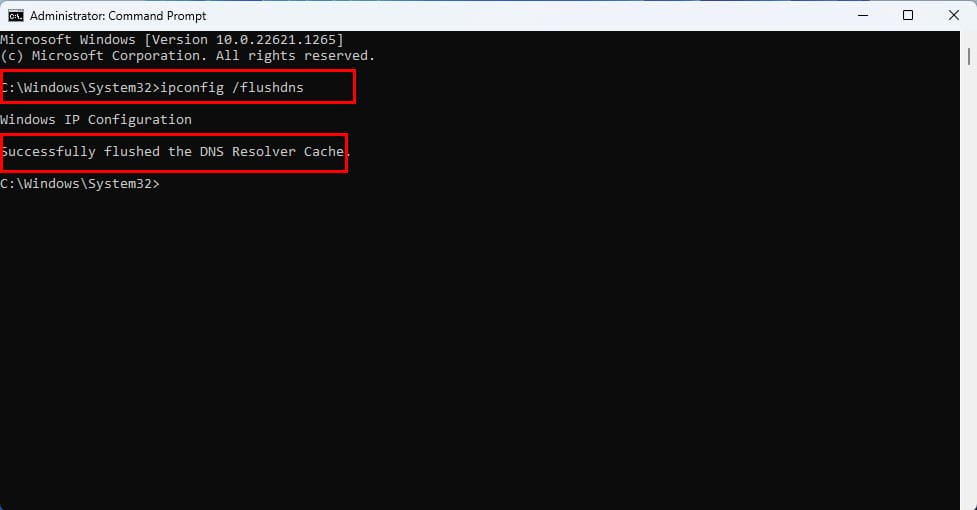
- The command line interface will show the message: Successfully flushed the DNS Resolver Cache.
This method is also valid for Windows 10, 8, 7, Vista, XP, etc.
Option 2 – Windows PowerShell Terminal
- Select the Start button, then type PowerShell.
- Select the Windows PowerShell app from the list of apps.
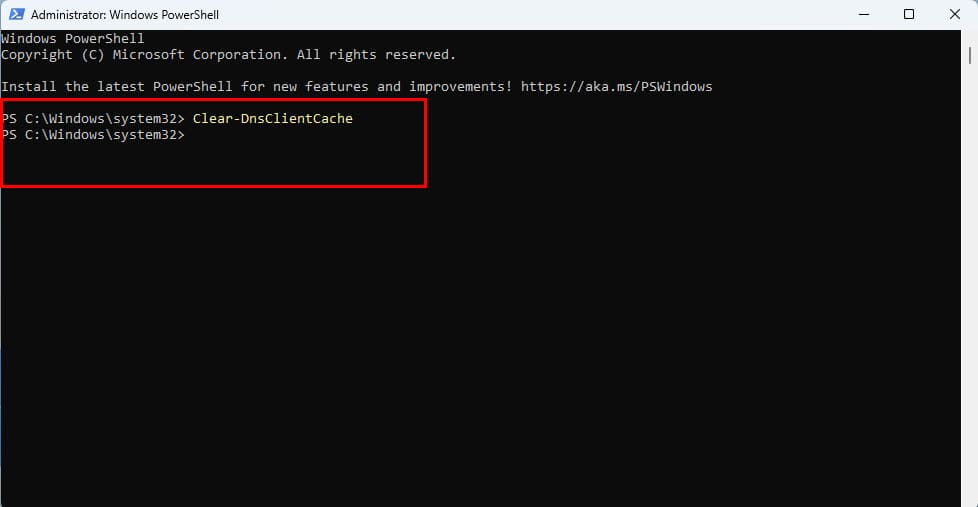
- Type the following command, then press Enter:
Clear-DnsClientCache
- It’ll erase the DNS resolver cache but won’t show any confirmation message.
- Alternatively, you can use the following command on PowerShell to see a confirmation message:
ipconfig /flushdns
Also read: Flush and reset a client resolver cache using the ipconfig command – from Microsoft
Option 3 – Using Run Command Dialog Box
- Hit the Windows + R keys simultaneously on your keyboard.
- The Run command dialog box will show up in the bottom left corner of the screen.
- There, you should see the Open field.
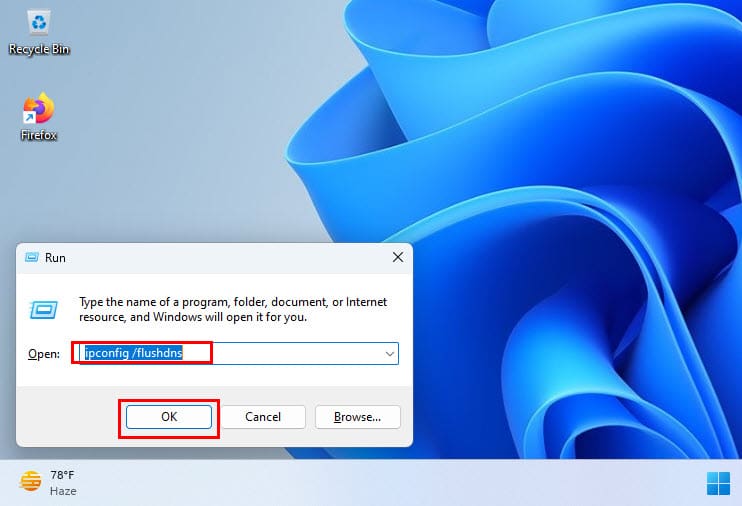
- Type the following command in that field and hit Enter to erase the local DNS cache on your Windows 11 PC:
ipconfig /flushdns
- You’ll see a silhouette of the Command Prompt and this confirms that Windows 11 cleared the DNS resolver cache.
Option 4 – Using a Batch File for Flush DNS
If you need to run the flush DNS command repeatedly for website and mobile app development purposes on your Windows 11 PC, you may want to create a batch file for the codes. Then, double-clicking the batch file will automatically clear the local DNS cache. Here are the batch file creation steps you can follow:
- Open the Notepad application.
- Copy and paste the following batch file command in it:
cmd.exe /k ipconfig /flushdns
- Now, save the Notepad as a batch file. To do this, simply hit Ctrl + S and then rename the file as flushDNS.bat.
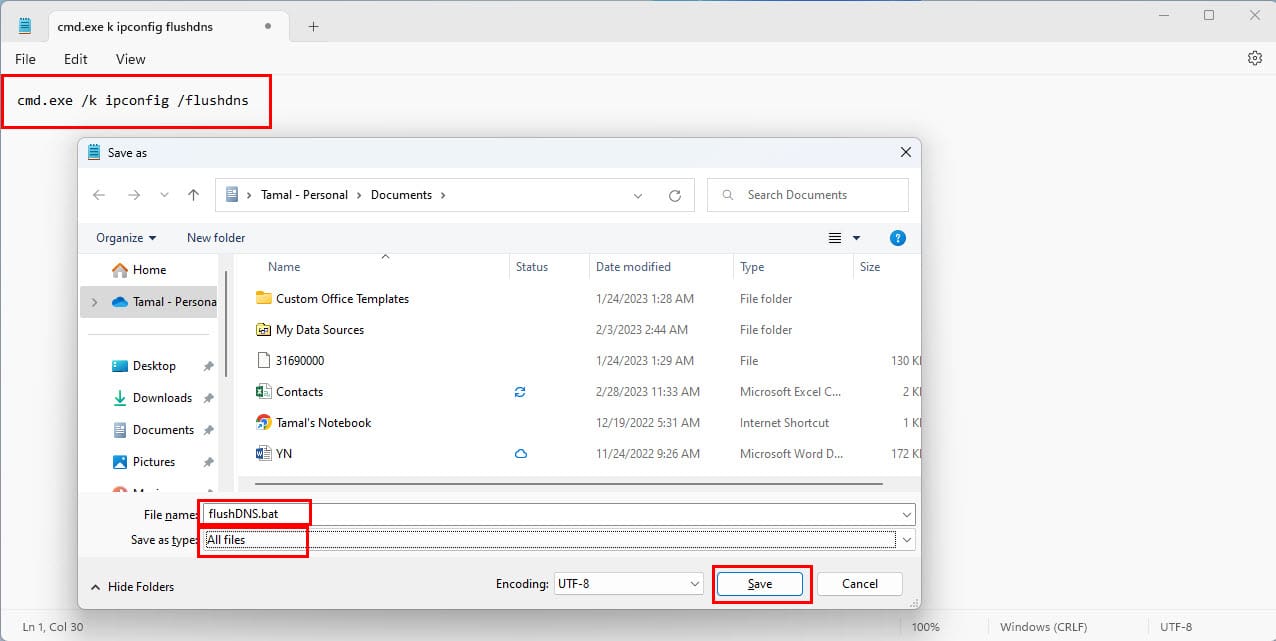
- In the Save as type drop-down list, select All files.
- Click Save to create the batch file.
- Now, go to the folder where you saved the batch file and double-click it.
- The Command Prompt will show up with the confirmation message that Windows deleted the local DNS cache copy.
How to Flush and Reset the DNS Resolver Cache in Web Browsers
You might also want to clear the DNS cache copy of the web browser in case you’re facing website loading issues or suspect hackers targeted your computer for DNS cache poisoning. Here’s how you can accomplish this for Chrome, Mozilla, and Edge web browsers:
- Open the Google Chrome browser and type in the following destination in its address bar:
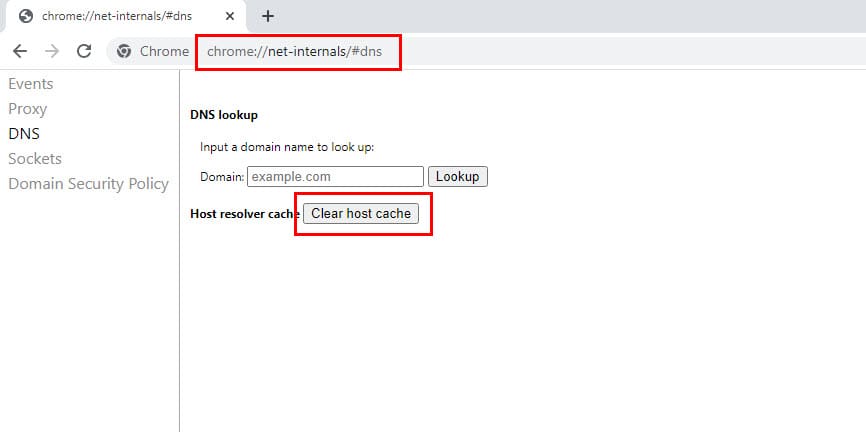
chrome://net-internals/#dns
- Now hit Enter to access the DNS cache copy of the Chrome browser.
- Beside the Host resolver cache text, click the Clear host cache button.
- For the Firefox web browser, simply use the following destination, and the rest of the steps are the same as Chrome:
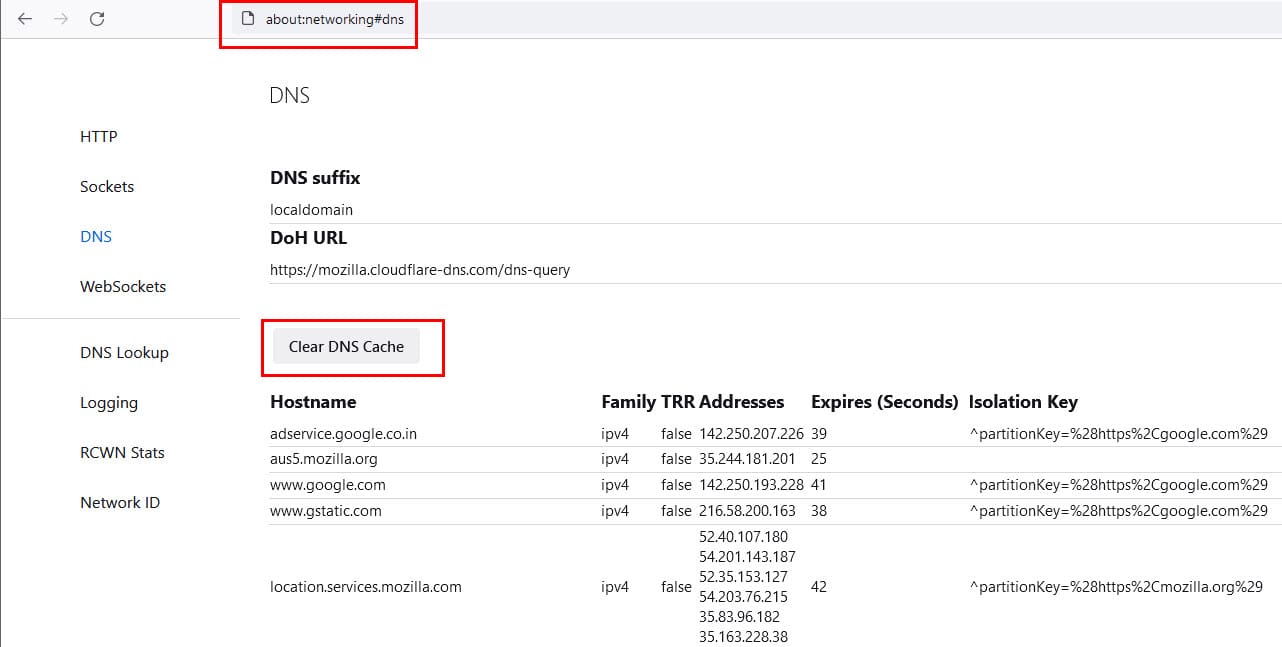
about:networking#dns
- If you’re on Microsoft Edge, then you can use the following code:
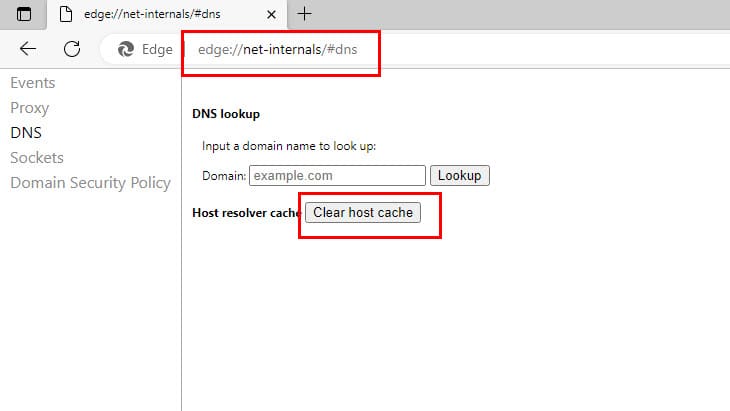
edge://net-internals/#dns
FAQ
What is the DNS Resolver Cache?
Whenever you visit a website using its domain name (i.e. microsoft.com), your browser is directed to a DNS server where it learns the IP address of that website. You are then directed to that website. A record of the IP address that the domain name points to is created within Windows so that if you visit that same website again, the information is accessed quicker. These records that get created make up the DNS Resolver Cache.
Why would flushing the DNS Resolver Cache fix anything?
Sometimes an IP address to a site may change. If the DNS Resolver Cache has the old IP address record, it may result in your computer not being able to reach the site. Cached data can also become corrupt. Therefore, clearing it is a step you can take whenever you cannot connect to a site.
Can I view the data in the DNS Resolver Cache?
Yes, you can. From a Command Prompt, you can use the following command to view the data in the DNS resolver cache:
ipconfig /displaydns

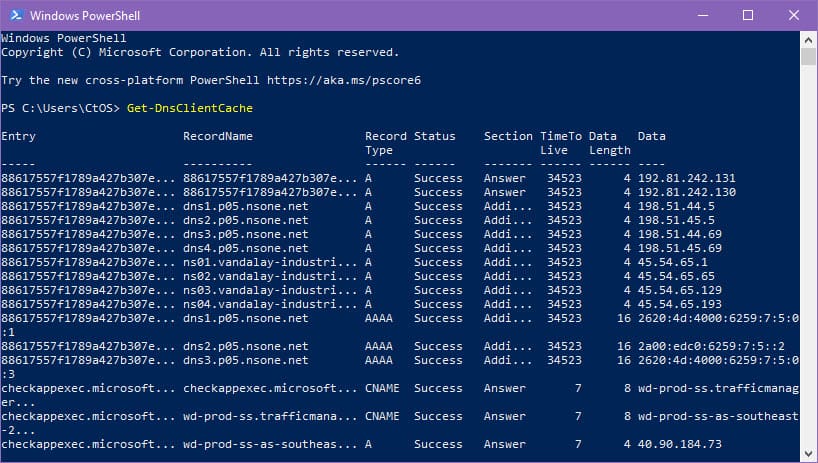
Alternatively, you can use the Microsoft PowerShell terminal on Windows 11 or 10 computer and execute the following code in it to view the data stored in your Windows PC’s DNS resolver cache:
Get-DnsClientCache
Conclusion
So, now you know how to flush and reset the DNS resolver cache in a Windows 11 PC. You also learned how to delete the local cache copy of DNS using Command Prompt and Run command dialog box in earlier versions of Windows like Windows 8, 7, Vista, XP, etc. Give the above methods a try when you face internet connectivity issues with a specific website or app. Don’t forget to comment below if I missed any other steps to flush and reset the DNS resolver cache in Windows PCs.
Next up, Why Is It Important to Route DNS Traffic Over Your VPN?


Thank you for the information.
Very good information I got from here.
not working
This forum/blog is extremely helpful. Thank you all for your posts.
Windows IP Configuration – Run successfully flushed the DNS Resolver Cache but continually ask for
C: \Users\Owner > and accepts nothing I input.
Please Advise!
Typing “cmd” didn’t work I had to type “run”
This would be very useful IF Windows 10 showed a command line when I click Start, so I could type anything at all. I can’t find a way to get to the cmd prompt.
Really It’s a Very Helpful Article. Thanks for share with us.
Hi I have just purchased a new lap top and it has problems connecting to the internet. the trouble shoot guide says : The DNS server is not responding” . please can you help
If you don’t want the command window to disappear, don’t use the Run command; use the Command Prompt command instead (as Administrator).
This will open a command terminal, wherein you can type
ipconfig /flushdns
and then to exit the command terminal window, either X at the top-right or enter the command
exit
To read the data, try copy and pasting everything into a doc. You can do this as the data is loading.
My question is about all the data that is in there after the flush. It appears to be junk but I’d like it gone so the next display dns is clean.
I don’t know yet. Have to relaunch website fix was for.
I tried this. Two web sites still refuse to load on any browser.
it is worked with the RUN command but it is run dialogue box quickly and even guys not seen the operation, if want see the operation try with the command prompt with the following command
ipconfig /flushdns (be sure there is a space before the slash)
When using the run command “ipconfig /displaydns” the command prompt window scrolls by so fast I cannot read it. I did try “ipconfig /displaydns /p just in case it worked like directory searches. No luck.
Richard & Anika the ipconfig/flushdns window will appear and disappear quickly.. sometimes a momentary pause it the cache is rather full but otherwise sometimes you may not even witness it but it will function as per the command
For me happens the same, box quickly disappears ;/
Very helpful. As a Customer Service analyst for the CDC, I come across this problem from time to time. It’s good to have yet another trick in my arsenal. Thanks!
Michael Bethea
Atlanta, GA
When I do these steps my run diallogue box quickly disappears ,,,,,thats all.