

If your computer seems a bit sluggish, launch the Task Manager to check if your apps use too much memory. You may notice the Desktop Window Manager is to blame. As a quick reminder, the Desktop Window Manager (dwm.exe) is a process that powers many graphics effects in Windows 10, such as transparency, animations, layering, and more.
This process may sometimes use a ridiculously high amount of memory, leaving your computer unable to process other tasks. The problem usually occurs when you open a live stream in your browser. If you’re looking for a solution to troubleshoot this problem, follow the instructions below.
Contents
How Do I Reduce Desktop Window Manager’s RAM Usage?
Update Your Drivers
Outdated drivers can often cause high RAM usage. Launch the Device Manager, and check if there’s an exclamation point next to your drivers. Right-click on the outdated driver and update it. If you want to speed up the process, you can use a driver updater to get the job done. Then restart your computer and check if dwm.exe is still causing high memory usage.
Roll Back Your Intel Drivers
If your computer is equipped with an Intel graphics driver, try rolling it back to driver version 26.20.100.7985.
- Download the driver from Intel’s website.
- Shut down your computer, wait for two or three minutes, and then power on your machine.
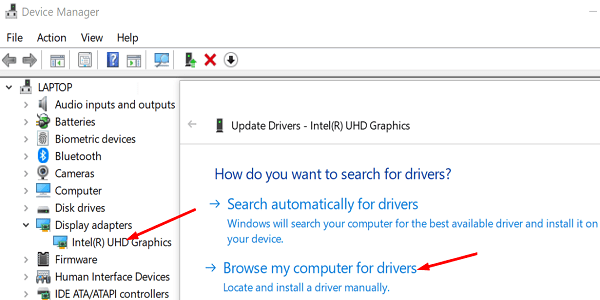
- Launch the Device Manager, select your Intel Driver and click on Update driver.
- Then click on Browse my computer for drivers.

- Install driver version 26.20.100.7985 and check if the issue is gone.
Disable Background apps
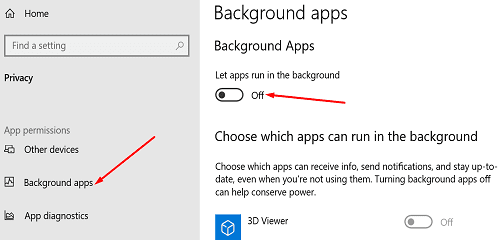
Navigate to Settings, click on Privacy, select Background Apps, and toggle off the option that allows apps to run in the background.
Then launch the Task Manager, click on the Processes tab, and right-click on the programs you want to close. Hit the End task option, refresh your computer and check the results.
Run SFC and DISM Scans
Launch Command Prompt with admin rights and run the commands below, hitting Enter after each one:
- sfc /scannow
- dism /online /cleanup-image /CheckHealth
- dism /online /cleanup-image /restorehealth.
Restart your machine, and check if the high RAM usage problem persists.
Switch Your Power Plan to Balanced
Some users said the high-performance power plan might cause this problem. They confirmed that switching to Balanced fixed the issue. Navigate to Control Panel → Hardware and Sound → Power Options. Enable the Balanced power plan, save the new settings and check the results.

Close OperaGX
If you’re using OperaGX, you may want to switch to a different browser. Some users confirmed the high RAM usage issue disappeared after closing OperaGX. Launch Google Chrome, Edge, or another browser of your choice and check the results.
Scan Your System for Malware
Malware may cause all sorts of glitches in your system. It’s not uncommon for malware infections to cause high CPU and RAM usage. Launch your antivirus, and run an in-depth antimalware scan. The whole process may take up to one hour, depending on how many files the antivirus needs to scan. Restart your computer and try again.
Roll Back Your OS Version
The Windows 10 20H2 October Update is known to cause high dwm.exe RAM usage. This is a known bug, and Microsoft is already working on a fix. To get rid of this problem, you can roll back to Windows 10 version 1909.
Navigate to Settings, select Update & Security, and click on Recovery. Then select Go back to the previous version of Windows 10.
Conclusion
Desktop Window Manager may sometimes eat up a lot of RAM. This is a known Windows 10 20H2 issue. As a workaround, you can go back to your previous OS version. Additionally, roll back your Intel graphics driver, run SFC and DISM, and enable the Balanced power plan.
Let us know if this problem is still affecting your computer. Did you find other ways to fix it? Share your thoughts in the comments below.


I found having an additional HD screen plugged into my laptop doubled the memory usage of DWM.EXE, which makes sense as there’s more desktop to manage.