You get together with some friends to study. If you’re like me, you can’t stand the silence and need some background music. The good news is that Zoom has an option to share your computer’s audio-only. You may have been sharing your screen and playing a video for the background music, but that’s no longer necessary.
But, if you have someone connecting from their smartphone, the screen sharing takes up the entire display, which may be uncomfortable for them. But by using the option that only lets you share the computer’s audio, those on smaller devices will always be able to see everyone and hear what you’re sharing.
Contents
When there’s something your Zoom buddies need to see and hear, sharing your screen is the best way to go. But, sometimes, all you want to do is share your computer’s audio. To do that, all you need to do is open the Zoom app, and once you’re in a meeting, click on the green Share Screen option.
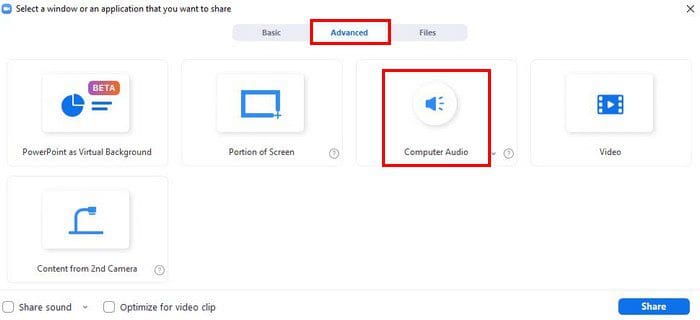
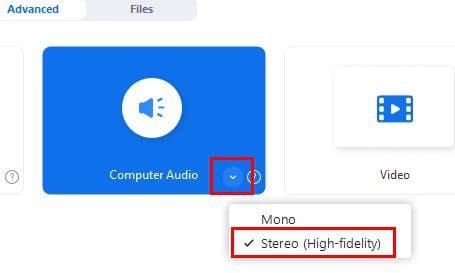
A new window will appear with different options. Make sure to click on the Advanced tab at the top, followed by the Computer audio option. When it’s highlighted in blue, that means it’s been selected, and now you can click on the blue share button at the bottom right. Don’t forget to click on the dropdown menu near the Computer audio option. With this option, you can share stereo sound.
You’ll know that you’re sharing your computer’s audio because you’ll see a message at the top of your screen letting you know. You’ll also see a stop share option in red. So, when you’re ready to stop sharing the audio, simply click on that to stop it.
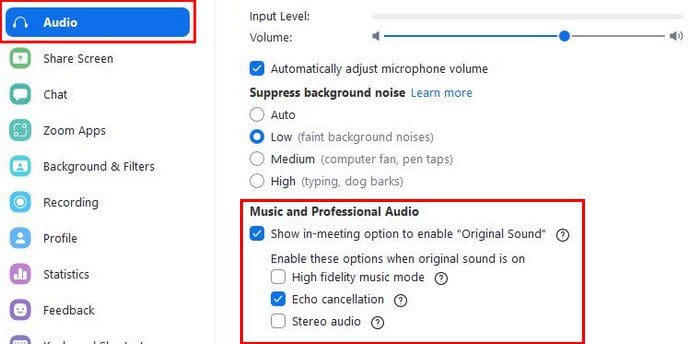
Something else you can try to get the best possible audio in your Zoom meeting is to adjust the Suppress background noise option. You can do this by going to Settings by clicking on your profile picture. Click on Settings and then click on the Audio tab on the left. Look for the Suppress background noise section and make sure you select the Low option.

Other Ways to Improve Zoom Audio Quality
One of many ways to improve the audio for your Zoom meeting is by investing in a high-quality microphone. These mics will give you much better audio than the mic on your laptop or Android device. You’ll also know where you need to talk so you can be heard, and you can move it wherever you want. If the mics are too expensive, you can also try getting a headset with a good mic. That’s going to be a lot better than the mic on your laptop.
In the Audio setting on the Zoom client. Besides how much background noise can be heard, you can optimize the mic. Also, if you see that Zoom gives you the option to connect through your computer audio or dial into a phone number, choose the one that works best for you.
But, make sure that you don’t use both, or you’ll get an echo. The same thing will happen if someone who is on the same Zoom call is too close to you. Also, make sure the mic isn’t too close or too far from you for the best audio. You can also try the Zoom extension called Krisp. It removes background noise. So, if your environment is usually boisterous, this is a great option.
How to Enable and Preserve Original Sound on Desktop and Android
What is Original Sound? What it does is that it lets you keep the sound from your mic without having to use the app’s echo cancellation and audio-enhancing features. Maybe your mic already has the features, and you don’ need any additional enhancement.
If you’re using the desktop client, click on your profile picture, followed by the Settings option. Click on the Audio tab, and under Music and Professional Audio, click on the box for the Original Sound option. You’ll now see how three audio options appear.
If you’re on your Android device, you’ll need to open the app and tap on the cogwheel. Go to Settings, followed by Meetings. At the top, Under Audio, tap the Use Original Audio.

Now that you’ve enabled it, you’ll see the option to enable the original sound at the top left of the meeting every time you join a Zoom meeting. If you’re on your Android device, you can enable the Original Sound by going to More and choosing Original Sound.
Conclusion
You want to have the best possible audio when you’re on your Zoom meetings. Good thing that Zoom offers different options for you to choose from. By going into the app’s settings, you can choose from different audio enhancement options. How many changes do you think you’re going to make? Let me know in the comments below, and don’t forget to share the article with others on social media.