
Microsoft PowerPoint Kiosk mode is a great method you can use for unattended slideshows like product presentations, business slideshows, and demos at a conference or fair. The self-running presentation on PowerPoint is very popular in many grocery stores, airport lounges, and railway waiting rooms where no one is available to click to continue the slideshow. Here, the computer linked to the display screen itself keeps changing the slides. If you need to learn how to enable auto kiosk presentation mode on PowerPoint 365, keep reading.
PowerPoint desktop app comes with tons of features to help professionals and individuals present content at schools, colleges, seminars, and business meetings. One handy feature is PowerPoint kiosk mode or self-running presentation. Before a meeting, you may want to have an automatic presentation run to give your participants something to look at before the actual meeting. Or perhaps you just want to set up a presentation at a product display and run it automatically. You can accomplish this in Microsoft PowerPoint 365 by performing the steps and methods outlined below.
Contents
What Is PowerPoint Kiosk Mode?
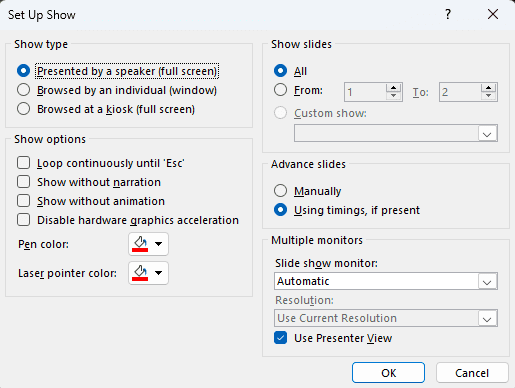
The kiosk mode or self-running slideshow on PowerPoint is a slide show setup on PowerPoint that enables you to display content in a public space without assigning a speaker or presenter. You find this option on the PowerPoint ribbon menu section Setp Up Slide Show. There are three different slide presenting options. Out of these three, the “Browsed at a kiosk (full screen)” option enables PowerPoint kiosk mode.
In the self-running presentation mode, the PowerPoint slideshow preview enters a continuous loop mode. According to a preconfigured view time per slide, the app will keep showing all the slides one by one. When it reaches the last slide, the presentation starts again from the beginning. You can modify the display time per slide if you want. Furthermore, you can add a narrator voice describing the slideshow if you want to. Sound in a PowerPoint kiosk mode presentation adds more value to the slideshows.
The self-running presentation mode of PowerPoint is available in the following editions:
- Microsoft 365 Windows app for PowerPoint
- PowerPoint for Mac
The feature is available on various versions of the above editions of the PowerPoint standalone app. Microsoft mostly used Browsed at a kiosk (full screen) option to explain that the app supports PowerPoint Kiosk Mode. Thus, if you see this option, rest assured the self-running slideshow will work.
At the time of writing, PowerPoint Kiosk Mode wasn’t available on any version of PowerPoint cloud apps like PowerPoint on the web for individuals and PowerPoint Web App for business subscribers. If you want to know if the feature is available on the web version or not, visit the PowerPoint help & learning portal and type a question in the How can we help you? search box.
Also read: How to Import Slides from Another Presentation File
How to Enable PowerPoint Kiosk Mode in Microsoft 365 App
Find below a step by step instructions to run PowerPoint slides in the self-running presentation mode. The steps are mostly similar to other Windows versions of PowerPoint apps like PowerPoint 2021, PowerPoint 2019, PowerPoint 2016, and so on.
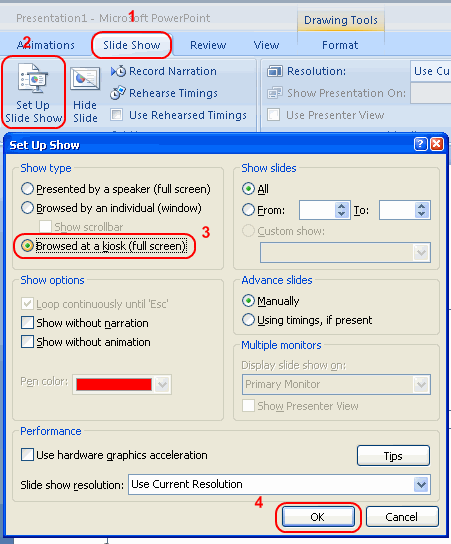
- Open the PowerPoint file in question.
- Click the Slide Show tab on the PowerPoint ribbon menu.
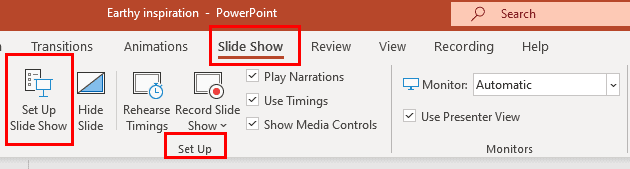
- Now, you should see the Set Up Slide Show command inside the Set Up command menu.
- Click on Set Up Slide Show.
- The Set Up Show dialog box will now open.
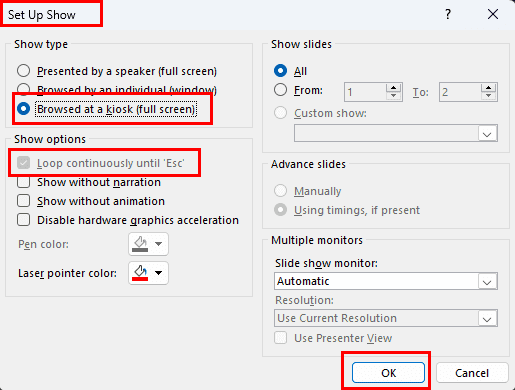
- Select the radio button for the slideshow playback option (Show type) Browsed at a kiosk (full screen).
That’s it! You’re all set up to present your slides automatically in an infinite loop. The slideshow won’t stop until you stop it or shut down the device on which you’re presenting the PPT file. Now that you know how to activate a self-running presentation on PowerPoint, find here some customization options:
Also read: Fix: PowerPoint Closes When Computer Goes to Sleep
Show Options
The Show Options commands control how the slideshow progresses in a kiosk mode. You’ll see that PowerPoint 365 automatically selects the Loop continuously until ‘Esc’ feature. It means you need to press the Esc key on the keyboard to stop the presentation. In this section, other controls you can select are as follows:
- Show without narration: Selecting this option will disable all audio narration in the PPT file
- Show without animation: When selected, PowerPoint won’t run the animations in a kiosk mode
- Disable hardware graphic acceleration: If the kiosk computer lacks GPU, you can enable this feature
Show Slides
By default, the Show slides section will auto-select All slides for self-running presentation. However, you can click the radio button for From to create a slideshow with manual slide views. For example, if your PPT contains 50 slides, you can choose to play only 25 by entering number 1 in the Form field and number 25 in the To field.
Advance Slides
For the auto kiosk presentation mode, PowerPoint will use the slide timing to change a slide after its timing expires. For example, if you set up the slide to display for 10 seconds, the app will show the page for 120 seconds and move on to the next slide. The Using timings, if present is this the default setting for Show slides in PowerPoint kiosk mode.
Here’s how you can manually change the display time for each slide:
- Click the Rehearse Timings button in the Set Up menu.
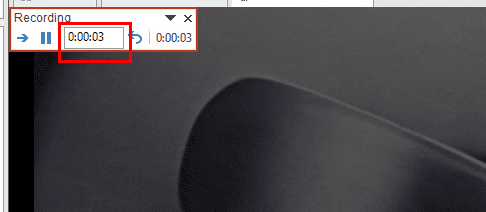
- You should see a time running on the top-left corner of the slideshow.
- Here, you can let the screen run for a specific time on its own.
- Alternatively, you can type in seconds and minutes in the timer box.
- When you’re done editing the slideshow timings, click the close button in the timer.
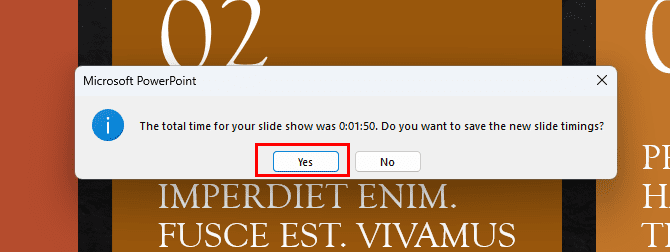
- Select Yes to apply the timing changes made.
Multiple Monitors
If there are multiple monitors connected to the same Windows PC, you can control the monitor for PPT display. Let’s consider there are five monitors connected to your PC in your business stall in a fair. Now, you want to display five different PPTs to the visitors of the fair. You can run all of them from the same PC. Then, on the Set Up Show dialog box, manually change the display screen to which you want to stream the content. Here’s how it’s done:
- Look for the Slide show monitor drop-down list under the Multiple monitors command section.
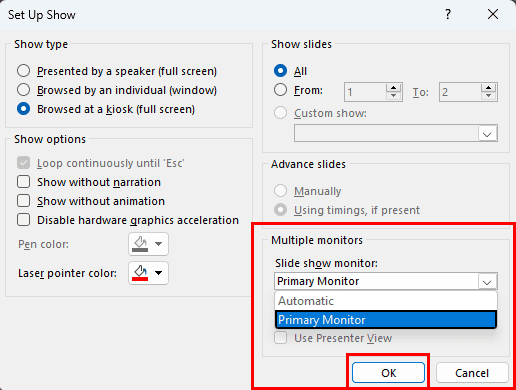
- Click the drop-down arrow and choose the monitor number, such as primary monitor, secondary monitor, etc.
- You could also see the monitor model number in the drop-down list field.
Add Sound or Slide Narrations
A PowerPoint slideshow with narration will attract more eyeballs than a silent one. Therefore, you may want to add narration to the slideshow before playing it in a business meeting, conference, or business fair. Here’s how you can add audio content to your slides to explain the whole presentation:
- Close out the Set Up Slide Show dialog box.
- Click the Record Slide Show drop-down list.
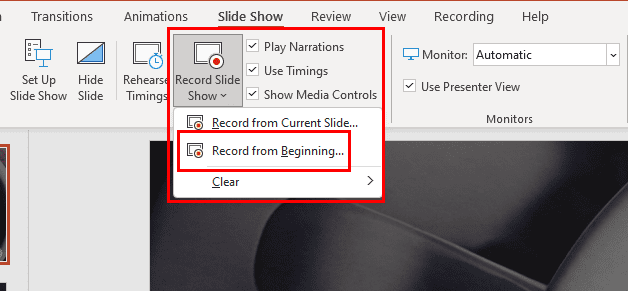
- Now, choose Record from Beginning.
- Click the Record button and start recording your narration of the PPT as the slides progress.

- If you need to delete a recording, you can choose from the below options by clicking the CLEAR button:
- Clear Recordings on Current Slide
- Clear Recordings on All Slides

- Select Stop when done.
From now on, you also don’t need to explain the presentation when displaying it in front of a large audience group. Your narration will play automatically in the background synchronized to the slides.
How to Enable Self-Running Presentation in PowerPoint 2007
- Open the presentation in you wish to automate in PowerPoint.
- Select the Slide Show tab.
- Select Set Up Slide Show.
- Choose the Browsed at a Kiosk (Full Screen) option.

Set Up kiosk mode in Microsoft 2007 app
Use PowerPoint Kiosk Mode in PowerPoint for Mac App
The macOS app for PowerPoint available on App Store also lets you activate the kiosk mode. Here’s how it’s done:
- Open the PPT file that you want to show in a kiosk at a fair or conference or business meeting.
- Click the Slide Show menu on the Mac toolbar.
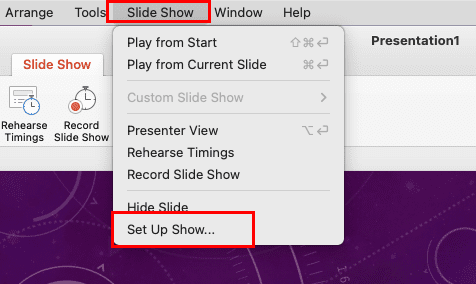
- On the context menu that pops up, choose Set Up Show.
- The Set Up Show dialog box will open.
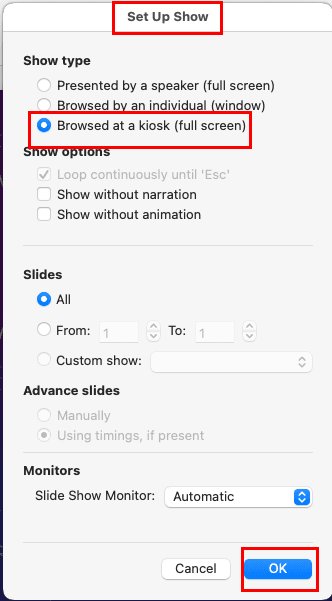
- Here, you need to select the Browsed at a kiosk (full screen) radio button under the Show type section.
On the PowerPoint for Mac app, you get similar self-running presentation optimization options as the Windows 11 app. These options are Show options, Slides, Advance slides, and Monitors.
Auto Kiosk Presentation Mode in PowerPoint: FAQ
What is another name for a self-running slideshow?
Another name for a self-running slideshow on Microsoft PowerPoint is the kiosk mode. It lets you present slides without clicking the next slide button.
What is a self running PowerPoint?
In a self-running PowerPoint slideshow, you add all the content, transition, timing, and audio narration. Then, you start it and the app puts the slides into a continuous loop. The PPT keeps running on its own without any intervention from you.
What does browsed at a kiosk mean?
Browsed at a kiosk means the automatic presentation of a slideshow on the Microsoft PowerPoint desktop app. Since businesses use this mode to showcase business plans, products, services, etc., on a display kiosk at public events, hence the name.
Conclusion
So far, you discovered the complete step-by-step guide on how to activate the PowerPoint kiosk mode on PowerPoint 365 desktop app. You also know how to do the same on a MacBook or iMac. Give this method a try the next time you wish to present slideshows automatically while interacting with your customers or clients. Don’t forget to leave your comments about your experience of self-running presentations using the PowerPoint app.
After these steps, you may want to set the slideshow to automatically change the slides.


thankyou for the instruction. -reneerosetimbreza
I’ve been trying to find out what format to use to save my presentation which is for display at a kiosk and requires input from the viewer to move to the next slide.