• Skip to main content
  • Skip to primary sidebar

Technipages

Smart phone, gadget and computer tutorials

  • Topics
    • Android
    • Gaming
    • Hardware
    • Internet
    • iOS
    • MacOS
    • Office
    • Software
    • Windows
    • Definitions
  • Product Reviews
  • Downloads
  • About
Opera for Android: How to Configure Autofill

Opera for Android: How to Configure Autofill

Posted on September 3, 2020 by Mel Hawthorne Leave a Comment

Aside from passwords, there are generally two types of data submitted through forms on websites: addresses and card details. Most online marketplaces will require a delivery address for any products that you buy and will require you to enter your card details to pay for it.

Traditionally you’d type these details every time or save them in your account on the website. Modern browsers, however, allow you to save this type of information in the browser itself. This allows you to easily import your address or payment details easily and quickly on any website, regardless of if you’ve used the site before. Additionally, you don’t have to worry about making a typo when entering your details, as they will be automatically entered for you from your saved data.

Even though this feature can be useful, not everyone will want to use it. Thankfully, you can disable the feature completely if you want. To do so in the Opera browser on Android, you need to configure the in-app settings.

Firstly, to be able to access the in-app settings, you need to tap the Opera icon found in the bottom-right corner of the app.

Tap the Opera icon in the bottom-right corner of the app to be able to access the in-app settings.

Next, tap “Settings” at the bottom of the popup-pane to open the settings themselves.

Tap “Settings” at the bottom of the popup panel to open the in-app settings.

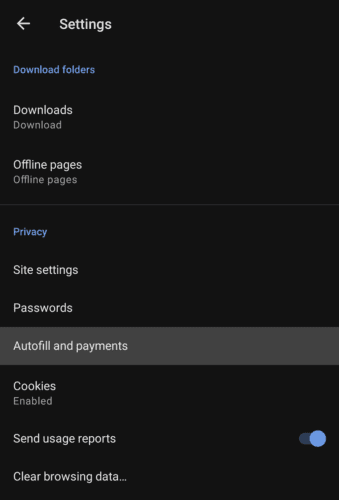
Once in the settings, scroll down to the bottom of the list, then tap “Autofill and payments” in the “Privacy” sub-section.

Tap “Autofill and payments” in the “Privacy” sub-section, near the bottom of the settings list.

The only option here is to enable or disable the entire autofill feature. If you want autofill to be enabled, ensure that the “Auto-fill forms” slider is set to the “On” position; if you want to disable the feature instead, tap the slider to the “Off” position.

To configure an address, card details, or a set of contact information, tap the relevant entry.

Toggle the autofill feature on and off and configure the saved data.

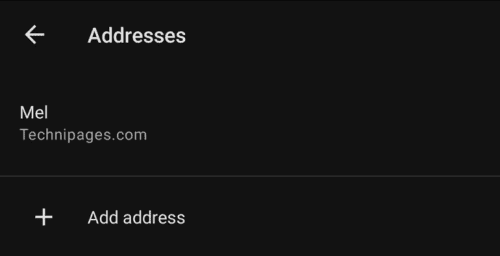
After tapping one of the options, for example, “Addresses”, you’ll be presented with the list of currently saved details in that category.

Tap an existing entry to edit it or tap “Add address” (or the relevant category) to add a new entry.

Tip: While the exact data fields will vary between the categories, the process of adding or editing entries is the same across all of them.

Tap an entry in one of the categories to edit it or create a new entry.

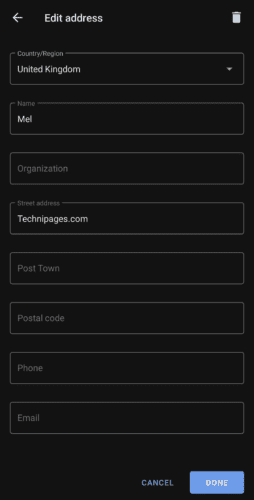
In the “Address” and “Contact info” categories, there aren’t any required categories; for card details, however, you will be required to enter a valid card number to be able to save an entry.

Simply add the data to the entry that you want, then click “Done” in the bottom-right corner to save. To delete an existing entry, tap the trash icon seen in the top-right corner of the edit entry view.

Enter the data you want into a new or existing entry, then click “Done” to save.

You Might Also Like

  • Ecosia for Android: How to Configure Form AutofillEcosia for Android: How to Configure Form Autofill
  • Opera for Android: How to Configure Ad-BlockerOpera for Android: How to Configure Ad-Blocker
  • Opera for Android: How to Configure the Built-In VPNOpera for Android: How to Configure the Built-In VPN
  • Opera for Android: How to Configure Cookie PreferencesOpera for Android: How to Configure Cookie Preferences
  • Opera for Android: How to Configure Dark ModeOpera for Android: How to Configure Dark Mode
  • Opera for Android: How to Configure Custom Color SchemesOpera for Android: How to Configure Custom Color Schemes
  • Opera Touch: Configure Cookie PreferencesOpera Touch: Configure Cookie Preferences
  • Edge for Android: How to Add Autofill AddressEdge for Android: How to Add Autofill Address
  • Dolphin for Android: How to Disable Form AutofillDolphin for Android: How to Disable Form Autofill

Filed Under: Android, Internet

Reader Interactions

Did this help? Let us know! Cancel reply

Your email address will not be published. Required fields are marked *

This site uses Akismet to reduce spam. Learn how your comment data is processed.

Primary Sidebar

Recent Posts

  • WhatsApp Self-Destructing Messages: What You Need to Know
  • Spotify: How to Merge Playlists
  • Google Duo on Android: How To Add Automatic Captions To Video and Audio Messages
  • Slack: How To Disable Notifications for Threads You’re Following
  • Slack: How To Configure Your Status
  • Google Duo: How To Prevent Other People From Seeing Your Video Before They Pick up Your Call
  • Slack: How To Configure Notification Keywords
  • How to Tell If Your Phone Is Dual-SIM

Who’s Behind Technipages?

Baby and Daddy My name is Mitch Bartlett. I've been working in technology for over 20 years in a wide range of tech jobs from Tech Support to Software Testing. I started this site as a technical guide for myself and it has grown into what I hope is a useful reference for all.

Follow me on Twitter, or visit my personal blog.

You May Also Like

  • 9 Best Android TV box
  • 10 Best Android Phone Cleaner Apps in 2019

© Copyright 2021 Technipages · All Rights Reserved · Privacy