
Enable USB Debugging on your Amazon Fire tablet and start using it with an Android Studio or software development kit (SDK) on your Windows PC, Mac, or Linux. Just use these steps to get started.
The USB Debugging feature of the Amazon Fire tablet lets app developers test their apps in simulated scenarios so the app performs well when you download and install it. Using the same feature, Android device technicians can resolve software-level issues on Amazon Fire tablets.
And finally, being an end user, you can use the USB Debugging functionality to perform advanced activities on your tablet like taking screenshots in bulk from a PC or Mac. Also, if you want to create a complete clone of the tablet, you can do so using USB Debugging. Setting up the Android Debug Bridge (ADB) service on your Fire HD tablet and PC is a challenging task. However, if you follow the step-by-step methods mentioned in this article, the Amazon Fire ADB and Android Studio will sync and work effortlessly.
Contents
- 1 How to Enable Android Debug Bridge (ADB) on Amazon Fire Tablets
- 2 Download and Install Android Studio SDK
- 3 Download and Install the Amazon Fire Driver
- 4 Setup ADB Between Amazon Fire Tablet and Windows PC
- 5 Test Device Connections Using ADB Commands
- 6 Setup ADB Between Amazon Fire and Mac/Linux
- 7 Conclusion
How to Enable Android Debug Bridge (ADB) on Amazon Fire Tablets
Since its launch, there have been different editions of the Amazon Fire tablet. Find below the different methods to enable ADB on all existing Amazon Fire tablets:
Enable ADB on Earlier Amazon Fire Tablets
If you’re using a dated Kindle Fire 1st generation tablet, then you don’t need to take any actions on the tablet computer. By default, ADB is active on these devices. However, if you’re using a Kindle Fire HD tablet to enable USB Debugging, here’s what you need to do:
- Swipe down from the top of the tablet screen.
- It should open the Notifications shade.
- There, tap on the More (+) icon.
- On the new window that opens, scroll down to find Settings. Tap on Settings.
- Inside Settings, you should find Security. Tap on it.
- At the bottom of the Security window, you should see Enable ADB On and Off toggle button.
- Tap the On toggle to activate ADB on the Kindle Fire HD tablet.
Activate ADB on All Amazon Fire X and Fire HD X Tablets
If you’ve ever enabled ADB or USB Debugging on an Android smartphone, you’ll find it really easy to do the same on an Amazon Fire tablet. Because the steps are similar in both of these device Android-run device classes. Find below how it’s done:
- Open the Fire OS Settings app from the Home Screen of the tablet.
- On the Settings screen, scroll down to the bottom and choose Device Options.
- Inside the Device Options window, go to the bottom and tap About Fire Tablet.
- There, you should see three choices: Device Model, Serial Number, and Build Number.
- Tap the Serial Number option seven times to activate Developer Options.
- When you see the “You are now a developer” text on the tablet screen, close the Settings app.
- Open Settings again from Home Screen and go to Device Options.
- At the bottom, you should see Developer Options. Tap on it.
- On the top of the next screen, tap the Off toggle button to turn on development settings.
- Now, scroll down to the Debugging section and touch the toggle for USB Debugging to activate this functionality.
Download and Install Android Studio SDK
You can use the ADB feature when you install Android Studio. Once it’s on your PC, you can execute various ADB commands using Windows Terminal app or the Android Studio app. Here’s how to install the SDK:
- Visit the Android Studio portal.

- Click the Download Android Studio button on the home page.
- There will be a pop-up for the license agreement. Accept that.
- Once the download is over, go to the Downloads folder on your PC and install the SDK.
Download and Install the Amazon Fire Driver
In this step, you’re going to install the Amazon Fire SDK. By doing this, you can effortlessly add the necessary Android SDKs to the Android Studio installation folder. Later on, Android Studio will use the package to identify and sync with your Amazon Fire HD X, Fire X, and Kindle Fire tablets. Here’s how you can accomplish this task:
- Open Chrome or Mozilla browser.
- Copy and paste the following URL into the address bar to download Kindle Fire USB Driver.
https://s3.amazonaws.com/android-sdk-manager/redist/kindle_fire_usb_driver.zip
- When the downloading is done, go to the Downloads folder to find the driver package.
- Extract the file using WinRAR or 7-Zip.
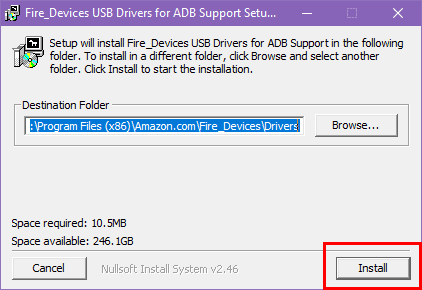
- Double-click the EXE file to install the necessary drivers on your Windows PC.
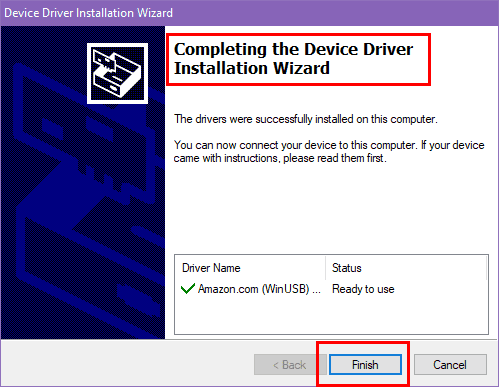
- Once the installation is over, click the Finish button.
Setup ADB Between Amazon Fire Tablet and Windows PC
Now, you’re ready to connect your Fire HD tablet to the PC for debugging and development purposes using the Android Studio app.
- Connect the Amazon Fire tablet to the Windows PC using a micro-USB cable.
- The tablet device should prompt you to choose from various USB connection options.
- You must choose the Media device (MTP) protocol for connectivity.

- If the device doesn’t prompt you to choose a USB connection option, swipe down from the top of the screen.
- Tap on the notification that says “Tap for other USB options“.
- Now, you can choose the Media device (MTP) protocol.
- For Fire OS 7 and later, you’ll need to select the File Transfer option.
- Another way to select the Media device (MTP) protocol is by visiting Settings > Device Options.

- Then go to Developer Options > USB computer connection.
- If you select the appropriate USB connection protocol, the tablet computer will flash the “Allow USB debugging?” prompt on its screen.
- Tap OK on the prompt to allow the ADB connection between the PC and tablet.
- Now, open Android Studio software on the PC and access any app project for the Amazon Fire tablet.
- Click Tools on the top of the project and then select Device Manager.

- On the right side under the Device Manager card, select Physical.
- You should find the Amazon Fire tablet in the device list table.
Test Device Connections Using ADB Commands
Your Windows PC should detect the Amazon Fire tablet as an “Android Composite ADB Interface” device. If not, you may have to remove the Amazon Fire device from Device Manager, then reinstall the Amazon Fire Tablet Driver as explained earlier. Once you see that the tablet connected successfully with the PC, follow these steps:
- Open Windows Command Prompt with elevated rights.
- Then, run the following command first:
adb kill-server
- Once you see that the ADB server on the PC stopped or the command executed successfully, run this command:
adb start-server
- The ADB server will restart at this point. Finally, run the following command:
adb devices
- You’ll see a message like “List of devices attached: G000N8978167088A device.”
- Here, the long numerical value is the Amazon Fire tablet serial number.
- You can cross-check this on your tablet by going to Settings > Device Options > About Fire Tablet menu.
Setup ADB Between Amazon Fire and Mac/Linux
You can also use your Mac or Linux computer to connect to your Amazon Fire tablet using the Android Debug Bridge protocol. Here are the steps you should try:
- Connect your Amazon Fire to your Mac or Linux computer.
- Select OK on the tablet to Allow USB debugging.
- Open the Terminal app from Spotlight on Mac. For Linux open Linux CLI.
- Firstly, stop the ADB server by running the following command:
adb kill-server
- When the ADB server is offline, restart it by executing this code on Terminal or Linux CLI:
adb start-server
- As the server restarts, copy and paste this code and hit Return to see the listed Amazon Fire tablet serial number:
adb devices
Conclusion
There you go! Now, nothing should stop you from connecting your Amazon Fire HD X, Fire X, and Kindle Fire tablet with a PC, Mac, or Linux for USB Debugging. Try out the above method and share your experience below in the comment box. If you also know another great way to use ADB with Amazon Fire tablet and computer, don’t forget to mention that in your comments.

On Windows 10
\extras\amazon\kindle_fire_usb_driver\KindleDrivers.exe
Right-click and Run As Administrator
(Because it will put files in Program files folder).
Thanks.
But, typical of those clowns who do Android Studio clowns… None of this is correct for anything in “Windows Configuration” section. Changed everything, and they leave no trail of what to do it in the newer versions.
A few hours in, and I’m still digging. If I find anything, I may followup with some clarification.
“DANIEL says
February 17, 2016 at 4:25 am
For me, it was necessary to go to the /extras/amazon/kinde-driver folder and run the installer exe to get the drivers to work (WIndows 10)
This worked with the latest 5.1.1 firmware – Thanks! :)”
What do you mean /extra/amazon/kindle-driver folder?
For me, it was necessary to go to the /extras/amazon/kinde-driver folder and run the installer exe to get the drivers to work (WIndows 10)
This worked with the latest 5.1.1 firmware – Thanks! :)
Thanks for this tutorial. I followed your directions exactly and was finally able to load the ADB driver for Fire HD7 4th generation on Windows 7.