Maybe you haven’t had the need to use morse code. But, since you never know when it might come in handy, it’s best to know how to enable it on your Gboard keyboard. You can start with the easiest things and move on from there.
Also, using the morse code on your keyboard can prevent others from typing unauthorized messages. Hopefully, they won’t know how to switch back to the normal keyboard. So, if you want to give morse code a try on your Android device, these are the changes you’ll need to make.
Contents
How to Switch to Morse Code on Gboard
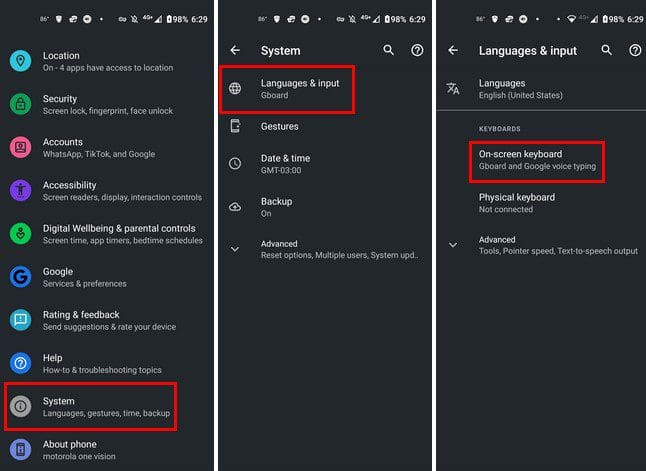
To get started, open the settings app for your Android device. Swipe all the way down and tap on System. Tap on the Language and input option, followed by On-screen keyboard at the top.
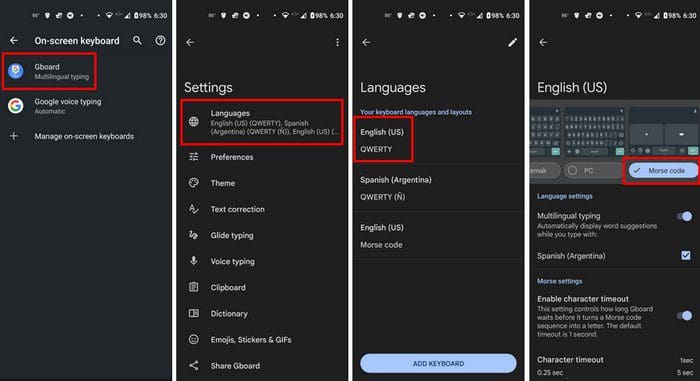
From the list of keyboards, tap on Gboard, followed by languages. If you don’ already have it, download the English (US) keyboard by tapping the blue Add Keyboard button at the bottom. Once it’s installed, tap the English keyboard from the list, and you should see different keyboard layouts. Swipe left until you come across the Morse code option.
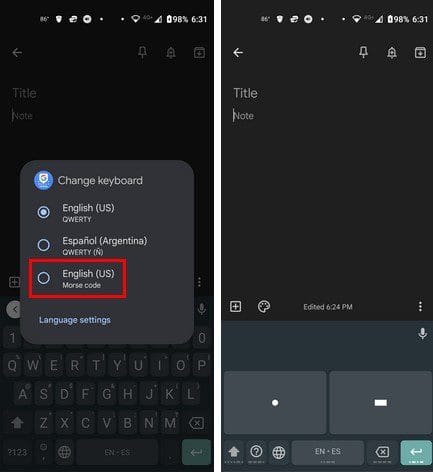
Once you’ve chosen the morse code layout, go to an app where you need to type something such as WhatsApp or Google Keep. Tap the world icon to see the different keyboard layouts. If you don’t see the work icon, that means you haven’t enabled it in settings. To turn it on, tap on the cogwheel, followed by preferences.
![]()
To have the wold icon visible, you’ll need to sacrifice easy access to the emojis. On the left, you’ll still see the emoji; to access it, you’ll need to long-press and then slide up. Tap on the world icon and tap on the English US Morse code option.
How to Customize the Morse Code Keyboard
Congrats! You’ve set up the morse code keyboard. If you want to personalize the keyboard some more, you can. Simply go to Settings > System > Languages and input > on-screen keyboard > Gboard > Languages > English US Morse Code.
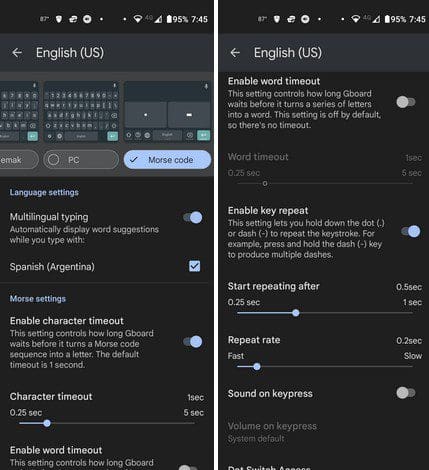
In the customization, you can adjust things such as:
- Multilingual typing
- Enable character timeout
- Character customization slider
- Enable work timeout and the slider to adjust it
- Start repeating after slider
- Repeat rate slider
- Sound on keypress
- Dot switch access
- Dash switch access
- Mini keyboard height
Conclusion
Gboard has a lot of layouts you can choose from. You know what keyboard you can use if you want to refresh your memory and start using morse code again. If you ever get bored of it, you can always switch back to the English keyboard at any time. It also has a lot of tricks you can use. How often do you use morse code? Let me know in the comments below and don’t forget to share the article with others on social media.