• Skip to main content
  • Skip to primary sidebar

Technipages

Smart phone, gadget and computer tutorials

  • Topics
    • Android
    • Gaming
    • Hardware
    • Internet
    • iOS
    • MacOS
    • Office
    • Software
    • Windows
    • Definitions
  • Product Reviews
  • Downloads
  • About
Excel 2019 & 2016: Force “Open as Read Only” Prompt

Excel 2019 & 2016: Force “Open as Read Only” Prompt

By Mitch Bartlett 10 Comments

If you have a file that is sensitive to changes, you can force Microsoft Excel 2019, 2016, or 365 to prompt the user to open as Read Only whenever they attempt to open the file. Here’s how to enable this setting.

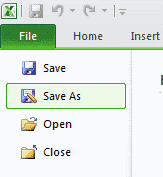
  1. In Excel, select “File” and click Save As.
    Excel save as
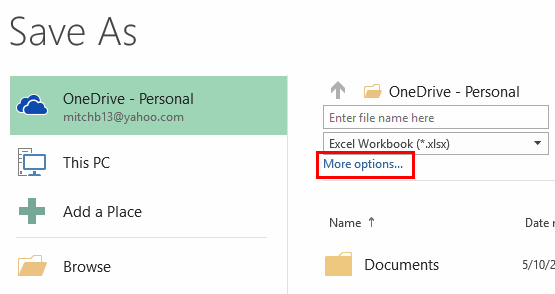
  2. Excel 2019 users, select “Browse“. Excel 2016 users select “More options…“.
    Excel 2016 More Options
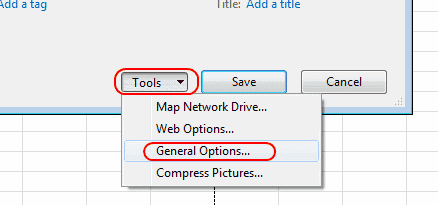
  3. Choose “Tools” > “General Options” at the bottom of the window.
    Excel general options
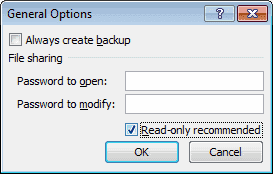
  4. Select the check-box for “Read-only recommended“, then select “OK“.
    Excel read only recommended setting
  5. Select “Save“.
  6. If prompted, choose “Yes” to update the file with the read-only setting.

That’s it! Anybody who opens the file in Excel will now be prompted to choose “Open as Read-Only“.

You Might Also Like

  • Enable Email Read Receipt in Outlook 2019/2016Enable Email Read Receipt in Outlook 2019/2016
  • Copy and Paste Values Without Formulas in Excel 2019, 2016, & 365Copy and Paste Values Without Formulas in Excel…
  • How to Set the Email Signature in Outlook 2019/2016How to Set the Email Signature in Outlook 2019/2016
  • How to Connect Outlook 2019 & 2016 to YahooHow to Connect Outlook 2019 & 2016 to Yahoo
  • Automatically Forward Email in Outlook 2019 or 2016Automatically Forward Email in Outlook 2019 or 2016
  • Recall Email Message in Outlook 2019/2016Recall Email Message in Outlook 2019/2016
  • Word 2019/2016: How to Hide or Unhide TextWord 2019/2016: How to Hide or Unhide Text
  • Disable Spell Check in Word 2019, 2016, & 365Disable Spell Check in Word 2019, 2016, & 365
  • Outlook 2019/2016: Enable/Disable AutocorrectOutlook 2019/2016: Enable/Disable Autocorrect

Filed Under: Office Tagged With: Excel 2016, Excel 2019, Office 365

Reader Interactions

Comments

  1. Karthick Ganesan says

    October 2, 2020 at 3:34 am

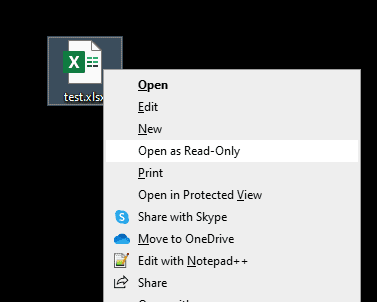
    Shift + Right-Click the file you want to Open as Read-Only. The context menu that appears has an option ‘Open as Read-Only’, Voila!

  2. Bill says

    December 6, 2019 at 1:03 pm

    Now the more savy users are going in and changing the budget so that their group gets more money. Because MS thinks read only is bad.

  3. jimmuh says

    October 3, 2019 at 1:57 pm

    This is how Excel has been for the every version for the last 20 years – I would like to know how to choose directly to open a file as “read only” as was the standard in earlier versions of excel. Why was this removed? Doesnt seem like an upgrade or improvement.

  4. Kamal Mohan says

    September 29, 2019 at 2:05 pm

    Hi,
    can you help me in disabling the editing option in automatically generated excel file created by a program as an output.

  5. Jennifer Woods says

    July 12, 2019 at 9:01 pm

    Great explanation; The prompt box states that the author would like you to open as ready only, but it still allows the ‘reader’ to “opt-in” and edit.

  6. Markus says

    April 21, 2019 at 6:20 pm

    Thank you for this straightforward explanation.

  7. John C. says

    January 18, 2019 at 12:49 pm

    Works the same for Excel 2013

  8. Issac says

    January 8, 2019 at 11:24 pm

    If I want to remove the pop up message how do I go about removing it,

  9. Tom Bates says

    December 10, 2018 at 1:51 pm

    Nice. Piece of cake once you know where to find it. :-)

  10. Jon says

    December 5, 2018 at 7:49 am

    THANK YOU for this simple explanation! It’s amazing how difficult it was to find this simple answer anywhere else. VERY helpful, thanks again!

Did this help? Let us know! Cancel reply

Your email address will not be published. Required fields are marked *

This site uses Akismet to reduce spam. Learn how your comment data is processed.

Primary Sidebar

Recent Posts

  • Slack: How To Hide Who Is Currently Typing a Message
  • Slack: How To Disable Animated Images and Emoji
  • Fix Microsoft Teams Error Loading Chunk
  • Microsoft Teams Notifications Not Working on iPhone
  • Fix Microsoft Teams: You Can’t Get There from Here
  • Microsoft Teams: How to Bookmark Messages
  • Slack: How To Configure Your Theme
  • IE/Edge: Content Was Blocked, Invalid Security Certificate

Who’s Behind Technipages?

Baby and Daddy My name is Mitch Bartlett. I've been working in technology for over 20 years in a wide range of tech jobs from Tech Support to Software Testing. I started this site as a technical guide for myself and it has grown into what I hope is a useful reference for all.

Follow me on Twitter, or visit my personal blog.

You May Also Like

  • 8 Best Laser Printers (Review) In 2019
  • Top 7 Affordable Gaming Laptops in 2019
  • 10 Best Android Phone Cleaner Apps in 2019
  • Open Standard
  • Open Source Software (OSS)

© Copyright 2021 Technipages · All Rights Reserved · Privacy