It can be unpleasant for your screen to turn off when you have to divert your attention elsewhere for only a minute. If you can’t deal with this daily, you’ll be happy to know that you can change the screen timeout time, so it lasts longer. If you ever change your mind and want to change the time again, you can do it as often as you want since there is no limit.
Contents
How to Modify the Screen Timeout for Windows 11
Changing the screen timeout is something you can easily do, even if you’re not very tech-savvy. With a few clicks here and there, you’ll finally have your screen stay on longer than the default time. You’ll need to go into your computer’s settings to do this. Click on the Windows Start menu icon and choose the Settings app.
Once you’re in settings, click on Power and Battery. You might use this route If you’re already in settings for some reason, but another way you can take is by right-clicking on the Windows Start Menu and selecting the Power Options option. Look for the Screen and Sleep option; you should see various options.

Under the Screen and Sleep section, you’ll see various options. You can change the screen time for options such as:
- On battery power, turn off my screen after
- When plugged in, turn off my screen after
- On battery power, put my device to sleep after
- When plugged in, put my device to sleep after
Each option will have a dropdown menu to the right. You can choose from times such as:
- One minute
- Two minutes
- Three minutes
- Five Minutes
- 10 minutes
- 15 minutes
- 20 minutes
- 25 minutes
- 30 minutes
- 45 minutes
- One hour
- Two hours
- Three hours
Going into your computer’s settings is one way of changing the screen time out of your Windows 11 computer, but you have other options if you have problems accessing settings for some reason. Another option would be to use the Control Panel.
Changing the Screen Timeout Using the Control Panel
The Control Panel is another option for modifying the screen timeout on your computer. You can open it by typing the control panel in the search bar and choosing the Run option when it appears in the search results. Once it’s open, click on Hardware and Sound, followed by Power Options.
On the left, you’ll see different options; click on the one that says Change when the computer sleeps. Click on the dropdown menu for the Turn off the display option and choose from the available options.
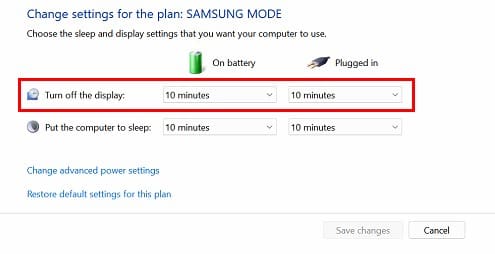
Once you’re done choosing a time, don’t forget to click on the Save Changes button.
Using the Command Prompt or PowerShell
But these aren’t all your options since you can use the Command Prompt or the PowerShell if you feel more comfortable using those. Open either one of them using the search bar, and once they are open, enter the following command: powercfg -change -monitor-timeout-ac 60
If you’re using your computer’s battery, then there will be a slight change in the command where you’ll change the ac for dc. So the command will look likes this: powercfg -change -monitor-timeout-dc 60. The only thing that changes is that it goes from ac to dc before the number 60. That’s all there is to it.
Remember that if you don’t feel comfortable using the Command Prompt or the PowerShell, you can change the screen timeout using your computer’s settings or the Control Panel. But keep reading a little more so you can see how you can use one more path.
Right-click on your desktop and choose the Personalize option from the list. Once you’re in Personalization, click on the Lock screen option. Under the Related Settings section, click on the Screen Timeout option. Click on Screen and sleep. You’ll see various options; you can change the screen timeout for the listed options.
There are some benefits to having your screen go dark shortly after you’ve stopped using it. If there are various people at home, you can avoid someone glancing at what you’re doing if the screen timeout is set for a minute or two. But, if that is not your case, you might be tempted to go for options such as never or an hour.
How to Change the Screen Timeout for Your Windows 10 Computer
The steps to modify the screen timeout on Windows 10 are also easy. Click on the Windows Start Menu and the cogwheel to go to Settings. Once you’re in settings, click on System, followed by Power and Sleep. You’ll have two options to choose from:
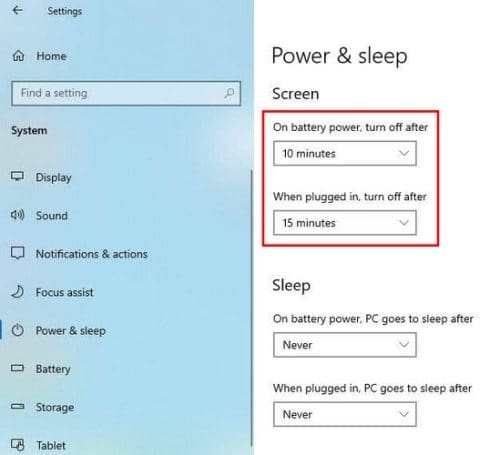
- On battery power, turn off after
- When plugged in, turn off after
You can choose from options for as little as a minute or never for both options. The option at the bottom is to put your computer to sleep, which is different. If you’re only planning on staying away from your computer for maybe 10-15 minutes, having the screen turned off soon is a good idea to keep your work from spying eyes that may be passing by.
But if the break will last at least an hour, putting your computer to sleep is a good idea since it helps increase the lifespan of your computer’s battery screen and hard drive. But if the break is going to last for at least a day, then that’s when it’s a good idea to turn off your computer.
Further Reading
There are areas where you can set a time for a screen timeout. For example, you can do that with your Samsung Galaxy S9. But if you feel like switching topics, you can continue reading with other topics, such as Security Settings to Keep Your Android Device. Also, since battery life is a topic that is always on Android users’ minds, you can also read how to maximize the battery life of your Galaxy S10e.
For those times when you feel like taking on a challenge like using More Code, see how you can enable it on your Gboard keyboard. And if you’re in the mood for one last read, you can read about how you can keep your Signal messages safe.
Conclusion
Being able to return to your computer without turning on the computer screen is very convenient. You can pick up where you left off without signing in again. Windows gives you various time options to choose from, and you can go back and change things up again as many times as you want. There are multiple ways you can get to the options and set a time limit. How long did you set the screen timeout for? Share your thoughts in the comments below, and don’t forget to share the article with others on social media.