A function that you may not know about in Windows 10 is the so-called “window snapping” option. Window snapping lets you snap windows to take up a specific section of the screen. It’s possible to snap a window to take up a quarter or half of the monitor or to fill the remaining space. This feature is pretty useful, though it may not be for everyone. This guide will cover how to enable and disable automatic window arrangement through window snapping in Windows 10.
You can snap a window by clicking and dragging the window until your cursor is touching the edge of the screen. You can snap to the left or right half of the monitor by dragging the window to the left or right edge. You can also snap to a quarter of the monitor by dragging the window to the respective corner of the screen.
Tip: You can see a slim preview outline of where the window will snap to, before you release the mouse button. If you don’t want it to snap there, pull the window away without letting go.
The window snapping options are in the Settings app. To get to them, press the Windows key, type “Snap settings” and hit enter. The snap settings are listed under “Work with multiple windows”. There are four settings, the first setting is a simple on/off toggle. With this off, window snapping is entirely disabled.
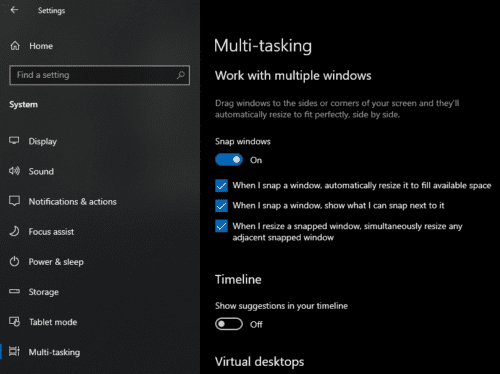
The second setting is “When I snap a window, automatically resize it to fill available space”. If this setting is disabled, windows will always snap to exactly half or a quarter of the monitor. However, if this option is enabled, the snapping is a little more flexible. If you snap one window to the left half of your monitor, then manually narrow it, you can fill the remaining space by snapping a second window to the right of the monitor.

The third setting is “When I snap a window, show what I can snap next to it”. If you snap a window, and there is a space without a snapped window, other windows that can be snapped into that space will be shown. This is designed to make it easier to fill the remaining space.

The fourth and final setting is “When I resize a snapped window, simultaneously resize any adjacent snapped window”. For example, if two windows are snapped to half the monitor each and this setting is enabled and you click and drag one window to be narrower, the other window will be widened to match. If this setting is disabled, the second window would not be widened automatically.

Having all these options enabled can be really helpful if you want to organise multiple windows to display at once – for example if you work with multiple programs or monitors. To enable or disable any of them, just click on their respective sliders once, the change will instantly apply.