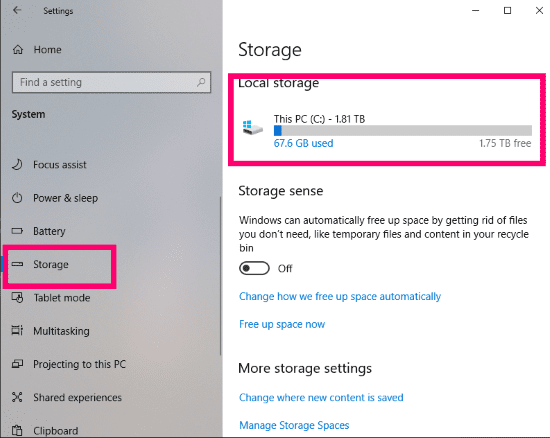
Every computer – or any other piece of technology – has a specific amount of disk space available to use. The operating system, programs and other information is all stored within this space. When your machine begins running sluggish, one of the first things you should do is to see how much space you have available. In Windows 10, you will want to open up your ”Settings,” and then click ”System” at the top. From there, choose ”Storage,” which is about halfway down the list on the left side of the window. You can now see how much total disk space your machine has, and how much you have free.
If the amount available is very low, there are many things you can do to free some of it up. This would include uninstalling unnecessary programs. Another option is to run what we call ”Disk Cleanup.” To do this:
- Click the ”Start” button.
- Type the word ”Disk” (without those quotes I used.)
- Next, click on ”Disk Cleanup.”
- Place a check in each of the boxes (but NOT in the “Compress Old Files” box) that seem to be taking up a lot of space.
- Last, you will need to click ”OK” and then ”Yes” to confirm. Let the process run and then close the windows.
How to Delete System Restore Points to Free Disk Space
Sometimes, those two steps alone may not be quite enough to give you the extra bits and bytes that you need to have available. If this is the case, another excellent option is to delete all of your old System Restore points.
System Restore automatically takes a “snapshot” of sorts of nearly everything on your computer and saves it. Then, if something goes wrong, you can restore your machine to the last restore point made. We see this – and use this method – often when a new piece of software will not play well with others or its host machine, or when a Windows update goes wonky.
If you have a lot of these restore points, they could be taking up quite a bit of space on your machine. Deleting them is not difficult or time consuming at all.
Click the ”Start” button again. This time, type in ”System Restore.” The box will open with the ”System Protection” tab already selected. From here, click on the ”Configure” button towards the bottom.

At the bottom of the new box that opens, click ”Delete” next to where it says ”Delete All Restore Points for This Drive.” Be sure to click ”Continue” when the confirmation box comes up.

Once the restore points have been erased, you will receive a box letting you know the process completed successfully. Close that box and then also close the ”System Protection” box… leaving the main ”System Properties” box OPEN. Since we just deleted all of our restore points, we need to create one new one right now just in case anything goes wrong with the machine!
At the very bottom of the box, click the ”Create” button next to ”Create a Restore Point Right Now….” Write a description for this restore point. Whenever I delete all of my old ones, I simply use something such as “New Point” for my description. The date and time are automatically added to the title of the restore point, and that is what is most important should you ever need to utilize it.

Once you have written the description, click that ”Create” button and the process begins. The length of time this will take depends on the size of your machine’s disk space and what all is on there. When it is finished a box will pop up letting you know that a new restore point was successfully created.

At this point, just click ”Close” on that box and then go ahead and close your ”System Properties” box, as well.
That’s all there is to it! Your machine should be running better and have much more space available now.
What other Windows questions can I answer for you?
Happy disk cleaning!