• Skip to main content
  • Skip to primary sidebar

Technipages

Tutorials and fixes for smartphone, gadget, and computer problems

  • Topics
    • Android
    • Gaming
    • Hardware
    • Internet
    • iOS
    • MacOS
    • Office
    • Software
    • Windows
    • Definitions
  • Product Reviews
  • Downloads
  • About Technipages
Slack: How To Add a New Channel Prefix

Slack: How To Add a New Channel Prefix

Posted on January 31, 2021 by Mel Hawthorne Leave a Comment

In a medium- or large-sized company, the number of individual teams and projects tends to be higher than in smaller companies, as well as just the number of employees. Slack allows you to create as many channels as you want. This facilitates easy communication for each of your teams and projects, who can keep discussions relevant to themselves in one place and have other company-wide or team channels for less relevant discussions.

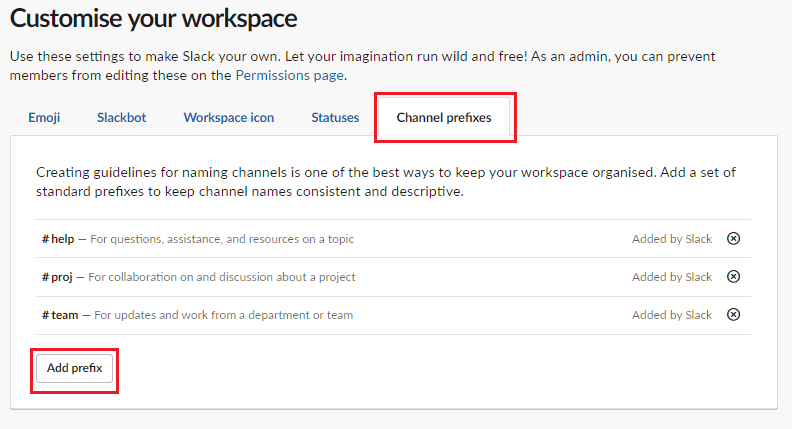
One of the tools that Slack offers to make it easier to find and group similar channels. As well as encouraging a more standard naming scheme, is “channel prefixes.” A “channel prefix” is a short term designed to go on the front of a channel name to help organize channels. Slack comes with three default channel prefixes, although none of the default workspace channels use them. They are “help,” “proj,” and “team.” They are designed to highlight channels for questions or helpful resources, collaborate on a project, or collaborate between a team, respectively.

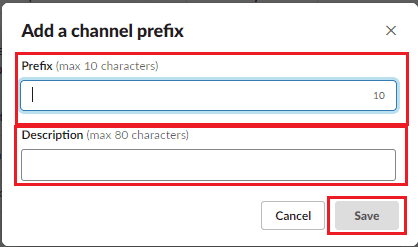
When you select a channel prefix as you name a channel, it will be immediately followed with a hyphen, so you can otherwise just type your channel names as you normally would.

How to Create a New Channel Prefix on Slack

If you want to add a new channel prefix, you need to go into the workspace customization settings. To do so, you first need to click on the workspace name in the top-right corner. Next, in the dropdown menu, select “Settings & administration,” then “Customise <workspace name>” to open the workspace customization settings in a new tab.

To get to the workspace customizations settings, click on the workspace name in the sidebar. Rhen select “Settings & administration” and “Customise.”

Once you’re in the workspace customization settings, switch to the “Channel prefixes” tab. To add a new channel prefix, click “Add prefix” in the bottom-left corner.

Tip: You can’t edit an existing channel prefix.

Enter the prefix you want to add and a brief description of when it should be used. Then click “Save” when you’re done.

Enter the prefix you want to add and a brief description of when it should be used, then click “Save.”

Channel prefixes in Slack are designed to make it easier to group and find certain types of channels and encourage using a more standard naming scheme. “By following the steps in this guide, you can add new channel prefixes to your workspace.

You Might Also Like

  • Slack: How To Create a New Channel
    Slack: How To Create a New Channel
  • Slack: How to Archive a Channel
    Slack: How to Archive a Channel
  • Slack: How To Rename a Channel
    Slack: How To Rename a Channel
  • Slack: How To Configure Who Can Use “@Everyone”, “@Channel”, and “@Here”
    Slack: How To Configure Who Can Use “@Everyone”, “@Channel”,…
  • How To Create Private Channel in Slack
    How To Create Private Channel in Slack
  • Slack: How To View Channel Analytics
    Slack: How To View Channel Analytics
  • Slack: How To Make an Existing Channel Private
    Slack: How To Make an Existing Channel Private
  • Slack: How To Manage Channel Management Permissions
    Slack: How To Manage Channel Management Permissions
  • Slack: How To Change Which Channel Groups Are Shown in the Sidebar
    Slack: How To Change Which Channel Groups Are Shown in the…

Filed Under: Software Tagged With: Slack

Reader Interactions

Did this help? Let us know!

Your email address will not be published. Required fields are marked *

This site uses Akismet to reduce spam. Learn how your comment data is processed.

Primary Sidebar

Recent Posts

  • How to Enable Dark Mode in Firefox
  • Windows 11: How to Add Clocks with Different Time Zones
  • Google Assistant: How to Never Miss a Birthday
  • Windows 11: How to Disable Notifications and Ads
  • How to Use Oculus Quest 2 Air Link
  • How to Create an Avatar in the Oculus Quest 2
  • 5 Free and Fun Math Apps for Kids
  • Windows 11: How to Discover What Graphics Card You’re Using

Who’s Behind Technipages?

Baby and Daddy My name is Mitch Bartlett. I've been working in technology for over 20 years in a wide range of tech jobs from Tech Support to Software Testing. I started this site as a technical guide for myself and it has grown into what I hope is a useful reference for all.

© Copyright 2022 Technipages · All Rights Reserved · Privacy