

When you turn your computer off or put it to sleep overnight, you need to press a button to turn it on again. But what if you want your computer to turn on again so you can download something or run a virus scan overnight when you don’t need the computer for anything else? As it happens, Windows has a function for that – you can set your PC up to wake from sleep automatically.
So, how do you configure this? Well, it’s not necessarily an easy process, so try to follow the instructions below to the letter!
To configure Windows to wake automatically you need to create a scheduled task with Task Scheduler. To get started, press the Windows key and type “Task Scheduler” in the search bar to open it.
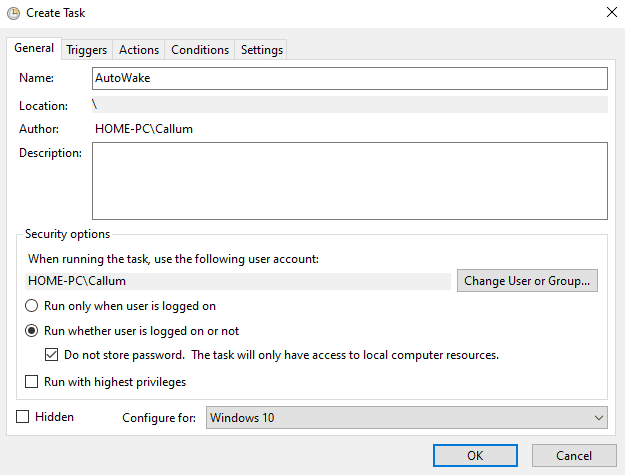
On the right-hand side of the Task Scheduler window click “Create Task…” to create a new scheduled task. The first thing to do with the new task is to give it a name, something recognizable is ideal so you can find it again in the future if you need to.
Something along the lines of “WakeUp” works. Also in the “General” tab, you should select “Run whether the user is logged on or not”, “Do not store password” and “Run with highest privileges” and then configure for “Windows 10”.
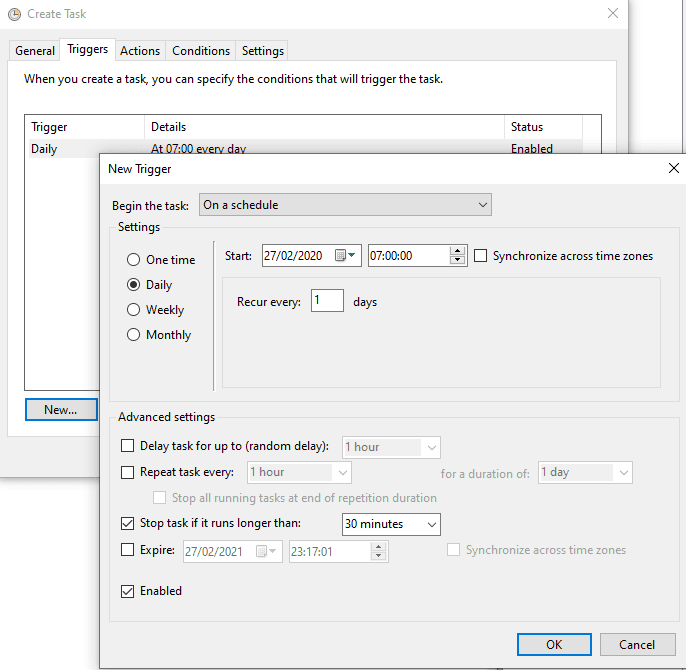
In the Triggers, tab click new to create a new trigger. Configure the trigger to run daily and to recur every day at the time of your choice, if that’s what you want. You can, of course, set it up differently if you prefer – this is entirely up to you!
In the advanced settings configure the task to stop after 30 minutes and ensure it is enabled and then click “OK”. This will prevent your computer from wasting resources.
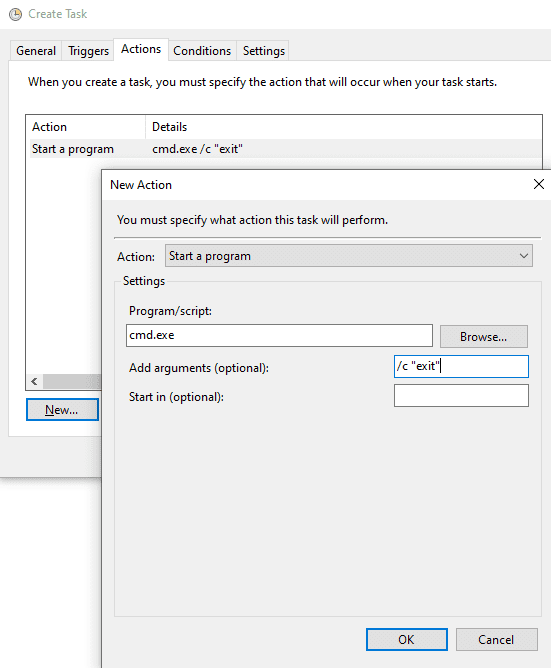
In the Actions tab, configure a new action to start a program. The program should be “cmd.exe” and the option arguments should be ‘/c “exit”’. This configuration will launch command prompt and instruct it to immediately run the command “exit” which will close command prompt but leave the computer on.
While this may sound a little confusing, it works a little like an alarm clock – you hear the sound, wake up and turn it off once you’re awake.
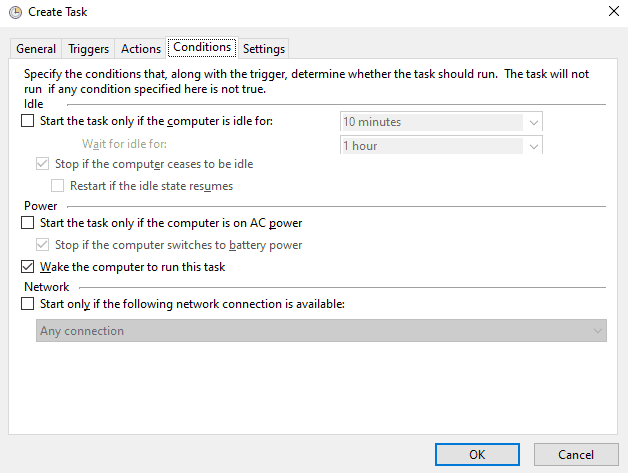
In the Conditions tab, ensure that “Wake the computer to run this task” is ticked. All the other options can be disabled.
Tip: If you have a laptop it might be wise to ensure that the task only runs when it’s on power. If you don’t, you could end up draining your battery without noticing!
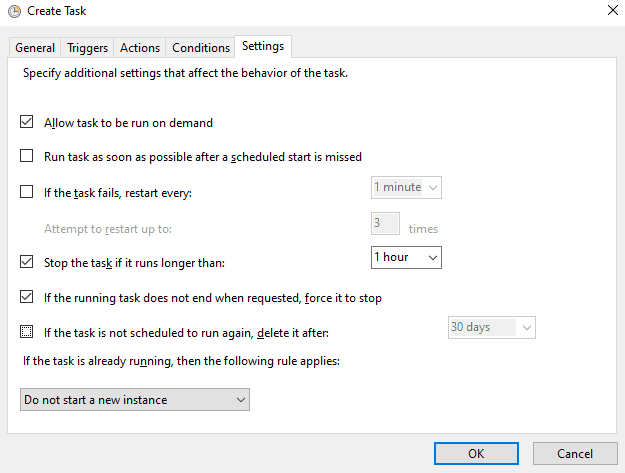
In the Settings tab ensure that the task won’t restart if the schedule is missed or the task fails. You should also ensure that the task will be stopped if it runs for longer than an hour. Again, this is to stop your computer from wasting valuable resources.
Once the task is set up click “OK” to save it.
The final step is to ensure your power plan is configured to allow wake timers. Without this setting, the scheduled task won’t work. Open the control panel (by clicking the Windows key and typing ‘Control Panel’ into the search field) and browse to edit your current power plan options at “Control Panel\Hardware and Sound\Power Options\Edit Plan Settings”. In the advanced power plan settings, ensure that the allow wake timers option is enabled under “Sleep > Allow wake timers.”

When all of that is done, your auto-wake up is ready to go – all that’s left is for you to put your computer to sleep! Remember that this won’t work if you shut your computer off entirely, or if you remove its power supply!


I followed the above procedure to the letter on a Windows 10 desktop computer. No dice. Also, there is a mistake between what the illustration shows and what the instructions say at the first steps. Which to follow? Makes no difference.
My Fujitsu laptop running Windows 10 wakes up using the procedure (I can hear the fans suddenly come to life at the schedules time, but the screen remain black and I still have to move my mouse or press a button for the screen to display.
I saw KAT’s comment above and tried this, but under ‘Enter the object name to select’ field there was no SYSTEM listed, the only Object Types listed were:
Builtin security principals
Groups
Users
These three Object Types simply have a checkbox for on/off, with no further expansion.
So, still stuck :(
To wake laptop from sleep, I had to use the ‘SYSTEM’ account, not my user account, to run the process.
General tab –> Security options section –> ‘When running the task, use the following user account –> click ‘Change User or Group…’ –> in the ‘Enter the object name to select’ field, type SYSTEM, then click ‘Check Names’ –> click OK