• Skip to main content
  • Skip to primary sidebar

Technipages

Tutorials and fixes for smartphone, gadget, and computer problems

  • Topics
    • Android
    • Gaming
    • Hardware
    • Internet
    • iOS
    • MacOS
    • Office
    • Software
    • Windows
    • Definitions
  • Product Reviews
  • Downloads
  • About Technipages
Linux Mint: How to Enable the on-Screen Keyboard

Linux Mint: How to Enable the on-Screen Keyboard

By Mel Hawthorne 1 Comment

If you have difficulty with using a keyboard, you may prefer using an on-screen keyboard that you can control with other input devices. While not particularly useful for most users, it can be important to those users that need it.

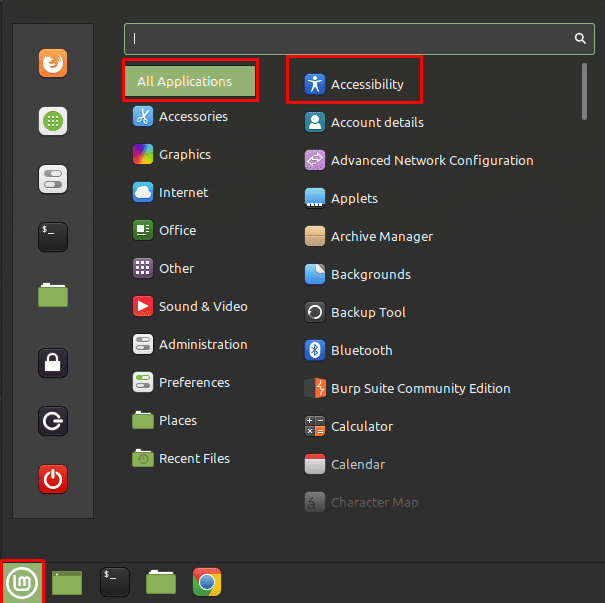
To activate Linux Mint’s on-screen keyboard, you need to go into the accessibility settings. To do so, click on the Linux Mint icon in the bottom-left corner, then move the mouse up to “All Applications” and then sideways to the top option “Accessibility”.

To open the accessibility settings, click on the Linux Mint icon in the bottom-left corner, then hover over “All Applications” and click on “Accessibility”.

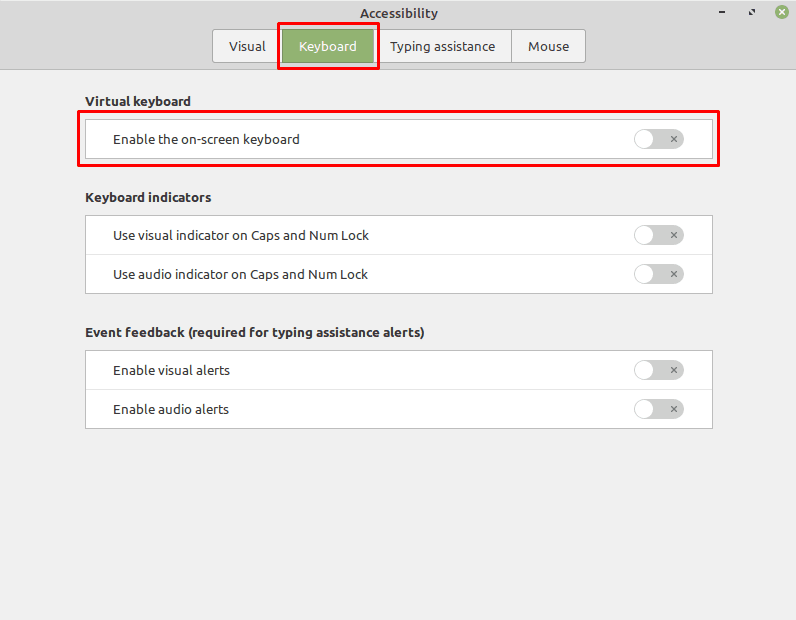
Once in the accessibility settings, switch to the “Keyboard” tab and click the top slider, labelled “Enable the on-screen keyboard” to the “On” position.

Switch to the “Keyboard” tab, then click the “Enable the on-screen keyboard” slider to the “On” position.

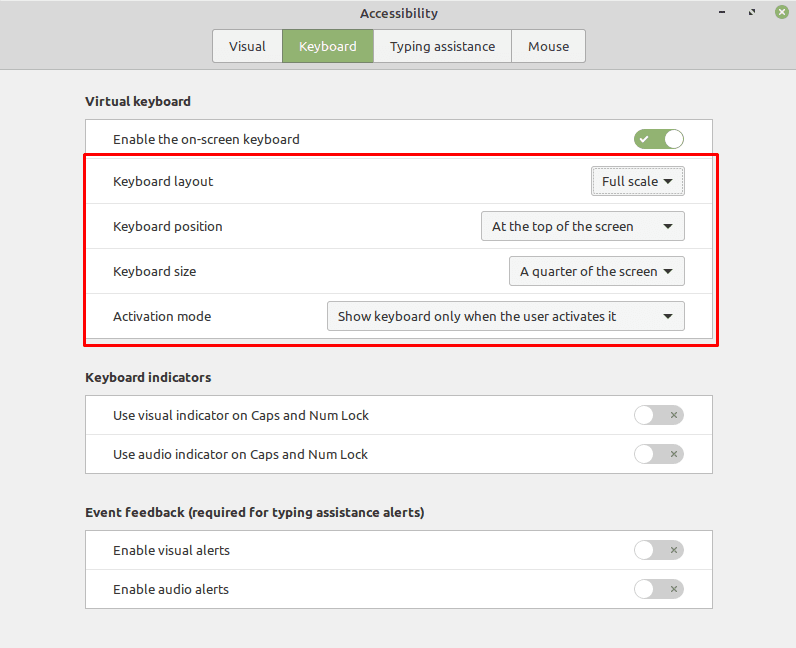
Four more keyboard options will appear once the keyboard has been enabled. The first allows you to configure the layout of the keyboard, you can choose between “Tablet”, “Touch”, “Full scale”, and “Scanning”.

“Keyboard position” allows you to configure the location of the on-screen keyboard. You have a choice between it being located at the top or the bottom of the screen. The “Keyboard size” option, allows you to configure how much of the screen the on-screen keyboard takes up, with the ability to choose a quarter, third, or half of the vertical space of the screen.

Note: When testing the keyboard position and size settings, it appeared the on-screen keyboard needed to be toggled off and on again for the settings to take effect. It’s also important to point out that placing the on-screen keyboard at the bottom of the screen caused it to interfere with screen elements such as the start menu. Placing the keyboard at the top of the screen reliably set that part of the screen aside for the exclusive use of the on-screen keyboard.

Placing the on-screen keyboard at the bottom of the screen can cause it to interfere with the start bar.

The “Activation mode” setting allows you to choose if the on-screen keyboard is always enabled when the user has enabled it, or if the keyboard only appears if a text box is expecting input.

Note: Some apps, such as Google Chrome do not get recognised as expecting input so the keyboard may never show up unless set to be always enabled.

For the best experience, we would recommend using your preferred layout, placing the keyboard at the top of the screen, setting it to “a quarter of the screen”, and leaving it permanently enabled.

You Might Also Like

  • Linux Mint: How to Change Your Keyboard Layout
    Linux Mint: How to Change Your Keyboard Layout
  • Linux Mint: How to Rebind System Keyboard Shortcuts
    Linux Mint: How to Rebind System Keyboard Shortcuts
  • Linux Mint: How to Create New Custom Keyboard Shortcuts
    Linux Mint: How to Create New Custom Keyboard Shortcuts
  • Linux Mint: How to Enable Key Debouncing
    Linux Mint: How to Enable Key Debouncing
  • Linux Mint: How to Enable Visual Accessibility Features
    Linux Mint: How to Enable Visual Accessibility Features
  • Linux Mint: How to Enable Automatic Checks for Captive Portals
    Linux Mint: How to Enable Automatic Checks for Captive…
  • Linux Mint: How to Show the Clock and an Away Message on the Lock Screen
    Linux Mint: How to Show the Clock and an Away Message on the…
  • Windows 10: Enable/Disable On-Screen Keyboard
    Windows 10: Enable/Disable On-Screen Keyboard
  • Linux Mint: How to Add New Applets
    Linux Mint: How to Add New Applets

Filed Under: Software

Reader Interactions

Comments

  1. David says

    January 1, 2022 at 9:50 am

    But what it the option to turn it on and off when needed? There isn’t a icon on bar at the bottom

Did this help? Let us know!

Your email address will not be published. Required fields are marked *

This site uses Akismet to reduce spam. Learn how your comment data is processed.

Primary Sidebar

Recent Posts

  • Windows 11: How to Fix Windows 11 Won’t Connect to a Network
  • What to Do When Firefox Won’t Load a Page
  • Chrome: How to Refresh Various Tabs Simultaneously
  • The Latest Foldable Phones – A Look At The Huawei Mate X2
  • Everything Announced at Google I/O 2022 That You Should Care About
  • How to Build the Best High-Spec PC for Your Budget
  • Google Shows Off Pixel 7 and Pixel Watch Ahead of Fall Launch
  • Windows 11: How to View Saved Passwords

Who’s Behind Technipages?

Baby and Daddy My name is Mitch Bartlett. I've been working in technology for over 20 years in a wide range of tech jobs from Tech Support to Software Testing. I started this site as a technical guide for myself and it has grown into what I hope is a useful reference for all.

You May Also Like

  • Linux
  • Best Smart Phone with Keyboard: Top 8 Reviewed
  • Best Keyboard Wrist Rests 2021
  • Screen Font
  • Screen Saver

© Copyright 2022 Technipages · All Rights Reserved · Privacy