Even though your notifications can get it of control, you still need them, or you will miss out on essential things. There are many devices where you’ll need to control your notifications, and the iPad is one of them. The iPad offers you various useful options for managing your notifications. You can change how you get them and what you don’t get notifications for. If you ever change your mind, you can make the necessary changes by returning to Settings. That way, you add your personal touch to your notifications.
Contents
How to Access Your Notifications on iPad
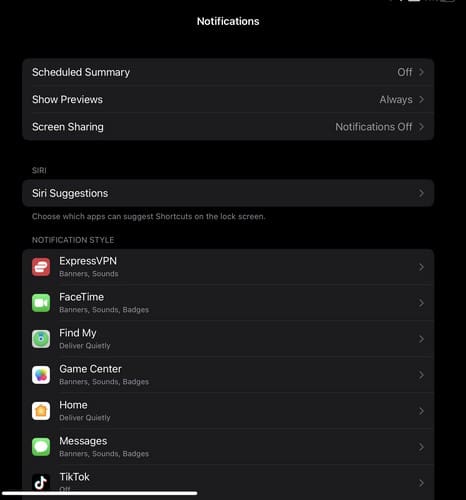
To start managing your notifications, you’ll need to know the steps to get to that section. Tap on the Settings app and swipe down the options on your left until you receive notifications. Tap on it, and you’ll see various options you can change to help you manage your notifications only on your iPad. The first option you will come across is the Scheduled Summary option. If you still need to set this up, your iPad should show you a summary of what it does when you first access it. It summarizes your non-important notifications at the time you specify. You choose two different times of the day. For example, you can get one first thing in the morning and when you finish working.
Suppose you want to see as much information as possible about your notifications. In that case, you can also edit how much information you can see. You can choose from options such as:
- Always
- When Unlocked
- Never
If you’re open to suggestions, you’ll also see a suggestion for Siri to suggest notifications for specific apps. Not to worry about getting notifications for apps you don’tdon’t need since you can toggle on which apps you want to get notifications for. You can toggle on the Time Sensitive Notifications for the more important notifications. They will stay on your Lock Screen for an hour, so you remember them.

How You Get Your Notifications
It may be a short list of options, but at least you don’t only have one to choose from. There are three options to choose from getting them on your Lock Screen, notifications center, and as a banner. You can have the banner be temporary or permanent. The notification options continue by having them appear as badges, and you can also disable the sound for the notifications. Having a preview of your notifications is very useful. Still, they can be annoying if you get them at the wrong time. That’s why, under the show previews option, you can have the notifications always appear, never, or only on your lock screen. By default, your iPad will have this option set in always.
So you never miss out on a specific notification, you can choose how your notifications are organized. You can choose from options such as automatic, by app, or turn it off. If there are other options you’re looking for that, you don’t see on your iPad; you’ll see an option at the bottom where you can access the settings for a specific app. Hopefully, you’ll find the notification you’re looking for when you open the app’sapp’s settings.
Further Reading
If you’re still in the mood to continue reading about iPad, why not read when it’s time to upgrade your iPad? There are also various apps you can install on your iPad. For example, here are some wellness apps you can try to get rid of that stress. And since every usually needs to get various things done at the same time, here are some multitasking tips as well.
Conclusion
Notifications help you get the information you need. But you can make the experience better by letting your iPad know how you want to get those notifications. By going into your iPad’s settings, you can make various changes. If you ever want to change them again, you’ll only need to repeat the steps to make more changes. Which modifications are you going to start with? Share your thoughts in the comments below, and don’t forget to share the article with others on social media.