If you often attend work-related video meetings, purchasing a high-quality webcam is a must. If you’re a Windows 10 user, getting a Microsoft LifeCam is actually a good idea. These devices are affordable and compatible with the latest Windows 10 OS versions. But sometimes, they might fail to work as intended.
Audio problems are some of the most common LifeCam issues that users complained about. They include buzzing sounds, echoes, humming, weird static sounds, or various noises that shouldn’t be there. So, let’s dive right in and explore how you can troubleshoot your webcam.
Contents
How Do I Fix Microsoft LifeCam Audio Issues?
Check Your Settings
Using an incorrect microphone or speaker settings may negatively affect LifeCam’s audio performance. While in the video call, go to your LifeCam Dashboard, select Settings, and then click on Audio/Video Settings. Tweak your mic, speakers, and LifeCam settings and check the results.
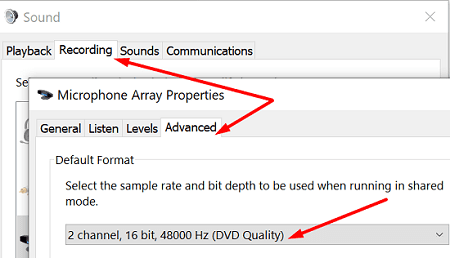
Additionally, go to Control Panel, select Hardware and Sound, and click on Sound. Click on the Recording tab, select your mic and click on the Properties button. Then click on the Advanced tab and select the highest sound quality (48000Hz) setting.
Other users confirmed they solved their LifeCam audio glitches by switching to Speakers from Default Playback Device (use the Listen tab).

Make sure you’re not using more than one mic, and move your external speakers a bit further away from your mic and camera if that’s possible. Additionally, if you’re not using a headset, make sure the headset setting is not selected.
Turn off any devices that might be interfering with the camera, including your TV set, fluorescent tubes, other monitors, and so on. If you’re using a laptop, unplug the power cord and check if you notice any improvements.
Run the Hardware Troubleshooter
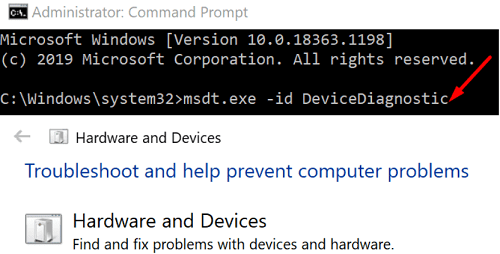
Try running the Hardware troubleshooter and check the results. Launch Command Prompt with admin rights and run the msdt.exe -id DeviceDiagnostic command. Then click on the Hardware and Devices troubleshooter and launch the tool. Restart your computer and check your camera.
Update the Driver
Make sure you’re running the latest driver version available for your camera. Launch the Device Manager, click on Cameras, double-click on your LifeCam webcam, and select Update Driver.
If the issue persists, uninstall the driver and restart your computer to automatically reinstall the latest driver version. Check the results, and if the problem persists, maybe it’s time to replace your good old LifeCam webcam.
Conclusion
Unfortunately, LifeCam audio issues are pretty common. Still, the good news is that you can quickly fix the problem by tweaking your mic settings. Additionally, move other electronic devices away from your webcam and update your drivers. Hit the comments below and let us know if you managed to fix this problem.