If you like to keep your email organized, you’ll want to look into the ProtonMail filter. But before you set up a filter, you’ll need to set up labels and folders. These two options are very similar but not identical. Labels are more like tags, and folders are like receptacles. See how you can create them on your computer and your Android device. Here’s how you can set them up.
Contents
How to Create a Label in ProtonMail
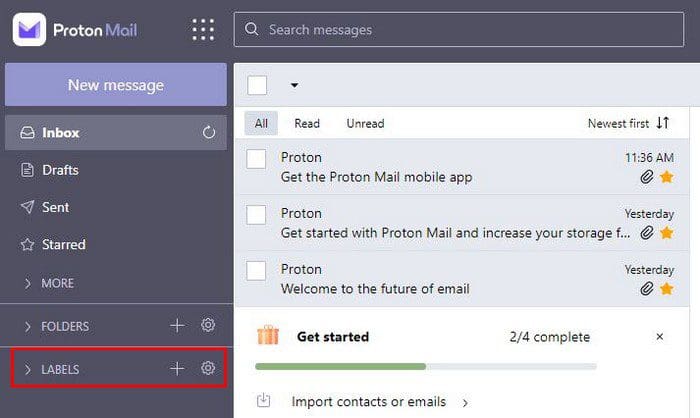
To quickly create a label in ProtonMail, click on the Labels option (plus icon) on the left of your screen.
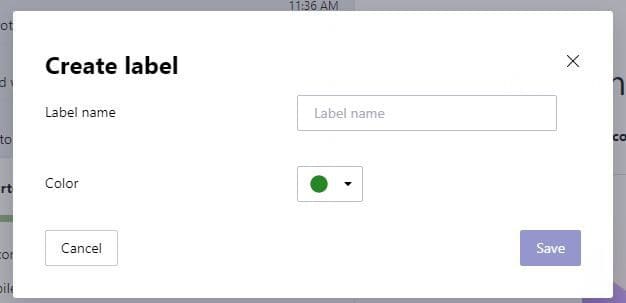
In the next window, give your new label a name and color. Once you’re done, click on the Save button. If you change your mind at any time, do not worry, you can always click on the cancel button on the bottom left.
When you click on the Save button, it’ll appear below where it says Labels. You can hide the label by clicking on the arrow. Even after creating the label, you can make changes to it. For example, you can go into Settings by clicking on the cogwheel to the side. Once you’re in, scroll down to the Labels section. You can do things such as change the order the labels appear.
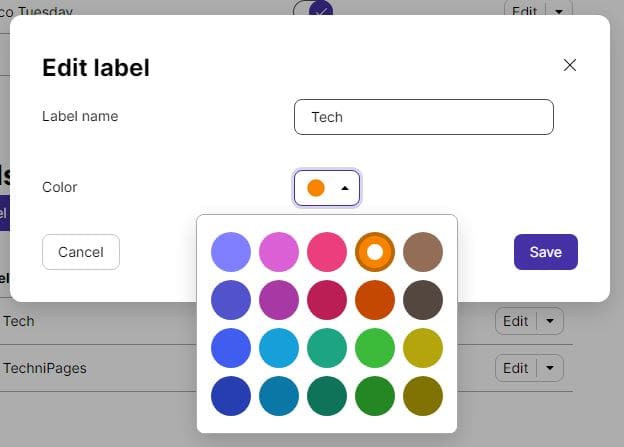
Place the cursor on the three lines and click the left button on your mouse. Without letting go, drag that label to the desired position. You can also change the color of the Label by clicking on the Edit button. When the window appears, you can change the name or the color by clicking on the dropdown menu.
Android
On your Android device, you can create a label by tapping on the three-lined menu and tapping on the plus icon. Just like in the desktop version, give the label a name and color and save.
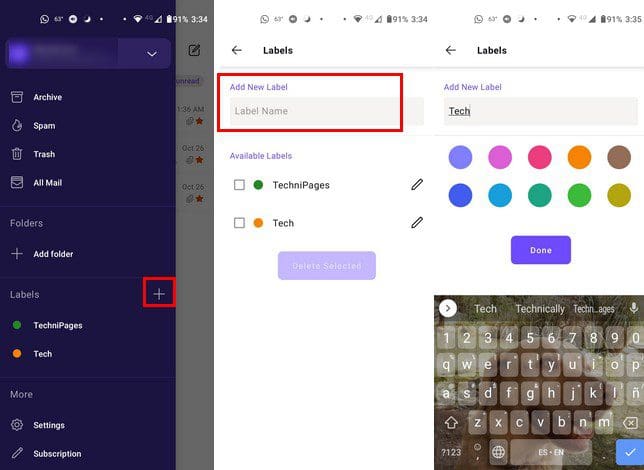
If you want to give the label a new color, tap on the pencil icon and choose a new color; tap on the update label option.
Creating Folders in ProtonMail
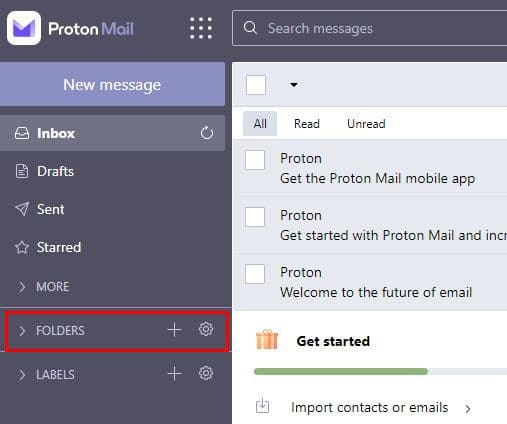
To create a folder, click on the plus icon to the right of the Folders option.
When the folder window appears, you’ll see options to add a folder name and give the folder a location. You can also enable or disable the option to receive notifications. These are options that you won’t see on the Android app.
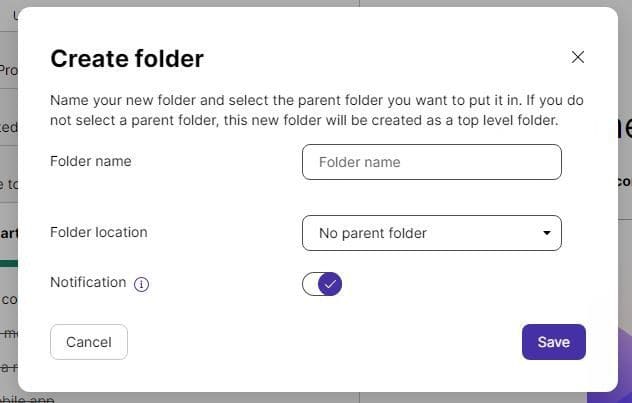
Click on the save button, and the folder will be created. If you have the Android app but created the folder on your computer, it’ll appear shortly after.
Even after you’ve created the folder, you can still make changes. Click on the cogwheel to the side of the Folders option, and you’ll immediately see the Folders section. You’ll see the option to enable or disable the colors for the folders, even if you want to inherit the color from the parent folder.

You can also enable or disable the notifications for each folder. You can also erase it by clicking on the arrow pointing down to the right of the Edit option. Click the Sort button to see your folders and labels alphabetically. This is a helpful tool since it’ll help you find your folder much faster when you have many of them.
Android
To create a folder on your Android device, tap on the three-lined menu and then the plus icon to the right of the folder option. Give the folder a name, choose a color, and don’t forget to save.

How to Create a Filter in ProtonMail
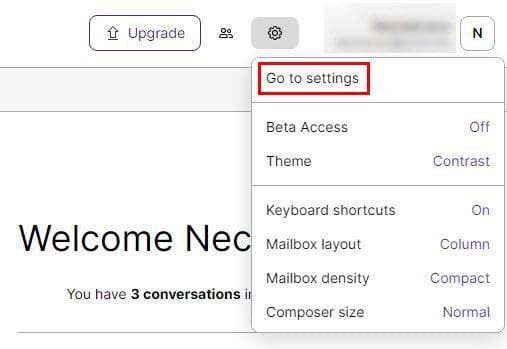
Now that the label and folder are created, it’s time to make the filter. It’s only possible to create a filter using the desktop version of ProtonMail. Once it is open, click on the cogwheel and go to Settings.
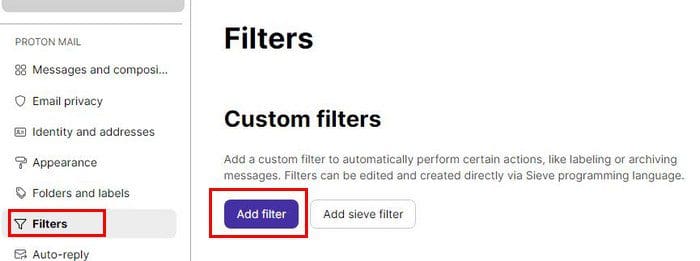
Once you’re in Settings, go to Filters. You can choose that option from the list of options on your left. Under the Custom filters section, click on the Add filter button.
When the Add filter window appears, there are some things you’ll need to fill out, such as:
- Name
- Actions
- Conditions

Once you’ve given the filter a name, it’s time to set the conditions. You can choose from two options:
- All (Filter if All of the following conditions are met)
- Any (Filter if ANY of the following conditions are met)
Below these two options, you’ll need to choose an option from the dropdown menu next to the If option. You can choose from options such as:

You’ll also need to choose from the listed options. If you chose The sender from the first list of options, you’d need to determine what the sender address needs to have for the filter to be activated. For example, If you want the filter activated if the sender name starts with a particular letter, choose the Begins with option and below type the letter. Don’t forget to click the Insert button when you type the letter.
Action
Before you preview the filter, you need to choose an action. When creating this filter, the email recipient needs to begin with an M. When that email meets the requirement, something needs to happen to that email, and that’s what you need to choose in the Move to Section.

Once you fill out what you want the filter to and click on the save button at the bottom right, your filter is saved. It takes time to set up the filter, but not too much. But when you have it, you save a lot of time since you don’t have to worry about sorting out your emails since the filter will do it for you.
Conclusion
Creating filters is a great way to stay organized and save time. You can create as many filters as you want so that everything is done your way. If you ever want to erase the filter you only need to go to Settings > Filters and when you find the filter you want to erase. Under where it says Action click on the dropdown menu and choose delete. That’s all there is to it. How many filters will you be creating? Share your thoughts in the comments below and don’t forget to share the article with others on social media.