
Don’t you like the default Xbox Game Bar settings for recording? Learn how to change Xbox Game Bar recording settings on Windows 11.
If you’re a hardcore PC gamer and haven’t used Xbox Game Bar yet, we’re sorry for you!
Well, it might be possible that you’re not a gamer but still use this feature for different reasons.
However, if you want to use it but don’t know how to change the Xbox Game Bar recording settings, continue reading.
Here we’ll tell you how to change all the Xbox Game Bar settings, including the recording settings.
Contents
What Is Xbox Game Bar?
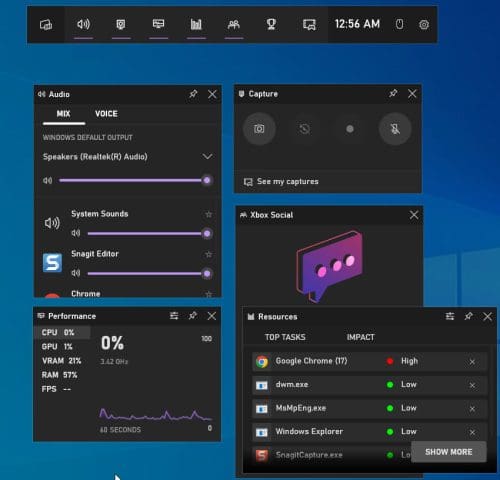
Xbox Game Bar is an overlay for gamers. This built-in overlay comes with all Windows 10 and 11 devices. Gamers can use it to take screenshots and record their gameplay without leaving the game.
Besides providing you with the above features, it comes with several widgets to check the utilization of computer resources, the gaming performance of your computer, and many more.
To enable Xbox Game Bar, press the Windows + G keys on your Windows 10 or 11.
As you can understand from its features, it’s not only the gamer community who will find this overlay useful.
People who want an easy solution to record their screen activity or take screenshots also use Xbox Game Bar.
Don’t let the name Xbox Game Bar confuse you. This overlay is solely available on Windows PC. You cant use it on your Xbox consoles.
One good news for the users is Xbox Game Bar is fully customizable. You can always change its settings and even add controls of your choice for specific actions.
How to Change Xbox Game Bar Recording Settings
As mentioned, this overlay can record the screen and has customization options. So, if you don’t like the default recording settings of Xbox Game Bar, you can change it according to your choice.
The question is, how? Well, the following sections will tell you about Xbox Game Bar recording settings in detail.
If you’re using Windows 10, here’s what you need to do to access the settings section:
- Press the Windows key and click on the gear icon from the left.
- From the Settings window, click on Gaming.
- Select Captures from the left panel to move to the recordings section.
If you have Xbox Game Bar already opened on your screen, you can access Xbox Game Bar settings through the following steps:
- Click on the gear icon. You’ll find it on the right side of the bar.

- In the General section, select Edit more preferences in Windows Settings.
- It’ll take you to the general Gaming settings window.
- Select Captures to change the Xbox Game Bar recording settings.
Now that you’re on the desired page let’s start changing the recording settings for Xbox Game Bar.
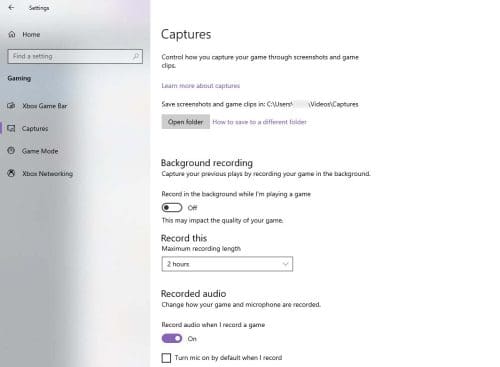
1. Saved File Location

First, it shows the default location address of your saved screenshots and clips. Clicking on the Open Folder button will take you to that folder.
You can also visit the hyperlink “How to save to a different folder” to learn ways to change the default location.
2. Background Recording
This option allows you to record in the background as you play a game. Xbox Game Bar monitors the last moments of your game and captures them if something awesome happened during that time.
However, enabling this feature could affect your gaming experience. Turning on this feature also makes other features visible:

- Option to record the last 15 seconds, 30 seconds, 1 minute, 3 minutes, 5 minutes, and 10 minutes.
- Checkbox for recording even when the computer isn’t plugged in.
- Checkbox to record while projecting your screen wirelessly.
3. Record This
This recording setting will let you determine the maximum time for recording a clip with Xbox Game Bar.
Besides the default 2 hours, it allows you to choose between 30 minutes, 1 hour, and 4 hours — depending on your storage availability and other factors.
4. Recorded Audio
The setting of this segment helps you decide how the game and audio are recorded.
By default, you’ll see only one option to turn on or off the audio recording while recording the game.
If you turn on this option, additional settings will appear. These are:
- Checkbox to turn on the microphone by default while recording.
- Option to choose audio quality between 96 kbps, 128 kbps, 160 kbps, and 192 kbps.
- Separate options to adjust the microphone volume and system volume.
- Checkbox to record game audio only.
5. Recorded Video
From this section of recording settings, you can control the quality of your screen recording or video clip. But remember, choosing a higher quality might affect your game.
Here, you can select a video frame rate between 30 fps (recommended) and 60 fps. The video quality is set as “Standard” by default, but you may change it to “High.”
Finally, choose whether Xbox Game Bar will capture the mouse cursor in recording or not by checking or unchecking this box.
How to Change Xbox Game Bar Recording Settings for Keyboard Shortcuts
Xbox Game Bar offers keyboard shortcuts for recording. If you want to change these shortcuts, follow these steps:
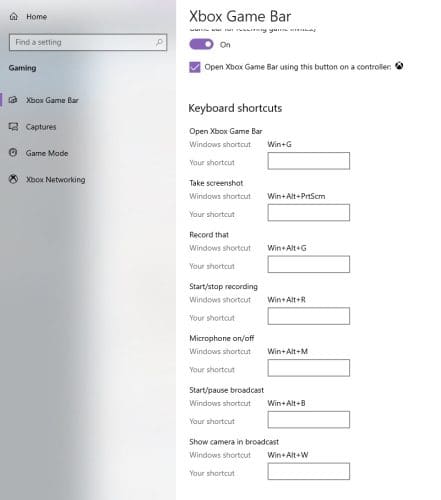
- Go to the Xbox Game Bar settings page by pressing the Windows + I keys and choosing Gaming.
- You’ll find the default shortcut and a blank field for your personalized shortcut.
- Enabling your shortcut is simple — put the cursor on the field and press CTRL + Shift/Alt + any other key together to set that.
- Apply the same method to add your shortcut for each action.
Change Xbox Game Bar Recording Settings: Final Words
Xbox Game Bar is a wonderful overlay from Microsoft. It empowers gamers by letting them take screenshots, record screens, and track resource utilization, to name a few.
To enable Xbox Game Bar, you must press Windows + G keys. Since it’s a customizable overlay, you can easily change its settings and controls.
Besides the game bar, its settings can be changed from the Windows Settings. Here, we’ve mentioned changing Xbox Game Bar recording settings on a Windows computer.
Reading this post will help you change other settings and controls as well. If you’ve questions about Xbox Game Bar, please tell us in the comments.
In case you want to disable this feature while playing certain games, check out this post on how to disable the Xbox Game Bar when playing games.


I have Windows 11. I do not see any option to change audio quality, either in Windows Settings or Game Bar Settings.
The shortcut to access the Xbox Game Bar is Windows+ALT+G (not Windows+G). You repeat that error more than once in this article.
Is it possible to present the recording length for a duration other than the options 30M, 1H, 4H, say 45M? You did not describe any option other than the defaults provided.