

Take control of startup programs in Microsoft Windows 11 and gain an edge in performance. Here’s how anybody can edit programs that start at system boot-up.
You must take some time out from your regular schedule to inspect the Windows Startup folder for programs. Most of these Startup apps eat up system resources silently. The next time you see the system memory or RAM going in the red zone on the Task Manager, go straight to the Startup folder and remove some unnecessary apps from that folder. These apps are likely the root cause behind the shortage of system resources like RAM, CPU processing power, and network bandwidth.
Don’t know how to change Windows 11 Startup programs? Not an issue! Keep reading as I explain the effortless and advanced ways to change startup programs on Windows 11 and other dated Windows operating systems below.
Also read: Windows 11 Is Faster than Windows 10 and Here’s Why
Note: As with anything, be careful not to disable anything important like sound card or network adapter software. When in doubt, leave it alone.
Contents
What Are Windows 11 Startup Programs?
The Microsoft Windows 11 operating system initiates some native and third-party apps when you boot up your Windows 11 PC. If you’re not into the technicalities of the Windows PC and just do your work and shut it off, then you might not notice these apps ever. However, you often notice that the PC is sluggish or non-responsive when you just log in to your user account. If you face unusual slowness at the starting moments of the PC, that’s because the system is running multiple startup programs in the back end.
For example, the audio drivers, GPU drivers, RGB lighting drivers, Bluetooth drivers, Antivirus, malware scanners, PC tune-up utilities, Google Chrome, Microsoft Teams, etc., automatically run at the system startup. All these apps themselves add a shortcut to the Startup folder of the Windows system. Then, when you switch on the PC, these apps start executing all at once.
That’s not all! Throughout the session, these apps run in the background taking away valuable system resources that you could use in graphic designing, coding, gaming, video processing, and so on. It’s not that all Windows 11 Startup programs are futile. Drivers like GPU, Bluetooth, Audio, Networking, Wi-Fi, etc., are indispensable.
That’s why, you must take control of the Windows Startup programs immediately, get rid of unnecessary ones, and speed up your PC instantly. If you’re still running out of memory, you can check out these best gaming RAMs.
Also read: Can You Mix RAM Brands: A Guide for RAM Mix and Match
Windows 11 Startup Programs That Cause the Cause Problems
If you’re taking the time to disable Startup programs on Windows 11 by following the methods explained in this article, don’t forget to remove these startup apps first:
- Cloud storage desktop apps like Dropbox, OneDrive, Google Drive, Box, etc.
- Virtual conferencing apps like Zoom, Microsoft Teams, etc.
- Instant messaging apps like Slack, Skype, and so on
- All Adobe software suits
- Project management apps like Notion, Asana, ClickUp, etc.
- Peer-to-peer (P2P) file downloading and uploading apps to download content from the Internet
Also read: 3 Alternatives to Cloud Storage
How to Edit Windows 11 Startup Programs
The Windows operating system evolved so much since Windows XP. In the early days, you had to jump through many hoops to access and delete Startup programs. However, it has now become a cakewalk for Windows 11. Find below some of the easiest ways to manipulate the Windows Startup apps:
Disable in an App’s Own Settings
Most third-party apps try to add a shortcut in the Startup folder to launch them at system boot-up. Here’s how you can use those apps to disable startup tasks:
- Open the third-party app in question and look for a user interface (UI) menu named Option, Settings, Preferences, etc.
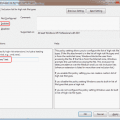
- In the current example, I’m going to disable the startup execution of the DropBox app.
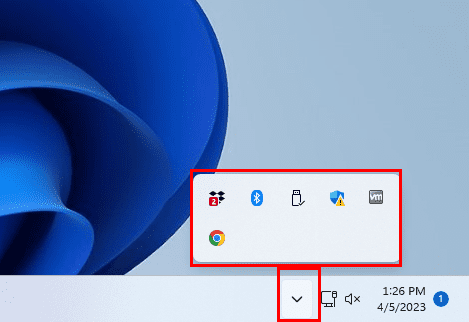
- Open DropBox from the Windows System Tray and click your account profile picture.
- Now, click Preferences from the context menu that pops up.
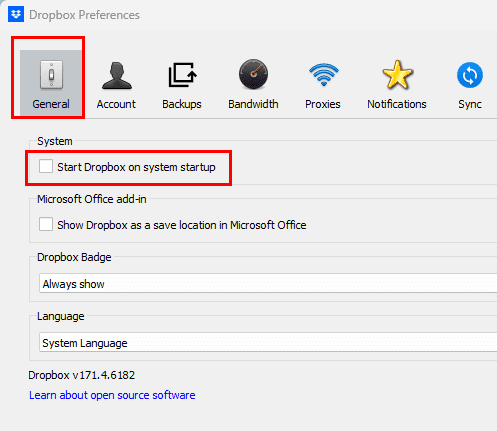
- Under the General tab, you should see a checkmark for the DropBox startup command.
- Uncheck it to remove the app from the system startup.
Edit Startup Apps From Windows 11 Settings
Windows 11 made it easier to find advanced system settings including the Startup apps scheduled to run during system boot-up. Here’s how to find those using the Windows Settings app:
- Press the Windows + I keys together to bring up the Windows Settings app.
- On the left side panel, click on Apps.
- Now, on the right-side panel, scroll until you locate the Startup menu. Click on it.
- You should see all the Startup apps on Windows 11.
- Some of these may be active and some aren’t.

- You can use the toggle buttons on the right side of each item to activate or deactivate startup commands.
- Below the toggle buttons, you should also see the impact of the Startup programs on the system performance.
- You can disable those startups that show High impact and Medium impact signals.
- Refrain from disabling essential system drivers even if they show High impact.
Delete Apps From the Startup Folder
There’s a system folder inside the Windows 11 installation directory that stores all the Startup programs. You can access the folder and delete unwanted apps from that folder as well. Here’s how it’s done:
- Open This PC and access the following directory:
C:\Users\user name\AppData\Roaming\Microsoft\Windows\Start Menu\Programs\Startup
- That’s the Startup folder.
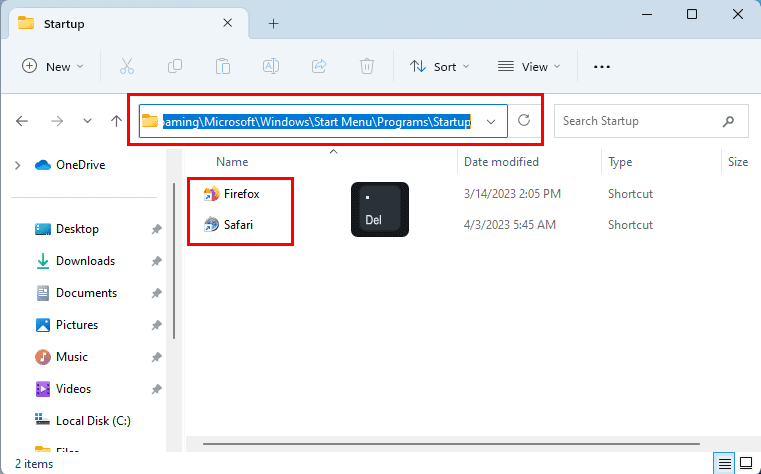
- If you find any apps here, you may delete those to speed up the PC.
- Critical system startup apps won’t show up in this folder.
This is the best method to add a third-party app to run on system startup. You can just add a shortcut to the app’s EXE file in this folder. On the next Windows 11 restart or power on, the third-party app will show up in the startup or System Tray.
Disable Startup Programs From Task Manager Tool
If stubborn startup apps keep showing up after performing all the above methods, then you can try to remove those from the Windows 11 Task Manager utility. Here’s how you can accomplish this task:
- Hit the Task Manager hotkey Ctrl + Shift + Esc.
- The Task Manager app will show up with Processes as the selected tab.
- Switch the selected tab to the Startup apps from the left side panel.
- Now, you see all the activate and inactive Startup apps either from Microsoft or third-party developers.
- Click the app you want to stop executing during system boot-up.

- Right-click and select the Disable button from the context menu.
That’s it! You’ve successfully disabled the Startup program. This tool shows all the critical and non-critical Startup apps. So, disable any of these apps after doing some background research.
Use the System Configuration Tool
Here’s how can you utilize the System Configuration utility to edit Windows 11 Startup programs:
- Press Windows + R keys together.
- The Run command box will pop up.
- Type the following command and hit Enter:
msconfig
- The System Configuration tool will show up.
- Go to the Startup tab.
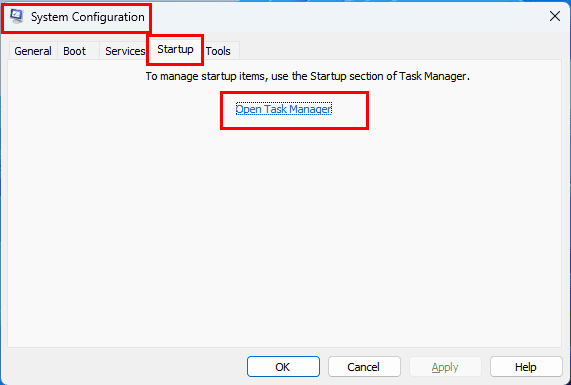
- On your Windows 11 and 1o PC, you’ll see the Open Task Manager hyperlink.
- Click on it to open Task Manager.
- Now, follow the steps mentioned in the above method to disable startup apps.
- However, for dated Windows operating systems like Windows 7 and XP, the Startup tab will show up the apps that are set to initiate during system boot-up.
- You need to uncheck the checkbox and restart the PC to enforce the changes.
Use the Autoruns Tool to Delete Startup Apps
Autoruns for Windows is a robust system utility that lets you explore all the services, core systems, processes, etc. of a Windows 11 PC. You can get it for free on the Autoruns for Windows portal and extract it to start using it right away. Here’s how it’s done:
- Run either Autoruns64.exe (For Windows 11 or other 64-bit systems) or Autoruns.exe (for dated Windows OSs) from the extracted folder.
- Go to the Services tab.
- Find out Startup programs from the Startup Apps, Startup folder, Task Manager, etc., and disable those from the Services on Autoruns.
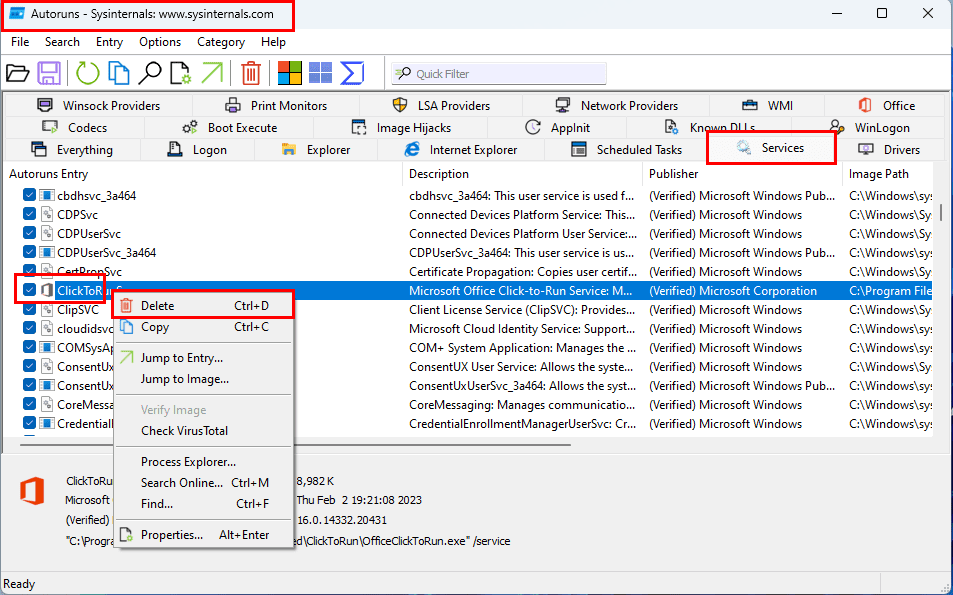
- You’ll need to match the Startup apps with their related Services before you can stop them from ever running during system boot-up.
- Select a service from the list, right-click, and select Delete.
- If required, the app will ask for administrator rights.
How to Change Windows 10 Startup Programs
Still on Windows 10? Not a problem! You can try the above methods or the following ones to delete Startup apps.
Using the Task Manager Startup Tab
- Right-click a blank area on the Taskbar, then choose Task Manager.
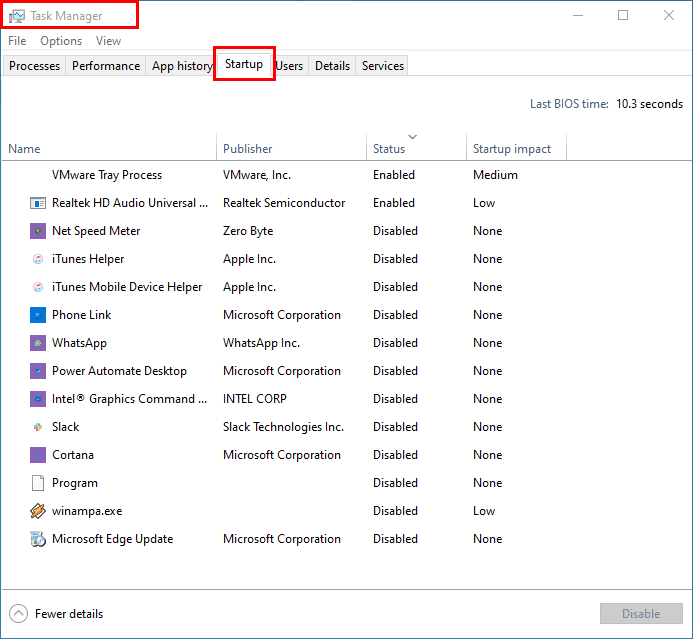
- Select the Startup tab.
- Select any item you wish to disable or enable, then choose the Disable or Enable button at the lower right corner of the window.
From the Startup Folder
- Hold the Windows Key and press R to bring up the Windows Run dialog.
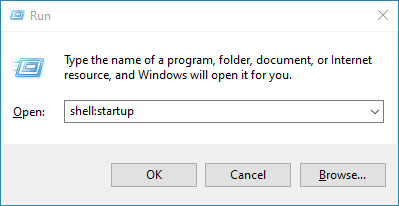
- Type shell:startup, then press Enter.
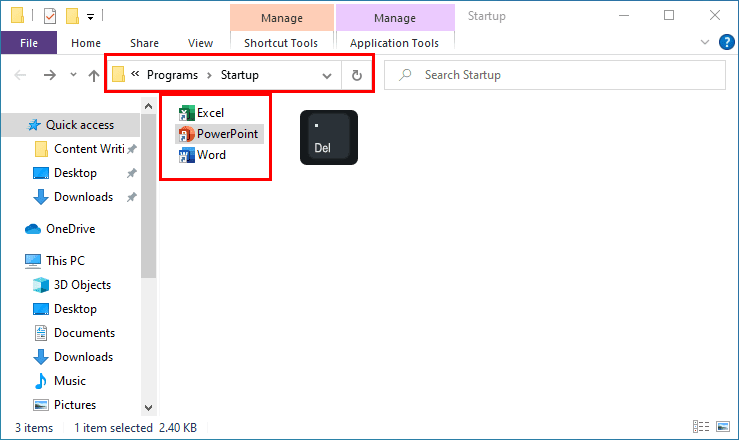
- The Startup folder appears. By default, there is usually nothing in it.
- Place the icons of any applications you would like to run at startup in this folder. Delete any icons of applications you don’t want running at startup.
Windows Startup Apps: Final Words
So this is how you can change the Windows 11 Startup programs to speed up your PC. Depending on your Windows PC’s operating system, you need to choose a method to weed out unnecessary and third-party Startup apps. The methods like Startup Apps UI in Windows 11 and System Configuration (Windows 10 and earlier) methods are the most straightforward among all other known processes to change apps that open on startup on a Windows PC.
Did this tutorial help you? How do you handle items that startup automatically in Windows 11? Do share your experience in the comments. Don’t forget to share the article from your social media handles to help your friends, followers, fans, and colleagues speed up their PCs for free by clearing unnecessary Startup programs.
Next up, How to Enter BIOS on Windows 11 PC and Windows: Useful Tips to Speed Up Startup.

I am no I T … But I will try anything ..
It’s driving me mad and keeps coming back ..
I have been continually troubled by a program ( Or anything containing that )
How can I delete it from my computer ..
Tried it all ..
Good article.
It’s worthwhile pointing out that if you want to customize the startup of an app more than the task manager allows, disable it from task manager, and instead use the Startup folder for the app startup.