

Remove Windows services from the list in the Services.msc utility in Microsoft Windows 11 by following any of the methods mentioned here.
A Windows 11 operating system is loaded with software, files, utilities, tools, drivers, etc. At the core of these tasks lies Windows services. These are long-running applications that don’t always need any command or instruction from the PC user. These programs run in the background and create a suitable platform where top-level software, databases, websites, etc., can operate.
Though Windows services are independent applications, you can still manage these at the user level. For example, you can schedule, run, stop, disable, and delete Windows services if you need to. Read this article until the end to discover different ways for removing services from Windows 11 and earlier Windows operating systems.
Also read: Difference Between Windows 11 Home and Pro
Contents
- 1 What Are Windows Services?
- 2 Reasons to Remove Windows Services
- 3 How to Remove Services From Windows 11: Command Prompt
- 4 How to Remove a Service in Windows 11: Registry Editor
- 5 How to Delete Windows Services Using PowerShell
- 6 How to Delete Windows Services Using Autoruns
- 7 Remove Windows Services: FAQs
- 8 Conclusion
What Are Windows Services?
Windows services are core components of the Microsoft Windows NT-based operating systems like Windows 11, 10, 8, 7, Vista, etc. As soon as you start the PC, Windows loads some basic services that enable other programs to function appropriately. For Example, Windows Time syncs the current date and time with all the software, networks, websites, servers, and so on. There are hundreds of other Windows services running in the background when I’m writing this article.
It’s not necessary that all these Windows services are crucial for the optimum operation of the PC. Some services may not become functional until you install relevant hardware or software into the PC. For example, you don’t need the Bluetooth Support Service on your PC if there’s no Bluetooth transmitter hardware.
In a personal Windows PC where you don’t do much computing other than reading emails, watching movies, or playing games, you can disable many of these Windows services. Hence, there’s a popular concept among gamers and high-spec PC users that removing services from Windows not necessary for its current purpose can actually speed up the system a lot.
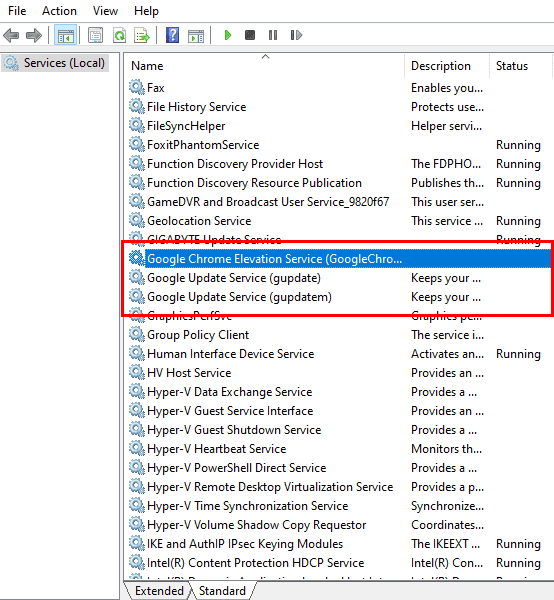
And, there aren’t just Windows services. Some software developers are also creating apps that install as a service on your PC to create a custom platform to run a top-level application from the same developer. For example, when you install the Google Chrome web browser, it also installs the following Windows services silently:
- Google Chrome Elevation Service
- Google Update Service
Reasons to Remove Windows Services
The primary reason to delete Windows services is to save PC resources like RAM, CPU, HDD, GPU, and networking bandwidth. Find below some additional justifications to remove Windows services on your Windows 11 PC:
- Some third-party Windows services may get left behind after you remove the linked application. Hackers can utilize those services to infiltrate your Windows 11 PC to steal banking credentials, private data, and so on.
- You can always disable some unwanted Windows services from your PC to increase system security. For instance, if you’re not planning to use remote support, then you should disable or delete the Remote Desktop Services. This prevents someone else to activate the functionality on your PC in your absence.
- If you don’t want your kids to use Xbox-related apps on the PC, removing services from Windows related to the Xbox will be helpful.
Let’s explore various methods to remove or delete Windows services in the following sections:
How to Remove Services From Windows 11: Command Prompt
You can delete Windows services using a short command on the Windows Command Prompt app. However, before you can go on and learn the code you need to use, you must find the Service Name first. Here’s how you can learn the actual name of the service you want to delete:
- Open the Services app either from the Run command box (Windows + R) by running the Services.msc command or searching the app on the Windows Start menu.
- When the Services app pops up, click the Standard tab at the bottom of the app screen.
- Now, click the Name column to sort all the services alphabetically.
- Scroll through the Windows services list to find the service you want to delete.
- Double-click the service after you find it.
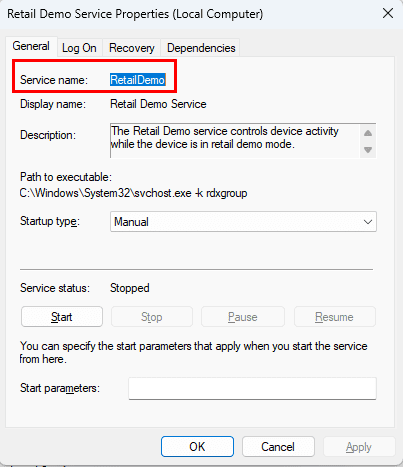
- You should find the system-level service name under the General tab.
You must use this shortcode or service abbreviation whenever you need to enter the service name in any of the methods described in this article.
Now that you know the system-level service name, you can get started with deleting it from the Windows 11 PC by following these steps. Remember, the method is also applicable for all Windows OSs until Windows XP.
- Launch Command Prompt with elevated rights from the Start menu.
- To do this, type Command and click Run as administrator.
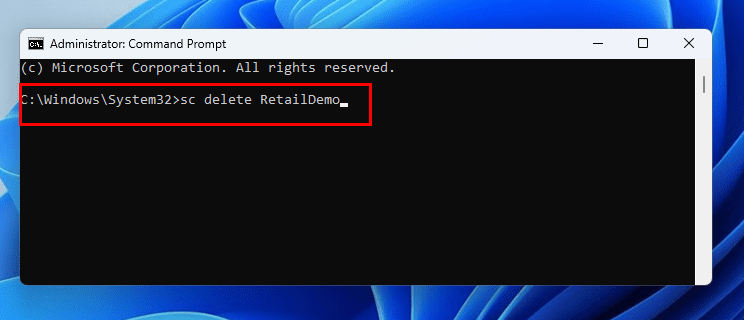
- Now, inside this Windows 11 terminal app, type the following command:
sc delete retaildemo
- Hit Enter.
- This command will delete the Retail Demo service from Windows 11.
- If you want to delete any other service, simply replace retaildemo of the command with the service name of the Windows service.
How to Remove a Service in Windows 11: Registry Editor
You can also use the Registry Editor to delete Windows services. Before using this tool, ensure you back up the Registry Editor. It’ll help you to restore the Windows services when you need them.
Did you back up the Windows 11 Registry database? Cool! Now, execute these steps to remove a Windows service:
- Hold down the Windows key and press R.
- Type regedit, then select OK.
- Navigate to the following location in the registry:
- HKEY_LOCAL_MACHINE
- System
- CurrentControlSet
- Services
- There are folders under Services that contain all the Windows services you see in the Services app.
- The names of the folders are the system-level names for each corresponding service.
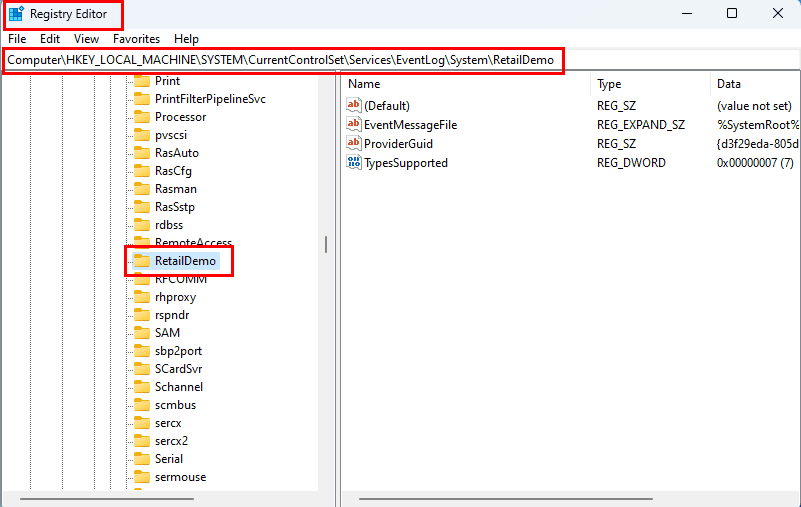
- For example, the above image shows the Registry entry for the Retail Demo service (system-level name:retaildemo).
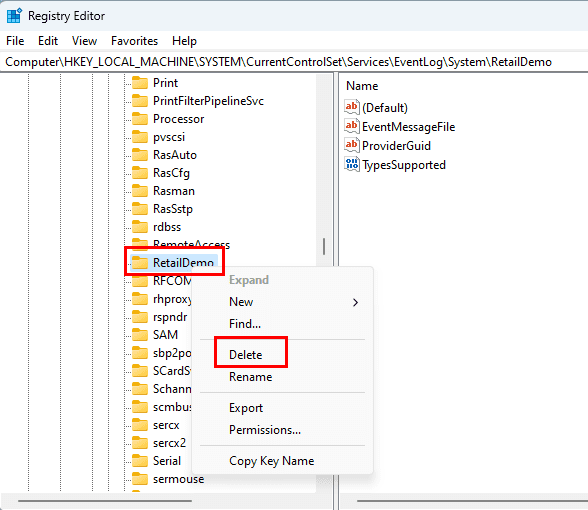
- Now, right-click the Registry entry folder and select Delete on the context menu to remove the service.
How to Delete Windows Services Using PowerShell
Windows PowerShell usually accepts the same codes that you can execute on the Command Prompt tool. So, the code to delete a Windows service will also work on PowerShell. Here’s how it’d done:
- Click Start and type Power.
- Windows PowerShell app will show up under the Best match section.
- Click Run as administrator.
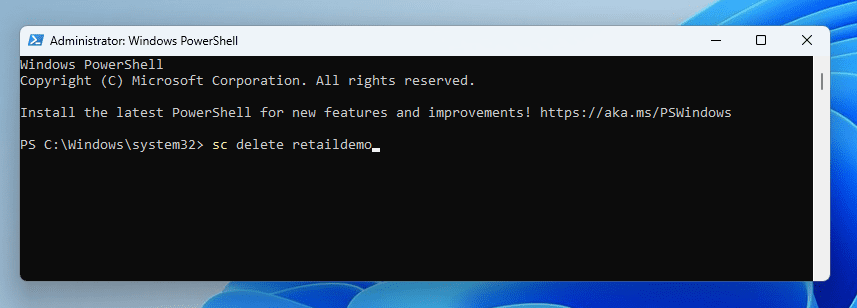
- Now, copy and paste the following command:
sc delete retaildemo
- Hit Enter to execute this PowerShell command.
- You won’t see any service deletion confirmation on PowerShell if all goes right.
- PowerShell only shows errors encountered during code execution.
- Don’t forget to replace the service name with the actual service you want to delete.
Also read: 7 Ways to Open PowerShell in Windows 10
How to Delete Windows Services Using Autoruns
This is perhaps the most intuitive way to remove Windows services that you no longer need on your Windows 11 PC. You can download the app for free from the Autoruns for Windows portal. Download the app and then extract its content in a separate folder. Now, double-click the Autoruns64.exe file to open the app. Once the app is open, follow these steps to ditch unwanted Windows services and third-party services:
- After opening the app, you come to the Everything tab.
- From here, navigate to the Services tab.
- You could see a short list of services if the following are checked in the Options menu on the Autoruns toolbar:
- Hide Microsoft Entries
- Hide Windows Entries
- Uncheck the above if you’re on a mission to delete unnecessary services installed by Microsoft.
- The list will now expand.
- Scroll the list to find the service you want to delete.
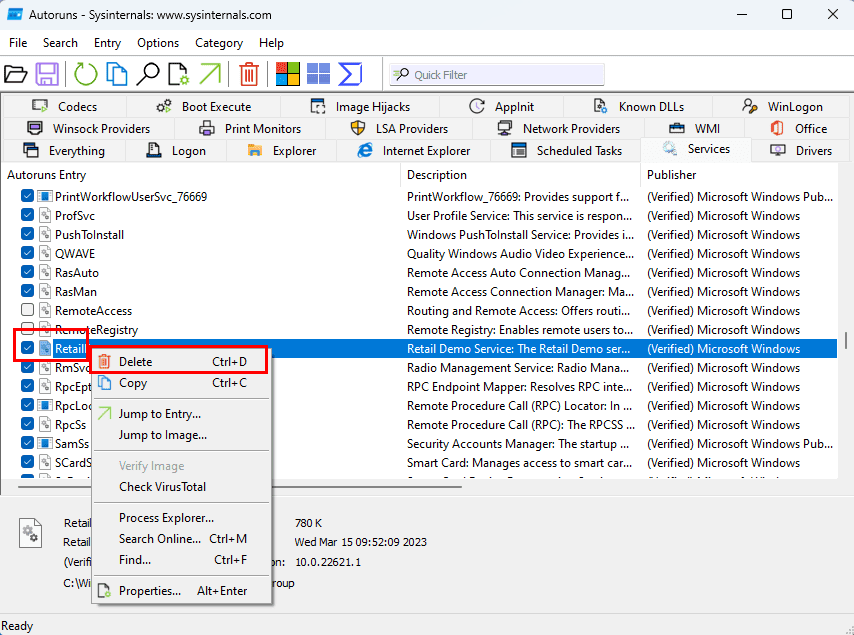
- Right-click and select Delete to erase the service permanently.
- Alternatively, select the service and hit the hotkey Ctrl + D to erase the service.
- If you want to delete services developed and installed by third-party developers, check the above options in the Options menu.
- Then, Autoruns shrinks the list to a few services.
- Find the service and repeat the delete step.
Remove Windows Services: FAQs
These steps only delete the name of the service. How do I delete the actual program that is running as a service?
You can track it down with these steps:
- Right-click the Taskbar and choose Task Manager.
- Select the Services tab.
- Right-click the service you wish to delete, then choose Go to details.
- The Task Manager will highlight the program linked to the service. If you wish to remove it, you can track it down by right-clicking it and selecting Open file location.
- From there, either uninstall the related program from Windows Settings > Apps > Installed Apps > click ellipses icon > click Uninstall.
- Alternatively, you can also delete the EXE file.
How do I edit services in Windows 11?
You can edit a Windows service by accessing the Services app. Here, you can edit the way the service initiates by clicking the drop-down list for the Startup type. Then, set any of the options you like from the drop-down menu: Automatic, Manual, Disabled, etc. You can also modify the Service status by clicking any of these buttons: Start, Stop, Pause, or Resume.
Conclusion
You can use all the above methods, except the PowerShell one, without any changes in Windows 11, 10, or 8.1, 8, 7, Vista, and XP. Choose the method you like and give it a try. If you know another way to remove Windows services, mention that in the comment box.
Next up, how to fix: Windows Update Service Is Missing From Services.msc.

THIS! THANKS!
Surjit Dadhwal says
June 8, 2020 at 1:48 am
SC DELETE ServiceName did not worked for me. Few points that might be helpful:
1) Use double quotes around ServiceName. So SC DELETE “ServiceName”
2) If 1 does not work then use .exe with SC. So SC.exe DELETE “ServiceName”
Number 2 worked for me.
option 1 doesn’t work, you need to be admin (but it doesn’t look like the author is about to correct that)
It is very good it helped
Thanks you so much
nothing worked for me as above
for me, the solution was
1. Get the service name, services.msc or taskmanager > services may be the point from where to get the servicename.
2. Open command prompt as admin
3. Use the command: SC DELETE “ServiceName”
4. Press Enter or Ok
Now can check if it is deleted or not with below
All data system services delete and cancel network sharing information system services all media reports that and application data all delete and cancel all like and comment and post and sharing information data all covid 19 and cancel delete
SC DELETE ServiceName did not worked for me. Few points that might be helpful:
1) Use double quotes around ServiceName. So SC DELETE “ServiceName”
2) If 1 does not work then use .exe with SC. So SC.exe DELETE “ServiceName”
Number 2 worked for me.
Maybe take a look here if you are stuck with deleting the service:
https://stackoverflow.com/questions/20561990/how-to-solve-the-specified-service-has-been-marked-for-deletion-error
Thanks a ton! The option 1 worked for me.
Thanks! it works for me!
Command –> SC DELETE “ServiceName” binPath= “C:\Program Files (x86)\XXX\ServiceName.exe -c Service.config”
Run the command prompt as administrator:
click start -> search for cmd -> right click -> choose “run as administrator
then run the command in step 1, this worked for me on windows 10
2 one worked.Thanks a lot.
Friends, this is very helpful! I learned a lot!
Can you please finish the option #2:
Once I find the entry in the registry, what do I do?
I imagine right-mouse-click on the yellow folder and delete?
can you please confirm?
Thanks
Larry
no , i tried both tricks, and both failed.
I first tried the RUN command, and nothing happened, the services were still being shown up on Service Applet listing.
Then i tried the registry trick, but still the service is still being shown on the services applet list., although this time the description given in the services list applet has changed to “Failed to load description. Error code 2”
With the registry trick only its description is lost, service is still on the list
(NB: i have stopped the services before trying these tricks)