
Generally, people like to leave all of their accounts signed in for as long as possible for ease of use. This saves you the step of signing in regularly or even every time you use a website or app. This choice is normally excellent from a security standpoint, as you can control who has access to your devices and the accounts they’re signed into.
However, if your device is lost or stolen, this approach leaves you open to the risk that whoever finds your device may be able to access your signed-in accounts. This risk is already bad enough for apps like WhatsApp and Facebook, where they could see many personal and potentially sensitive details. It’s much worse if they can access your email accounts or your password manager. With access to your email, they’d be able to see what accounts you have and then force a password reset. With access to your password manager, they could see a list of your accounts and the associated login details.
If you’re in this situation, one of the things you should do is deauthorize all existing sessions for your accounts. If you use Bitwarden, deauthorizing your password manager sessions is simple.
How to Deauthorize Your Existing Bitwarden Sessions
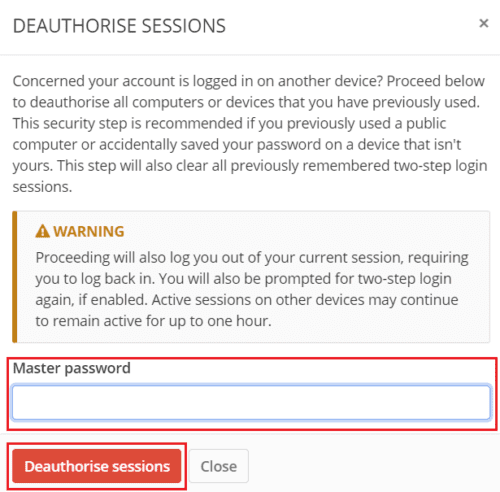
First, you need to sign into the Bitwarden web vault. Next, switch to the “Settings” tab, then scroll to the bottom of the page, and click “Deauthorise sessions.”

Deauthorizing all of your sessions will sign all of your devices out, including your current one. The sessions will be expired immediately, but it may take up to an hour for other devices to register the change and sign out. To complete the process and sign out of Bitwarden on all of your devices, enter your master password and click “Deauthorize sessions.”
Deauthorising all sessions is an effective way to ensure that no one can access your Bitwarden account. Even if someone else now has access to a device on which you are signed in. By following the steps in this guide, you can deauthorize all of your existing Bitwarden sessions. Given that it can take up to an hour for this change to propagate, you must perform this action as soon as possible if you think someone else might be able to access a signed-in session.


The wording “deauthorize” is misleading to me. The explanation for using this or why to use it, is not clear in the
email notification I get every time I log in. I am no techie but all the current word usages across the internet do not mean what they sound like they should mean.
So the email notification to say you can deauthorize a current device says to me that it is totally removed from use period…even for myself. I had to do a google search just to find THIS page with your ‘deauthorize’ explanation. Why is it not included with the vault information for the owner/user of said vault?