Password managers securely store your login details for many accounts. This means that you only have to remember the passwords to sign in to your devices and sign in to your password manager. Everything else is managed for you. For accounts on most websites, you’ll just need a username and a password to sign in. Some sites, however, may have a more complex sign-in form. In these cases, one of Bitwarden’s killer features, custom fields, can be particularly helpful.
Custom fields allow you to create and name new variables in an entry that can also be auto-filled. If you ever need to store details for a second account on the same site, you could choose to enter all the details, including your custom fields, again manually. Alternatively, you could choose to use the “Clone entry” feature to copy the existing structure of an entry.
Cloning an entry takes a copy of the entry as it is. You can then edit either the original or the cloned copy entirely independently. This can help if you’ve got multiple accounts with the same service, especially if those entries have custom fields.
How to Clone an Entry in the Bitwarden Browser Extension
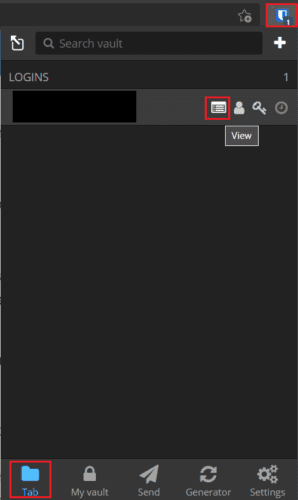
To clone an entry via the Bitwarden browser extension, you first need to open the extension pane. To do so, click on the Bitwarden extension icon. Next, find the entry you want to clone and click “View.” If the entry is configured with a URL and you are currently on that website, it will appear in the default “Tab” tab. Alternatively, if the entry you want to clone does not appear here, you can either use the search bar at the top of the “My vault” tab at the bottom to find the entry you want.
When you’re viewing the entry, you want to clone, scroll to the bottom and click “Clone item.”

Clicking “Clone item” will open the “Add item” screen and will pre-populate it with all the details of the entry you cloned, with the only difference being the entry name having “ – Clone” added to the end of it. Now you just need to change the details you want to, then click “Save” in the top-right.

How to Clone an Entry in the Bitwarden Web Vault
To clone an entry via the Bitwarden website, first sign into the Bitwarden web vault. Next, in the default “My vault” tab, find the entry you want to clone, then click on the cogwheel icon to the right of it and select “Clone.”

You’ll now see the “Add item” form with all the details cloned entry pre-filled. Just as in the extension, the only difference will be the addition of “ – clone” to the entry name’s end. Once you’ve updated the cloned entry with all the changes you want to make, click “Save” in the bottom left corner.

Sometimes when creating a new entry in your Bitwarden vault, you may want to copy a previous entry as a starting point. By following the steps in this guide, you can clone an entry in your Bitwarden vault.