Apple iPads at school, work, or home are for productivity and performance. You can increase your productivity multifold by using some cool iPad gestures.
The latest versions of iPadOS, like iPadOS 14, 15, and 16, make your multitasking life effortless with virtually unlimited gestures on iPad.
Also, the Liquid Retina display of the latest iPad models can record multiple iPad swipe gestures at once — making multitasking a walk in the park.
You can only enjoy the benefits of multitasking and button-less movements on your iPad if you know all the famous and frequently used gestures on your iPad. Read this article until the end to learn all the gestures for iPad, including the most-used iPad finger gestures.
Contents
Activating iPad Gestures
You may not find all kinds of finger and touch gestures for iPad active out of the box. Here’s how you can activate some hidden gestures on iPad:
Allowing Four and Five Finger Gestures
- Open Settings and tap General.
- On the right-side panel, tap Gestures.
- Toggle on the option for Four & Five Finger Swipe.
Allowing Swipe From Corner Gestures
- From Settings, go to General and then select Gestures.
- Under the Corner Gestures menu, toggle on Allow Finger to Swipe From Corner.
- You can also choose which corner swipe should perform which task.
- For example, tap Left Corner Swipe and choose between the options like Off, Quick Note, and Screenshot.
- Similarly, select Right Corner Swipe to assign anything from the above three options.
Useful Basic iPad Gestures
These gestures are fundamental, and you may already know some of them. But, if you genuinely want to be a pro-iPad user or super productive at the workplace, brush up on the following iPad gestures now:
1. Waking Up the iPad
Gently touch the screen of the iPad when it’s in sleep mode to wake up the device. The Lock Screen would show up to let you read notifications, change the song track, etc.
2. Unlocking the Lock Screen
To unlock the Lock Screen, you can tap on the Liquid Retina display once and then flick up from the bottom of the screen.
Now, you can use Touch ID, Face ID, or Passcode to unlock your iPad.
3. Pop Up the App Dock
If you’re working on a webpage or email and need to access another app, first, you need to get the App Dock.
Place any one finger on the bottom of the screen. Then swipe up slowly. As you perform this gesture on iPad, the App Dock with pop up almost instantly.
4. Go to iPad Home Screen
Now, you may want to go back to the Home Screen. But without a dedicated Home button, you must rely on iPad finger gestures.
Quickly flick up your finger from the bottom of the Liquid Retina display screen to settle the open window on the App Dock and show up the Home Screen.
5. Quickly Checking Notifications
If you need to go through current app notifications on your iPad, iPad swipe gestures can help you with it.
Swipe down from the top of the screen using one finger. As you do this, a screen overlay will come down with you and the Notification Center.
6. Finding the Control Center
You need to adjust the screen brightness, activate Bluetooth, turn off Wi-Fi, and more. You can do all these on the iPad Control Center. But how do you access that? It’s pretty easy with the following gesture on iPad:
Place your finger on the top-right side of the bezel. Now slowly swipe down the screen, and with your finger movement, the Control Center also slides down. It shows up as a Home Screen overlay. Touch anywhere on the Home Screen to hide Control Center.
7. Checking What’s in the Today View
Today View is an effortless view to see your current productivity level. It also shows you other app usage and Home Screen widgets in a consolidated manner.
Using iPad swipe gestures, swipe the iPad screen from the left-side bezel to get the Today View overlay on Home Screen. By long-tapping the Today View, you can customize the widgets it shows up.
8. Pop Up Spotlight Search
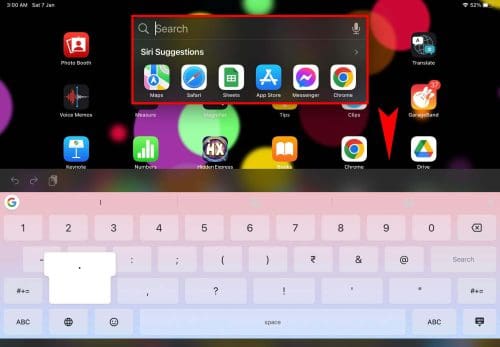
Want to quickly find a document, file, photo, or app on your iPad? Use the Spotlight Search. It looks up the entire iPad, including the system and third-party apps, to fetch the needed content.
You can use another iPad swipe gesture to find Spotlight. Simply swipe down on the Home Screen from anywhere to find this tool. You can also use it on the Lock Screen. Furthermore, you can use up to three fingers to swipe down and reveal Spotlight.
Useful Multitasking iPad Gestures
9. Surfing Multiple Apps
Let’s consider you’ve opened five apps on your iPad. Now, you need to frequently swap within these apps to refer to data or information and create your document or spreadsheet.
You’ll see a scroll bar at the bottom of the screen when there are multiple apps open in the background. Swipe right or left by touching this scroll bar to surf many open apps quickly.
10. Getting App Switcher
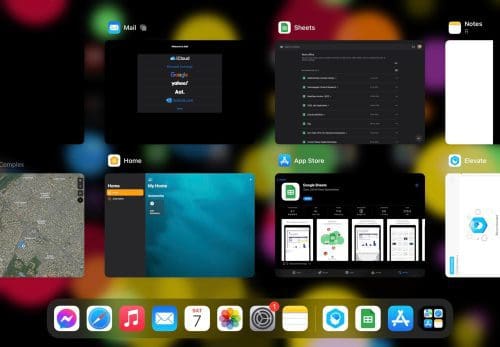
App Switcher lets you swap between open apps. It also enables you to force-stop apps should they show any latency or glitches during operation.
There are multiple iPad swipe gestures and iPad finger gestures to get to the App Switcher screen.
The best one is to slowly flick up with one finger from the bottom of the screen. When you see an overlay on the Home Screen, let go of the screen.
All the open apps will show up in small cards of three-by-three view. Swipe left or right to see more open apps on the App Switcher screen.
11. Opening Multiple Apps on One Screen
For instance, you need to work on a spreadsheet and refer to Apple Mail, Apple Notes, Apple Music, Apple Maps, etc.
You can use the following iPad gestures for such a multitasking scenario:
- Open the main app you want in full screen, for example, Google Sheets.
- Now, slowly swipe from the bottom of the screen to show the App Dock.
- Long tap on any app icon on the App Dock.
- Now, drop the app onto the Google Sheets app.

- The second app will float on the Google Sheets app, and its size is equivalent to an iPhone screen. It’s known as the Slide Over view.
- Add more apps to this Slide Over.
- Do you notice the scroll bar below the Slide Over app? Swipe your finger left or right on this small scroll bar to switch between the Slide Over apps.
- You can perform this multitasking gesture for all other apps.
12. Create a Split Screen View
You can open two apps simultaneously, and each app will occupy equal space on the screen. This is Split View for apps on iPad. To activate Split View, follow these steps:

- Open one app in full-screen view.
- Now, swipe up from the bottom of the screen slowly to get to the App Dock.
- Long press the second app for Split Screen, drag it to the left or right edge of the screen and drop it there.
- That’s it! You’ve got your Split Screen view for two apps.
13. Take Quick Notes
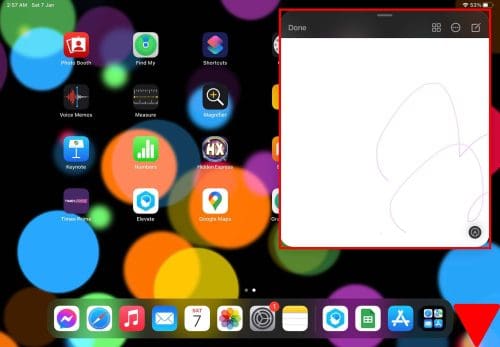
Swipe your finger from the right corner, and you’ll see a small screen for the Apple Notes app. This iPad swipe gesture will depend on the selection that you made earlier on Settings> Gestures> Corner Gestures.
14. Take Screenshots
You can increase the lifetime of iPad buttons by using iPad finger gestures for screenshots. Activate a dedicated screenshot gesture in Settings> Gestures> Corner Gestures. Then, perform that finger gesture on the iPad screen to take quick screenshots.
How to Take Screenshots on iPad With Gestures?
On my iPad, I use the Left Corner Swipe for screenshots. You can choose between the left and right corner swipe action from the Settings app.
Further Readings on Mobile Phone Gestures
To learn more about mobile phone and tablet gestures on Android devices, you can check out these articles real quick:
First off, you can create custom gestures on Android using the Full-Screen Gestures App on Android.
Secondly, if you want to configure custom gestures, you may want to try out the Dolphin for Android app.
Thirdly, if you need to capture quick screenshots on an Android 10 or later device, take a three-finger screenshot by following this article.
iPad Gestures: Final Words
Congratulations! You’ve perfectly learned and practiced all the frequently-used and helpful iPad gestures that make you a pro user of iPad. You save time and effort by relying on finger gestures rather than buttons.
Also, Apple removed most of the buttons from its latest iPad, including the Home button, to give its users a taste of intuitive navigation only using one, two, or many fingers at once.
Perform tap, swipe, flick up, pinch, slide, and many other gesture combinations to get things done faster.
Don’t forget to leave comments below if you know of any different iPad gestures that I didn’t cover in this article. It’ll genuinely help your fellow iPad users and me.