You can do different things to manage the recycling bin on your Windows computer. For example, you can prevent Windows from automatically emptying the recycling bin. You can also change how often Windows empties the recycling bin. Maybe you want it emptied faster or want it to wait longer.
Contents
How to Modify the Amount of Storage the Recycling Bin Holds – Windows 11
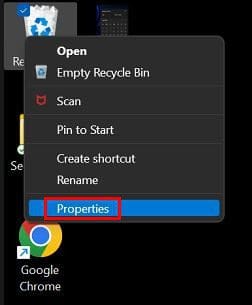
One change you can make to the recycling bin is modifying the amount of reserved storage. That way, you can have the recycling bin save more or less before it starts erasing the oldest files. Right-click on the Recycling Bin and choose the Properties option to get started.
When the Recycling Bin Properties windows opens, look for the section that says Settings for selected location. Make sure the Custom size is selected and enter the amount of your choice. If you’re not sure how much MB is the amount you need, you can always ask Google. But, here are some numbers that might be useful.
- 1GB is 1,000MB
- 2GB IS 2,000 MB
- 10GB is 10,000 MB
- 20GB is 20,000 MB
- 50GB is 50,000 MB
How to Avoid Sending Files to the Recycling Bin
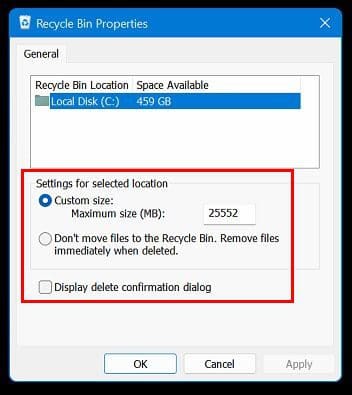
You can also avoid sending the files you erase to the recycling bin. By doing this, you directly delete them. You can do this by right-clicking on the Recycling Bin icon and going to Properties. This time in the Recycling Bin Properties, Windows select the option that says Don’t move files to the Recycling Bin. Remove files immediately when deleted.
You can also get rid of the confirmation message when you delete a file by unchecking the Display delete confirmation dialog option.
Tip: You can also delete a file without sending it to the Recycling Bin by pressing the Shift key when deleting.
How to Erase or Hide the Recycling Bin Icon – Windows 11
If you’re the kind of user that doesn’t want the recycling bin cluttering up the desktop, there is something you can do about it. You can hide/erase the icon by going to Settings >Personalization> Themes. Another way is to right-click on the desktop and choose Personalization and choose the Themes option.
![]()
Go to Desktop icon settings and uncheck the option that says Recycling bin when the window appears. You can also access the Desktop icon settings option by right-clicking on the desktop and choosing the personalization option. Scroll down to the Themes option.
![]()
Conclusion
There are different things you can do to the Recycling Bin settings. You can hide the icon from your desktop. You can also change the number of files it can save before it starts erasing the oldest ones. You can access these options through the Settings app or by right-clicking on the desktop. Which route did you choose? Share your thoughts in the comments below, and don’t forget to share the article with others on social media.