
When you need to use your webcam, you want to look your best. But that won’t happen if the brightness is off or if there is something else that is not adjusted right. But that can easily be fixed by going into the webcam’s settings and making a few changes here and there. Even if you’re having problems with the webcam, the following steps will help since they will take you to where to need to go to get the issue fixed.
Contents
How to Change the Brightness, Contrast, and Video Rotation
To change the brightness, contrast, and video rotation, you’ll need to go into your computer’s Settings by clicking on the Windows Start menu and choosing Settings.

When it opens, click on Bluetooth and devices and click on the Camera option that will be to your right. Under Connected Cameras, click on the camera that’s installed on your computer.

On the next page, in the Default Image Settings section, you’ll find the slider or the plus/minus options to adjust these settings. Any changes you make will be applied automatically.

Disabling the Webcam and Troubleshooting
Below the video of your webcam, you’ll see the options to Disable the webcam and troubleshoot it. If you decide to disable it, you won’t be able to continue using it, but it will still show that it’s installed on your computer. If you ever change your mind and want to turn it back on, follow these steps and click on the Enable button.
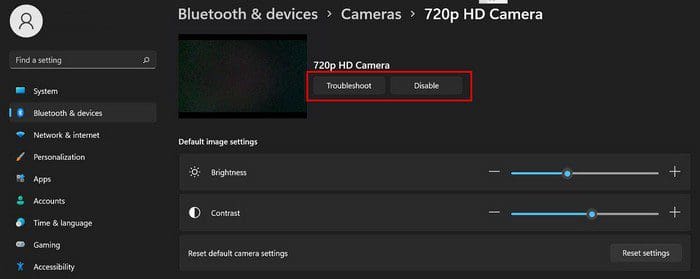
You’ll be taken to a separate page when you click on the Troubleshoot option. Here you’ll need to answer some questions to help you find a solution to the issue your camera is experiencing. You have different kinds of options all in one place. For example, you can adjust the brightness, disable the camera and find help with your camera issues.
How to Deny Apps Access to Your Camera
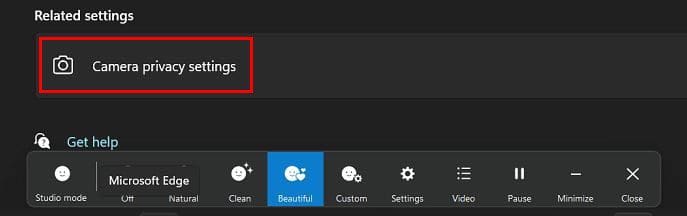
Are you curious to see what app has access to your webcam? After following these steps, you’ll see a list of all the apps that are accessing your webcam. If you want to deny access to any of them, all you need to do is toggle the button off. That’s all there is to it. Click on Camera Privacy Settings.
On the next page, you should see the list of the apps that have access to your webcam.
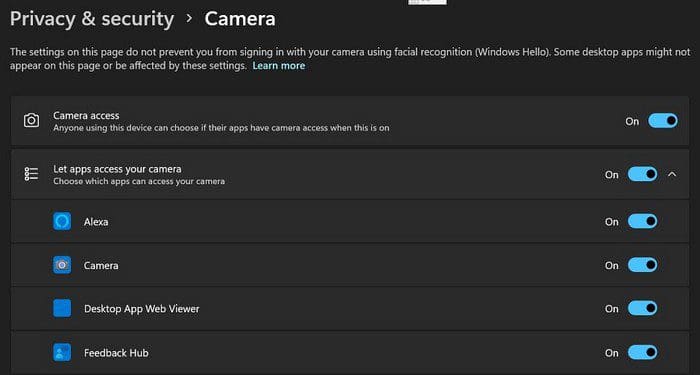
If you want to block access to all the apps, simply toggle off the Let apps access your camera option. You also can deny access to specific apps by toggling off the option for that app only to the right of the app.
As long as you adjust the webcam settings at the bottom, you should also see the studio mode options.
You can apply options such as:
- Natural
- Clean
- Beautiful
- Custom
- Video
- Pause
- Minimize
- Close
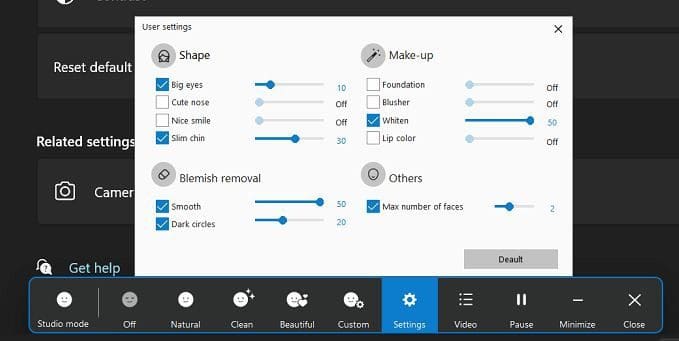
If you go into Settings, you can adjust the slider for things such as:
- Big eyes
- Cute Nose
- Nice Smile
- Slim chin
- Foundation
- Blusher
- Whiten
- Lip Color
- Smooth for blemish removal
- Dark circles for blemish removal
Conclusion
You can do various things when it comes to customizing your webcam. You can deny access to the apps you want and even disable them if that’s what you want. If the webcam is giving you problems, there’s a troubleshooting button you can try to fix the issue. You’ll also see an option to adjust the contrast and brightness, so your video looks great. What changes will you be making? Share your thoughts in the comments below, and don’t forget to share the article with others on social media.