

Want to let another user quickly access their content or software data on your Windows 11 PC without slowing down your work? You can utilize the Fast User Switching feature of the Windows 11 operating system. If you don’t know how to enable it, use the feature, or disable the functionality, keep reading.
The Fast User Switching feature in Microsoft Windows 11 allows users to log in to a PC while keeping other users logged in and their applications running. This allows multiple users to use the computer without interrupting what other users are working on. You can enable or disable fast user switching using the methods mentioned below in this article.
Contents
What Is Windows Fast User Switching?
All Windows PCs allow you to create a user account and log into the device using that user profile. While you’re logged in using a specific user account, Windows OS writes all data about favorites, history, alerts, desktop settings, etc., in a reserved folder for that specific user account. Other users can’t access these data from their profiles. All modern Microsoft Windows OSs since Windows XP come with an additional feature about user accounts. This is commonly known as Fast User Switching.
In this process, you no longer need to log out of your user account. Thus, you don’t need to close apps and files in the middle of the work. Another user can securely log in to their Windows user accounts from the Start menu, Task Manager, etc. When their work is done, they can log off. Now, you can log in to your account and will find that all the apps are running as you left them. The process also doesn’t disconnect any network connectivity. Hence, downloads or streaming from another user account keeps running.
There are no user account limits for the Fast User Switching function. You can switch to unlimited user accounts, provided that the system is robust enough to support such actions. If you set up one of the best high-spec PC at work or home and allow fast switching to user accounts for multiple individuals, it actually means many users are using the same device simultaneously.
How to Enable or Disable Fast User Switching on Windows 11
Instant switching of users on Windows 11 should be active by default. However, if you see that the feature isn’t active, you can do the following to enable it. These methods are similar in dated Windows operating systems like Win 10, 8, 7, XP, etc. Just reverse the methods to disable the feature.
1. Creating a Group Policy Modification
One of the easiest ways to enable or disable the fast switching of user accounts is by making quick changes in the Local Group Policy Editor tool. Here’s how it’s done:
- Click the Start menu or Windows flag to launch Start.
- Type Group and you should see the Edit group policy option under the Best match section of the search result. Click on it.
- The Local Group Policy Editor appears.
- Access the Logon Group Policy setting by expanding the following:
- Local Computer Policy
- Computer Configuration
- Administrative Templates
- System
- Logon
- On the right side of the Local Group Policy Editor, you must see various Logon settings.
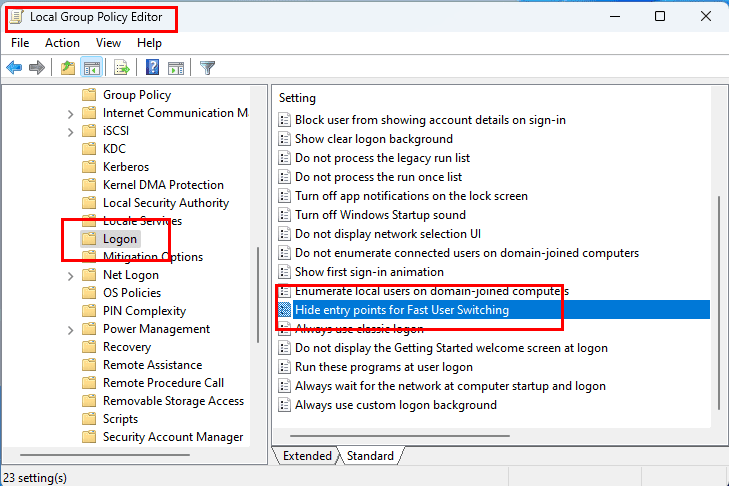
- Scroll down the list to locate the “Hide Entry Points for Fast User Switching” setting.
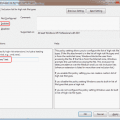
- Double-click to open the “Hide Entry Points for Fast User Switching” setting.
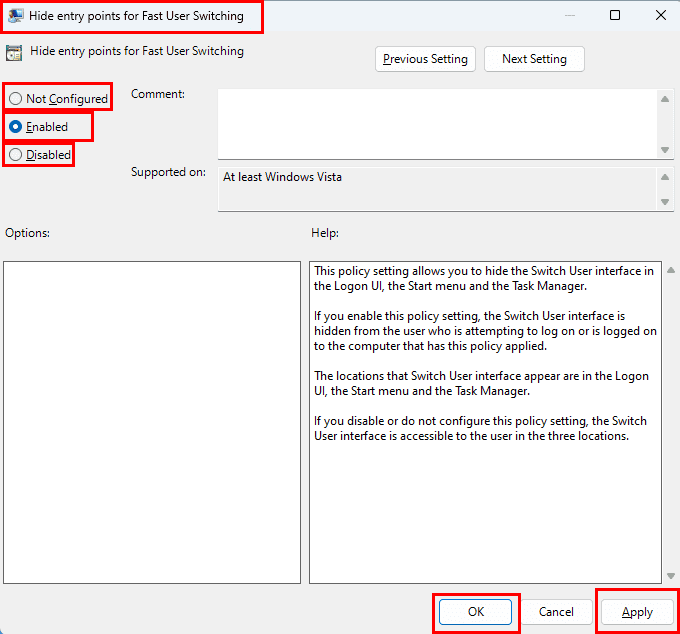
- If you see Not Configured is the default selection, here’s what you can do:
- Select Enabled to turn Fast User Switching off.
- Set it to Disable to activate the instant user switching feature.
- You must click Apply and then select OK to save the changes.
You can also apply this method on earlier Windows PCs like Windows 10, 8, 7, Vista, etc.
2. Using the Registry Editor
The Registry Editor is another great place to make system-wide changes to the user interface, features, etc. Here’s how you can use this tool to activate fast user account switching on Windows 11:
- Hold the Windows Key and press R to bring up the Run dialog box.
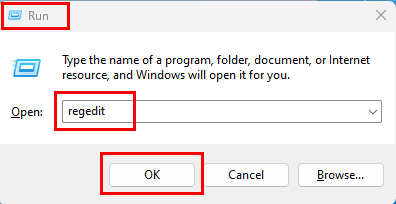
- Type regedit then press Enter.
- Expand the following Registry keys:
- HKEY_LOCAL_MACHINE
- SOFTWARE
- Microsoft
- Windows
- CurrentVersion
- Policies
- System
- Look for a value called HideFastUserSwitching.
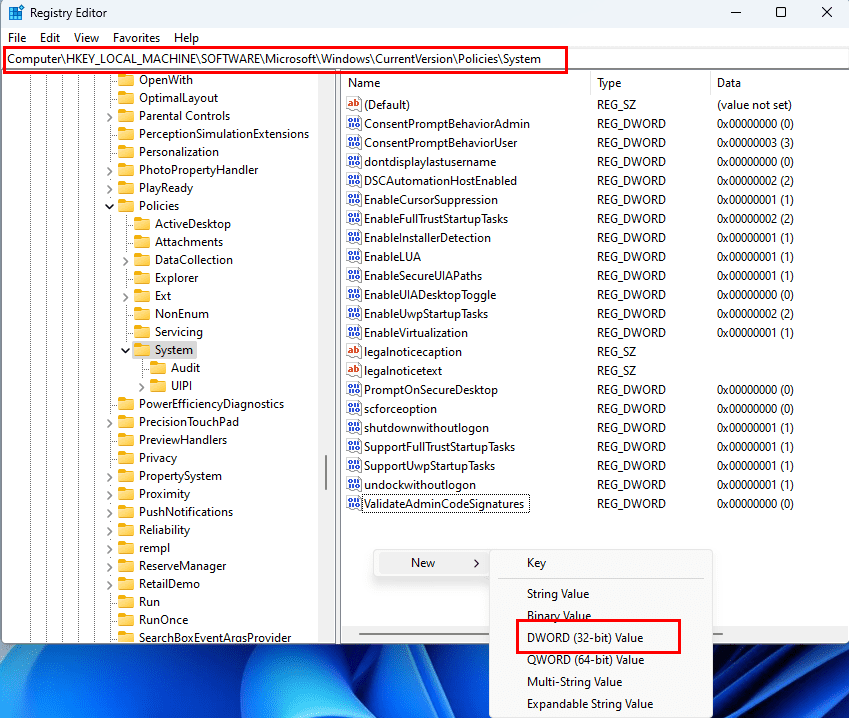
- If it does not exist, right-click the System folder, and select New DWORD (32-bit) Value to create a new blank value.
- Now, rename the DWORD (32-bit) Value to HideFastUserSwitching.
- Press Enter to confirm the rename of the value.
- Double-click HideFastUserSwitching.
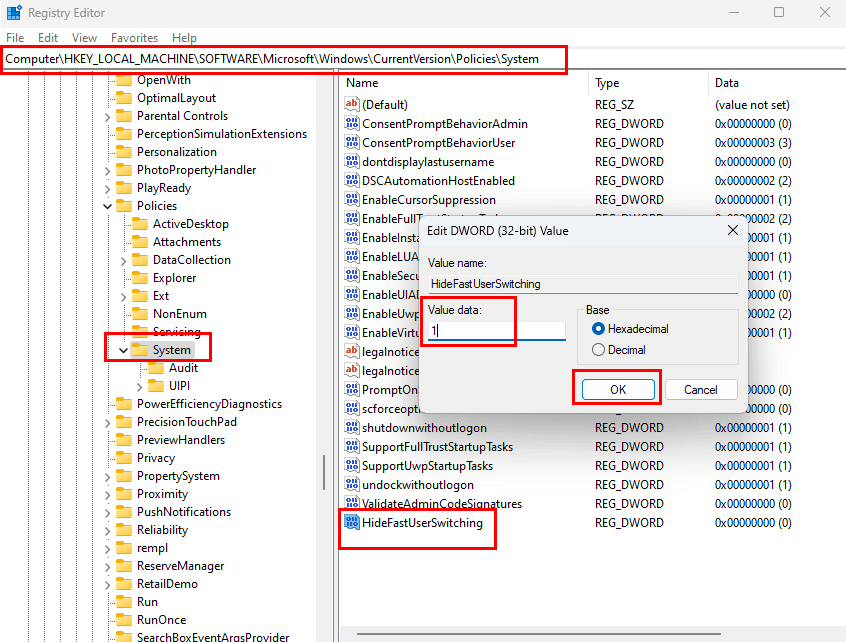
- Change the Value data to 1 to disable Fast User Switching.
- When you need the feature, open the HideFastUserSwitching value and change the Value data to 0.
3. Execute a Command Prompt or PowerShell Command
Suppose you’re in hurry and find the above methods too manual. I’ve got another intuitive method for you to activate fast account switching. In this process, you need to execute a programming code on Windows 11 Command Prompt or PowerShell. Don’t worry! I’ll provide the code you need to run. Just follow these steps:
- Hit the Windows key on your keyboard and type PowerShell.
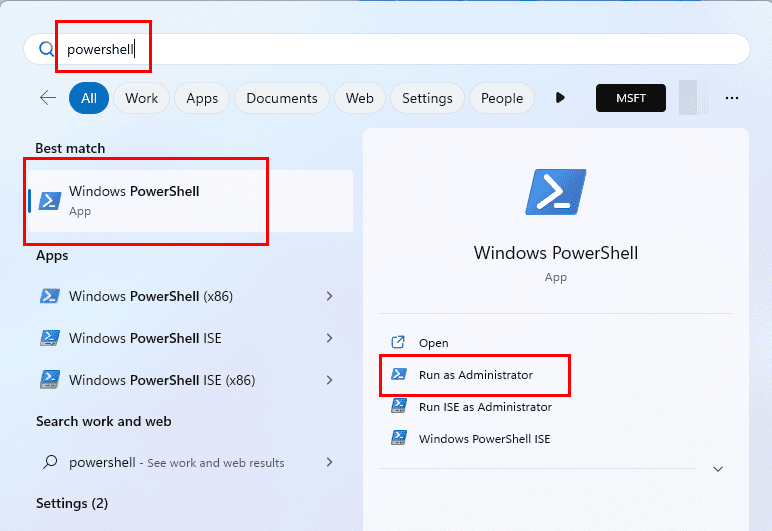
- Whichever Windows terminal app you open, you must run them as an administrator.
- Now, copy and paste the following code onto the terminal app:
powershell -windowstyle hidden -command "Start-Process cmd -ArgumentList '/s,/c,REG Delete HKLM\SOFTWARE\Microsoft\Windows\CurrentVersion\Policies\System /V HideFastUserSwitching /F & REG Delete HKCU\Software\Microsoft\Windows\CurrentVersion\Policies\System /V HideFastUserSwitching /F & taskkill /f /im explorer.exe & start explorer.exe' -Verb runAs"
- Hit Enter to activate fast switching of Windows 11 users.
- If you want to deactivate the feature, just use the following command:
powershell -windowstyle hidden -command "Start-Process cmd -ArgumentList '/s,/c,REG ADD HKLM\SOFTWARE\Microsoft\Windows\CurrentVersion\Policies\System /V HideFastUserSwitching /T REG_DWORD /D 00000001 /F & REG Delete HKCU\Software\Microsoft\Windows\CurrentVersion\Policies\System /V HideFastUserSwitching /F & taskkill /f /im explorer.exe & start explorer.exe' -Verb runAs"
How to Use Fast User Switching
There are many ways to log in to another Windows 11 user account without logging out of the existing session. The following are the most effortless ones:
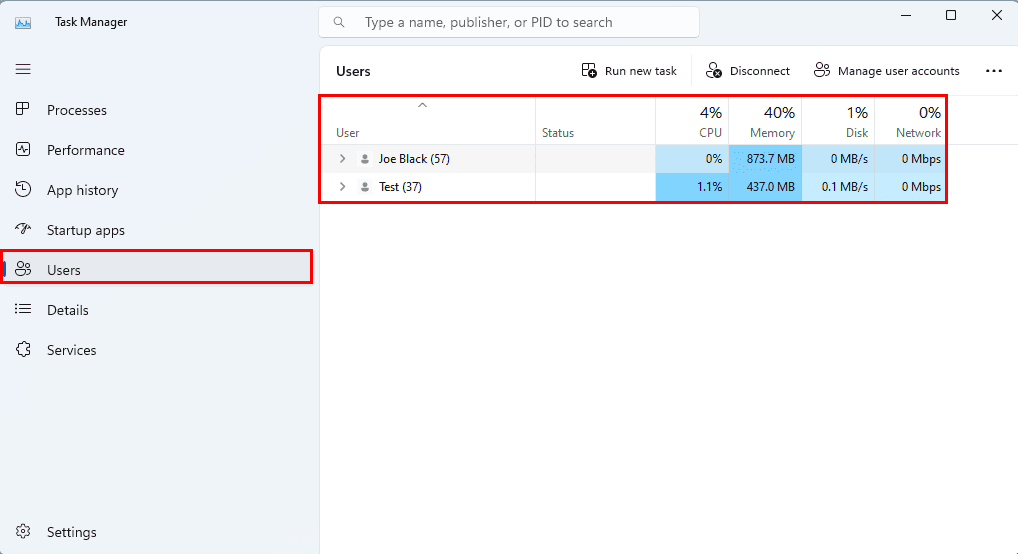
Switch User Accounts From Task Manager
- Open the Task Manager by pressing Ctrl + Shift + Esc altogether.
- Now, click the Users icon to navigate to the Users section on Task Manager.
- You should see all the added user accounts there.
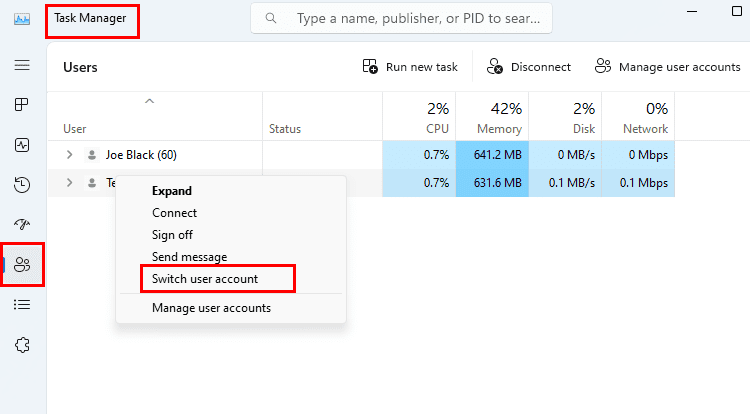
- Right-click on the user account you want to switch to and select Switch user account from the context menu.
- You’ll now see the login screen of Windows 11.
- Enter the password for your other account to log in.
If you don’t find the above feature on a dated Windows PC, you can use the next method.
Switch User Profile From Start Menu
- Click the Windows flag or Start menu.
- You should see your User Account avatar or profile picture in the bottom left corner.
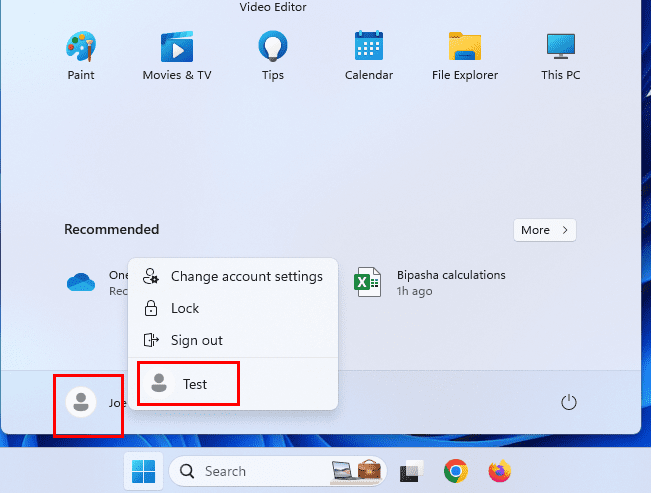
- Right-click on the avatar or user profile.
- On the next menu that opens, click the alternative user account to which you want to log in.
- Enter the password and complete the login process.
Fast User Switching FAQs
How do I enable or disable fast user switching in Windows 11?
The feature is usually by default active on your Windows 11 PC. If you’re unable to switch to a different user account without logging out of the existing one, follow any of the three methods mentioned earlier in this article.
What is the fast user switching feature?
You no longer need to stop your work in the middle to let another employee sign in to a share Windows 11 or 10 PC when you use quick switching of accounts. Windows 11 or 10 keeps your work and apps running in the background. However, the new user isn’t able to see your work, apps, or documents.
Is there a limit to fast user switching Windows 10 or 11?
There is no limit on the number of users you can fast switch on your Windows 11 or 10 PC. However, more than two user accounts, while logged in simultaneously, will seriously impact the performance of the system. All the user accounts use CPU, HDD read and write bandwidth, RAM, Network, and GPU. Thus, the Windows PC must distribute the entire reserve to all the user accounts currently logged in and becomes sluggish. You must enhance the CPU, GPU, and RAM to use fast switching effortlessly.
Also read: Best CPUs for Video Editing 2022
What are the disadvantages of Fast User Switching on Windows 11?
No doubt the feature is truly excellent in home, business, or school setups where different users share a common computer. The feature is also useful for software, website, and mobile app developers. However, it also has some drawbacks and these are as outlined here:
- The cost of the device increases as you need to invest in additional RAM, CPU, and GPU power
- If two or more users are using one specific app and one of them trying to update the app, the update may not work
- Even if the update works, the users will face different issues with the software until you perform a complete system restart
- Shutting down the PC from one profile will force stop all the processes on other logged-in user accounts
Conclusion
So, this is how you can use the Fast User Switching feature on Windows 11. Depending on your technical expertise, choose the method that you think is the easiest for you. If you know another cool way to switch user accounts quickly without stopping work, do share that in the comment section. Don’t forget to share this article on your social media handles to help your fans, friends, and colleagues.
Next up, how to enable or disable User Account Control (UAC) in Windows. You may also want to explore how to add a new user account to Windows 11.


On both examples, moving form step 3 to step 4 is not properly explained
FINALLY — this worked!!!!!!!!!!!!!!!!!! Been scouring the net for solutions — this one so easy.
@R Torbert
The 32 bit vs 64 bit has to do with the length of the value, nothing to do with the OS.
if you need a 32 bit value you would still use 32-bit.
In the regedit option, if your system is 64-bit… would you still select “New DWORD 32-bit value“?
There is a “New DWORD 64-bit value“ … which seems more appropriate for a 64-bit system.
I tried both options and it’s still not working. It only worked once, which was a few days ago, but after I ran some registry cleaner it stopped working. I guess the registry cleaner has deleted some other keys that might be related somehow.
Thank you so much, worked a treat.
thanks a lot you helped me. God bless you
Totally works
this worked, thanks.
Thanks Mitch. I always forget where to find and change this setting. Love the photo of you and the kid. :)
Thank you so very much … was looking for this answer for hours!
I am using Pro but neither option makes a difference, nor the ore the suggested in the comments.
never had a problem with this until recently…. “helpful” update must have sabotaged my setup…. wish they’d just quit screwing with things without notice
Here is the fix
gpedit.msc
computer configuration > administrative templates > system > Logon
Always use classic logon set to enabled.
the switch user icon will now show on lock screen.
Works as described. Thanks!
I try option 2 and found the value called “HideFastUserSwitching”. But it will not allow me to set it to “0” to enable it.
I get the message “Cannot edit HideFastUserSwitching: Error writing the value’s new contents.”
Thanks for publishing such a clear solution! Few things more frustrating than knowing something is there but not being able to find it. Puzzled by finding no “switch user” ability in Win 10 out of the box. Problem solved. Finding this in policy menus is last place I would have looked with my limited Win 10 experience. Went from Win 7 to Win 10 and found I was not in Kansas anymore.
Thanks a lot
The first option won’t work if you have the free Windows 10, you’ll need the “Pro” one because that is the only one that has the file gpedit.msc, the registry editor (regedit) is in almost all (if not all, I don’t know) Windows, so that includes all Windows 10 and makes the second option always work.
Thank you very much
You need the Pro version in Windows 10 to get gpedit.msc
Hi I have no option to “Hide Entry Points for Fast User Switching“.
Looked for half an hour before finding this which worked! (I used the regedit option)
Using Option 1, I get an error message that Windows can’t find “gpedit.msc”. The 2nd option seems to have worked (though I don’t know how I’ll know!). I just exited from the regedit box since I didn’t see a “save” or any other way to leave.
Thanks a lot