• Skip to main content
  • Skip to primary sidebar

Technipages

Tutorials and fixes for smartphone, gadget, and computer problems

  • Topics
    • Android
    • Gaming
    • Hardware
    • Internet
    • iOS
    • MacOS
    • Office
    • Software
    • Windows
    • Definitions
  • Product Reviews
  • Downloads
  • About Technipages

Windows 10: Disable Sticky-Keys Permanently

By Mel Hawthorne 1 Comment

The keyboard shortcut to activate Sticky Keys is to press the shift key five times in a row. When Sticky Keys is activated and triggered, the computer beeps, and a window pops up.

This can be annoying, for example, the sounds can be disruptive if done as a classroom “prank”, and the window opening can even tab you out of a video game at inopportune times. This guide will walk you through how to disable Sticky Keys completely.

Sticky Keys is designed as an Ease of Access tool to allow users to use keyboard shortcuts without having to hold down the control, alt, and shift keys. However, most users that encounter Sticky Keys do so by accident.

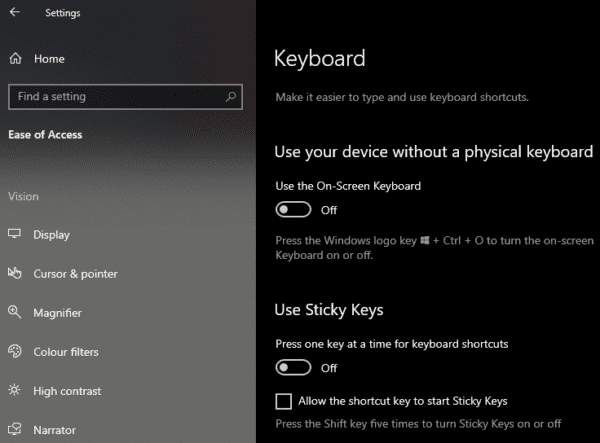
You can disable Sticky Keys is through the Settings app. Press the Windows key, type “Sticky Keys” and hit enter. This will take you to the “Keyboard” tab in the “Ease of Access” settings in the Settings app. To disable Sticky Keys, ensure that both options under Sticky Keys are disabled. “Press one key at a time for keyboard shortcuts”, should be set to off, and “Allow the shortcut key to start Sticky Keys”, should be unticked.

Disable both Sticky Keys settings to stop the shortcut from activating it again.

You Might Also Like

  • Excel: Permanently Disable Compatibility Checker Dialog
    Excel: Permanently Disable Compatibility Checker Dialog
  • iTunes: Permanently Disable iPhone or iPad Backup Process
    iTunes: Permanently Disable iPhone or iPad Backup Process
  • Using Sticky Notes in Windows Vista, 7, And 10
    Using Sticky Notes in Windows Vista, 7, And 10
  • Windows 10 Import/Export Registry Keys From Command Line
    Windows 10 Import/Export Registry Keys From Command Line
  • How To Empty Folders Permanently in Gmail
    How To Empty Folders Permanently in Gmail
  • Turn Off "This will be permanently deleted" Message in Outlook
    Turn Off "This will be permanently deleted" Message in…
  • Facebook: Permanently Delete Messages From Both Sides
    Facebook: Permanently Delete Messages From Both Sides
  • How to Permanently and Easily Delete Any WhatsApp Group
    How to Permanently and Easily Delete Any WhatsApp Group
  • Android: Permanently Turn Off Google Voice Search
    Android: Permanently Turn Off Google Voice Search

Filed Under: Windows

Reader Interactions

Comments

  1. gogo says

    September 29, 2021 at 9:44 am

    it worked

Did this help? Let us know!

Your email address will not be published. Required fields are marked *

This site uses Akismet to reduce spam. Learn how your comment data is processed.

Primary Sidebar

Recent Posts

  • Windows 11: How to Add Clocks with Different Time Zones
  • Google Assistant: How to Never Miss a Birthday
  • Windows 11: How to Disable Notifications and Ads
  • How to Use Oculus Quest 2 Air Link
  • How to Create an Avatar in the Oculus Quest 2
  • 5 Free and Fun Math Apps for Kids
  • Windows 11: How to Discover What Graphics Card You’re Using
  • How to Change Display Resolution on Windows 10 and 11

Who’s Behind Technipages?

Baby and Daddy My name is Mitch Bartlett. I've been working in technology for over 20 years in a wide range of tech jobs from Tech Support to Software Testing. I started this site as a technical guide for myself and it has grown into what I hope is a useful reference for all.

You May Also Like

  • Windows 95/98
  • Microsoft Windows NT
  • Microsoft Windows
  • Microsoft Windows 95
  • Windows Media Player (WMP)
  • Top 8 Itunes Alternatives for Windows

© Copyright 2022 Technipages · All Rights Reserved · Privacy