• Skip to main content
  • Skip to primary sidebar

Technipages

Tutorials and fixes for smartphone, gadget, and computer problems

  • Topics
    • Android
    • Gaming
    • Hardware
    • Internet
    • iOS
    • MacOS
    • Office
    • Software
    • Windows
    • Definitions
  • Product Reviews
  • Downloads
  • About Technipages
Slack: How To Create a New Channel

Slack: How To Create a New Channel

Posted on January 25, 2021 by Mel Hawthorne Leave a Comment

Slack is a chatroom type app designed primarily for use by businesses. The concept of having a single overarching server simplifies managing multiple communications platforms across the company. Simultaneously, each team and project can have their own channels allowing targeted discussions that can relatively easily be kept on topic.

The channels are a key part of Slack’s popularity and usefulness as they allow discussions to be kept on topic. If a channel is facing too much off-topic chatter, this can be split into a new channel. People can be added to channels relevant to their work and then can choose to join other interest-based channels. The creation of channels that aren’t specifically team-based also encourages wider communication and relationship building in the company.

How to Make a New Channel on Slack

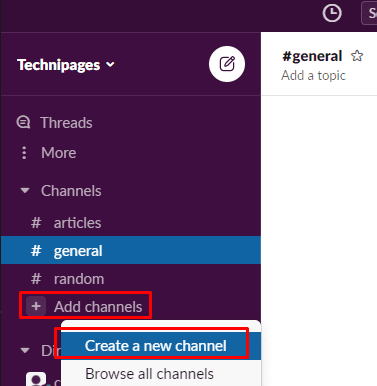
To add a new channel, you first need to click “Add channels.”  It’s at the bottom of the “Channels” section in the sidebar, then select “Create a new channel.”

Tip: Only users with the correct permissions can create channels. If you can’t see the option, you may need to ask someone else to make channels for you.

To add a new channel, click “Add channels” at the bottom of the “Channels” section. It’s in the sidebar, then select “Create a new channel.”

In the channel creation window, enter a name for the channel and a description.

Tip: Ideally, the channel name should be somewhat descriptive of what the channel is about. For example, a team channel should be named after the team, a project channel after the project name, an interesting channel after the interest, etc.

Select if the channel is private or public with the “Make private” slider. Public channels can be joined by anyone in the workspace. In contrast, private channels can’t be seen if you’re not a member and can only be joined by invitation. Once you’re happy with the new channel’s configuration, click “Create” to create the channel.

Choose a channel name and description. Then mark the channel as public or private.

Slack channels are a great way to organize communication in a workspace to manage crosstalk. However, only users with the correct permissions can create new channels. If you follow the steps in this guide, you’ll be able to create your own channels.

You Might Also Like

  • How To Create Private Channel in Slack
    How To Create Private Channel in Slack
  • How to Create a Channel on Telegram
    How to Create a Channel on Telegram
  • Slack: How to Archive a Channel
    Slack: How to Archive a Channel
  • Slack: How To Rename a Channel
    Slack: How To Rename a Channel
  • Slack: How To Add a New Channel Prefix
    Slack: How To Add a New Channel Prefix
  • Slack: How To Configure Who Can Use “@Everyone”, “@Channel”, and “@Here”
    Slack: How To Configure Who Can Use “@Everyone”, “@Channel”,…
  • Slack: How To View Channel Analytics
    Slack: How To View Channel Analytics
  • Slack: How To Make an Existing Channel Private
    Slack: How To Make an Existing Channel Private
  • Slack: How To Manage Channel Management Permissions
    Slack: How To Manage Channel Management Permissions

Filed Under: Software Tagged With: Slack

Reader Interactions

Did this help? Let us know!

Your email address will not be published. Required fields are marked *

This site uses Akismet to reduce spam. Learn how your comment data is processed.

Primary Sidebar

Recent Posts

  • Windows 11: How to Add Clocks with Different Time Zones
  • Google Assistant: How to Never Miss a Birthday
  • Windows 11: How to Disable Notifications and Ads
  • How to Use Oculus Quest 2 Air Link
  • How to Create an Avatar in the Oculus Quest 2
  • 5 Free and Fun Math Apps for Kids
  • Windows 11: How to Discover What Graphics Card You’re Using
  • How to Change Display Resolution on Windows 10 and 11

Who’s Behind Technipages?

Baby and Daddy My name is Mitch Bartlett. I've been working in technology for over 20 years in a wide range of tech jobs from Tech Support to Software Testing. I started this site as a technical guide for myself and it has grown into what I hope is a useful reference for all.

© Copyright 2022 Technipages · All Rights Reserved · Privacy