When developing software, having a fully-featured development environment is key to having a good workflow. Eclipse is a well-respected Integrated Development Environment (IDE) that is ideal for application development in languages such as C, C++, Java and more.
So how can you install Eclipse in Windows 10?
There are several different versions of Eclipse available from the Eclipse downloads page, all with different features and functions. Make sure you choose the one best suited for your needs and proceed with that version. The exact installation process might vary for some of them, but for the most part, should follow the steps below.
Once you’ve downloaded your chosen version of Eclipse from the site, run the installer by executing the file you downloaded. If you’re missing the Java virtual machine, you will be prompted to install a JDK (Java Development Kit).
Should you have a Java virtual machine installed already, and it wasn’t identified, you can search for the Java virtual machine on your hard drive by clicking “Yes” when prompted to do so. Alternatively, if you click “No”, a page will open with links to the download pages of a range of different JDK versions.
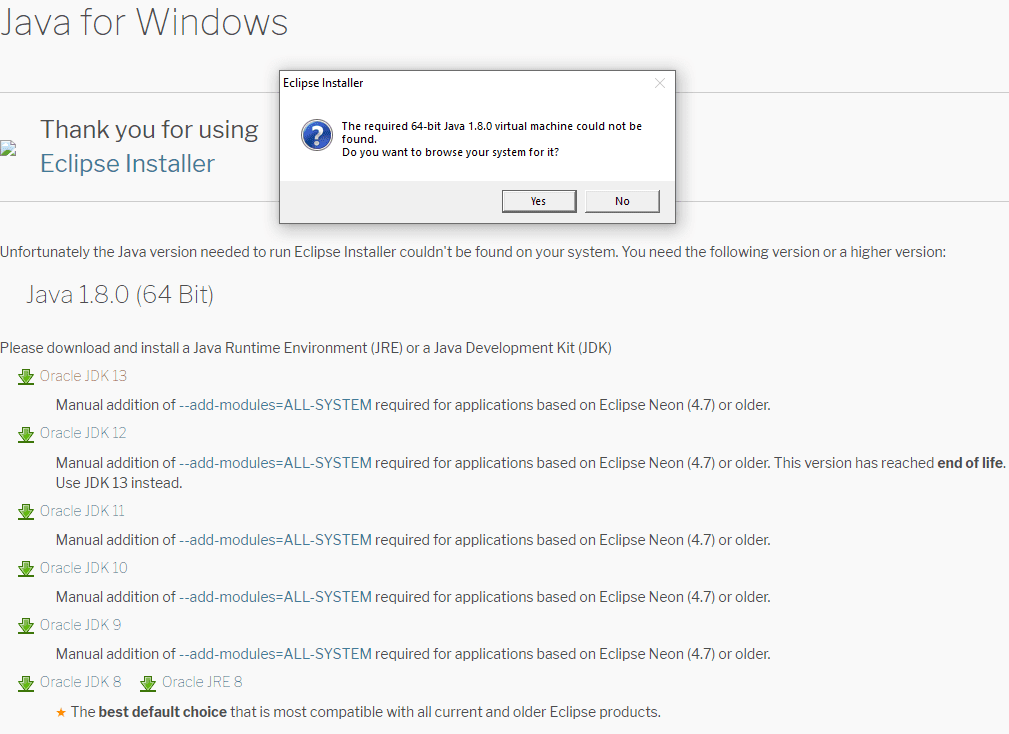
Tip: To find out how to install JDK, click on this link and follow the instructions from Oracle there. Depending on the software on your PC, you likely won’t need to do this.
Once you’ve configured the Eclipse installer to use the JDK you can proceed with the Eclipse installation. If you chose the generic installer, you now have to choose which type of package you want to install.
Your package choice should be based on the programming language you are intending to develop in. If you are a Java developer, you’ll need to choose one of the Java packages, if you’re a PHP developer you’ll need to install the PHP package, etc.

Once you’ve chosen which package to install by clicking on the relevant option, the next screen will allow you to configure your installation options. The options available are the installation folder, the path to the Java virtual machine, and tick box options for the creation of a start menu entry and a desktop shortcut.
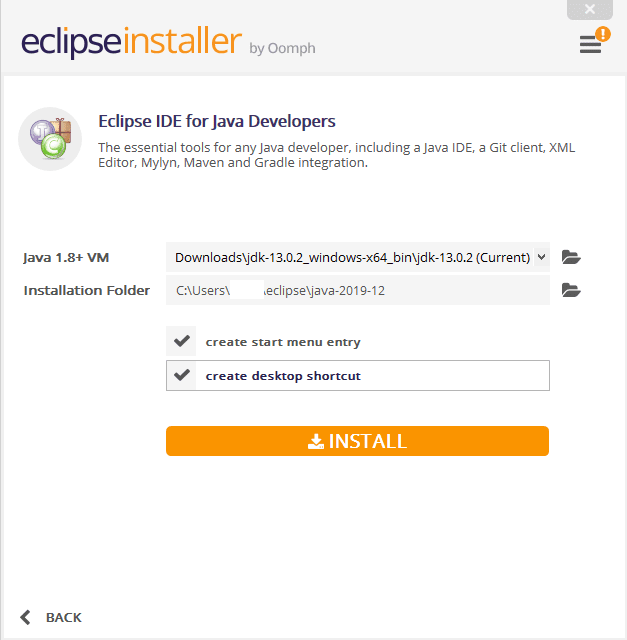
Once you have configured the installation options as necessary, click “Install” to install Eclipse. During the installation process, you may be required to review and accept a number of licences to continue.
Tip: These will depend on the packages and versions you chose in previous steps.
You may also be required to trust some certificates from Sun Microsystems and the Eclipse Foundation for code signing purposes. Certificates from those two sources are trustworthy here – you need to accept them to use the program.

Once the installation is complete, you can launch Eclipse either by clicking “Launch” in the installer window, by typing “Eclipse” into the start bar and pressing enter or by double-clicking the desktop icon.