• Skip to main content
  • Skip to primary sidebar

Technipages

Tutorials and fixes for smartphone, gadget, and computer problems

  • Topics
    • Android
    • Gaming
    • Hardware
    • Internet
    • iOS
    • MacOS
    • Office
    • Software
    • Windows
    • Definitions
  • Product Reviews
  • Downloads
  • About Technipages
How to View XPS Documents in Windows 10

How to View XPS Documents in Windows 10

By Mel Hawthorne 4 Comments

One of the most popular formats for sharing documents is PDF. This is because the document looks and acts the same wherever you view it, on any device or reader. The immutability of the formatting makes PDF ideal for published documents and reports, leading to its popular usage in business.

When Windows Vista released in 2007, Microsoft included a new competing standard called XPS. Standing for XML Paper Specification, XPS was designed to perform most of the same tasks. There aren’t too many differences in terms of the practical usability or feature sets between the two.

The XPS format never really took off however and has slowly been abandoned by Microsoft. With the Windows 10 April 2018 update, the default XPS file viewer was removed from new installations, although it was not removed from computers that updated from any previous version of Windows 10.

If you’re one of the people that still has to or wants to use the XPS format, then this would be quite annoying. There is a way to manually re-install the XPS viewer though.

How to view XPS documents in Windows 10

To install the XPS viewer, you need to add the feature via the Settings app. You can open the Settings app to the right page by pressing the Windows key, typing “Manage optional features” and hitting enter.

Press the Windows key, type “Manage optional features” and hit enter, to open the Settings app to the right page.

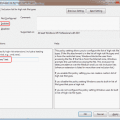
If the list of installed features includes “XPS Viewer” then the viewer is already installed. If the XPS Viewer feature is not installed, you need to click the “Add a feature” button in the top-left corner.

To add XPS Viewer, click on the “Add a feature” button in the top-left corner.

Use the search function or scroll to the bottom of the alphabetically sorted list to find “XPS Viewer”. Tick the relevant checkbox and click “Install” to start downloading the feature.

Find the “XPS Viewer” in the list, tick the relevant checkbox, then click install.

Once the XPS Viewer is downloaded, you can open it via the Start Menu by pressing the Windows key, typing “XPS Viewer” and hitting enter. Then you just need to open any XPS document you want to view. Alternatively, the “xps” and “oxps” file extensions should be registered to the XPS Viewer app, so you should be able to double click on an XPS file in File Explorer to open them.

Tip: You don’t need to restart your computer to be able to start using the XPS Viewer app.

You Might Also Like

  • How to View Multiple Documents at Once in Sublime Text 3
    How to View Multiple Documents at Once in Sublime Text 3
  • Windows 10: Block Apps from Accessing Your Documents
    Windows 10: Block Apps from Accessing Your Documents
  • Canon Pixma MX340: Scan Documents (Windows)
    Canon Pixma MX340: Scan Documents (Windows)
  • Troubleshooting XPS Documents Not Opening
    Troubleshooting XPS Documents Not Opening
  • Convert Excel Documents to PDF Format
    Convert Excel Documents to PDF Format
  • How to Scan Documents Using Android Camera
    How to Scan Documents Using Android Camera
  • Troubleshooting Printer Says Documents Are Waiting
    Troubleshooting Printer Says Documents Are Waiting
  • How to Synchronise Scrolling for Multiple Documents in Notepad++
    How to Synchronise Scrolling for Multiple Documents in…
  • How to Hide Pictures, Videos, and Documents on Android
    How to Hide Pictures, Videos, and Documents on Android

Filed Under: Windows

Reader Interactions

Comments

  1. kev says

    September 19, 2021 at 3:41 am

    Thank you., I never would’ve thought it’s already there, you just need to “install it” What the heck!!!

  2. TRUC CHI PHAM says

    August 12, 2021 at 1:58 pm

    I did the same thing, but the installation is failed. how can i troubleshoot it?

  3. Susan says

    January 29, 2021 at 6:17 pm

    Yes, thank you!

  4. ConsumerRep says

    January 3, 2021 at 1:47 pm

    Thank you! This is a godsend. Migrating to a new desktop from my 2006 Gateway PC with Windows XP to a 2020 Lenovo Windows 10 has been a bit of a problem. I still can not load my Lotus 123 software, and have had to do work arounds.

Did this help? Let us know!

Your email address will not be published. Required fields are marked *

This site uses Akismet to reduce spam. Learn how your comment data is processed.

Primary Sidebar

Recent Posts

  • Windows 11: How to Fix Windows 11 Won’t Connect to a Network
  • What to Do When Firefox Won’t Load a Page
  • Chrome: How to Refresh Various Tabs Simultaneously
  • The Latest Foldable Phones – A Look At The Huawei Mate X2
  • Everything Announced at Google I/O 2022 That You Should Care About
  • How to Build the Best High-Spec PC for Your Budget
  • Google Shows Off Pixel 7 and Pixel Watch Ahead of Fall Launch
  • Windows 11: How to View Saved Passwords

Who’s Behind Technipages?

Baby and Daddy My name is Mitch Bartlett. I've been working in technology for over 20 years in a wide range of tech jobs from Tech Support to Software Testing. I started this site as a technical guide for myself and it has grown into what I hope is a useful reference for all.

You May Also Like

  • Windows 95/98
  • Microsoft Windows NT
  • Microsoft Windows
  • Microsoft Windows 95
  • Windows Media Player (WMP)
  • Top 8 Itunes Alternatives for Windows

© Copyright 2022 Technipages · All Rights Reserved · Privacy