
Sometimes, the unexpected happens. Despite regularly backing up your files and folders, you just can’t locate a specific file that seems to have vanished into thin air. But before paying for premium third-party data recovery programs, install Microsoft’s Windows File Recovery tool. File Recovery is actually a command-line app that you can download from the Microsoft Store. The tool is compatible with Windows 10 build 19041 or later.
Contents
Learn More About Windows File Recovery
The tool doesn’t have an appealing graphical interface, but you shouldn’t let that detail get in the way. Windows File Recovery can successfully recover lost or deleted files from your internal drives, external drives, as well as USB drives.
In other words, if you can’t restore deleted files from the Recycle Bin, File Recovery is up to the task. However, the tool can’t recover data from cloud storage. It doesn’t support Network file shares either.
Keep in mind that File Recovery doesn’t offer any guarantees. Prevention is better than cure, and that’s why you should back up your data regularly.
Increase Your Chances of Recovering Deleted Files
Once you remove a file from your computer, Windows marks the space used by that file as free space. The good news is that the data associated with the deleted file may still exist on that drive. But other apps and programs can use that space to save and store their own data. In other words, if you want to increase the chances of successfully recovering lost data, you should avoid using your computer until your run File Recovery.
How to Use Windows File Recovery
- First things first, download the app from the Microsoft Store. Hit the Install button.
- Then type File Recovery in the Windows search box and select the Windows File Recovery app.
- Let the app make changes to your device.
- The Command Prompt window should now be visible on the screen.
- Run the following command structure:
winfr source-drive: destination-drive: [/mode] [/switches] - Use Regular or Extensive recovery mode.
Let’s Take an Example
Let’s say you want to recover your Pictures folder in Regular mode. To do that, run the following command: Winfr C: D: /regular /n \Users\UserName\Pictures\
This command instructs your computer to recover all the images from the Pictures folder stored on your C drive and restore them on the D drive.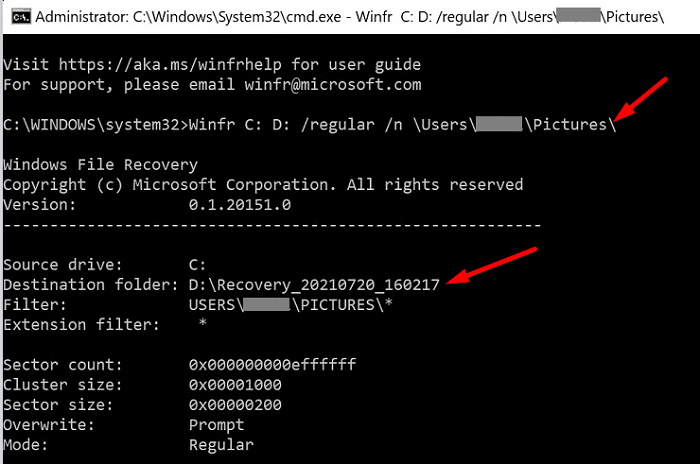
Let’s say you want to recover only your JPEG photos from the Pictures folder and move them to your recovery folder on the D drive. To do that, you need to run this command: Winfr C: D: /extensive /n \Users\UserName\Pictures\*.JPEG

The app automatically creates a recovery folder on the destination drive called Recovery_<date and time>.

Regular vs. Extensive Recovery Mode
There are two recovery modes that you can use: Regular or Extensive. The Regular mode allows you to recover specific files, such as PDF and Word files. In other words, you can better filter the results.
The Extensive mode lets you use more general filters to recover data. At the same time, it performs a more thorough search. For example, you can use this mode to recover all the file types that contain “payment” in their name. Or you can recover a specific file type, such as Excel files, JPEG images, and so on.
Keep in mind that recovering files in Extensive mode usually takes longer than Regular mode. If you can’t recover your files and folders in Regular mode, switch to Extensive mode.
If the file you’re trying to recover has recently been deleted, start with Regular mode. But if you deleted it a few days or weeks ago, or you’re trying to restore it after formatting your disk, use Extensive mode.
Important Notes
- When you specify a folder name in the File Recover command, you need to add a backslash at the end of the folder.
- The source and destination drives must be different. You can’t recover data you deleted from the C drive and restore it on the same drive. If you only have one drive on your machine, use an external hard drive as the destination drive.
- If a file or folder name contains spaces, surround it with quotes. Make sure to include the file name extension as well.
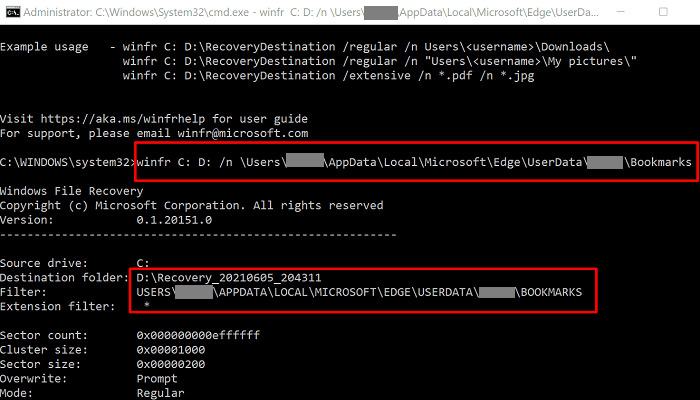
By the way, did you know that you can use Windows File Recovery to restore deleted Microsoft Edge favorites?
Conclusion
Windows File Recovery can recover deleted files and folders from internal, external, or USB drives. Keep in mind that the source and destination drives must be different. To increase the chances of recovering lost data, avoid using your machine until your run File Recovery.
Have you ever used Windows File Recover to restore deleted files and folders? How did the whole process go? Tell us more about your experience in the comments below.