Hello, gaming enthusiasts! Today, we’re going to explore an exciting topic that combines two of the biggest names in the gaming industry: Nintendo and Steam Deck. If you’ve ever wondered if you could use your Nintendo controls on your Steam Deck, you’re in the right place. In this blog post, we’ll guide you through the process of setting up and using Nintendo controls on your Steam Deck. Let’s dive in!
Contents
What is Steam Deck?
Before we delve into the details, let’s briefly discuss what Steam Deck is. Steam Deck is a handheld gaming device developed by Valve Corporation. It’s essentially a portable PC that allows you to play your Steam games wherever you want. It comes with a custom APU developed by AMD for handheld gaming, a 7″ touchscreen, and full-sized controls. It also has a dock that provides more connectivity options and allows you to connect it to a larger display.
Why Use Nintendo Controls on Steam Deck?
Nintendo has a long history of creating innovative and comfortable controllers, from the classic GameCube controller to the versatile Joy-Cons of the Nintendo Switch. If you’re a Nintendo fan who has recently purchased a Steam Deck, you might find the familiarity and comfort of Nintendo’s controllers appealing. Plus, it’s always great to have options and versatility in your gaming setup.
How to Use Nintendo Controls on Steam Deck
Now, let’s get to the main topic of this blog post. Here’s a step-by-step guide on how to use Nintendo controls on your Steam Deck:
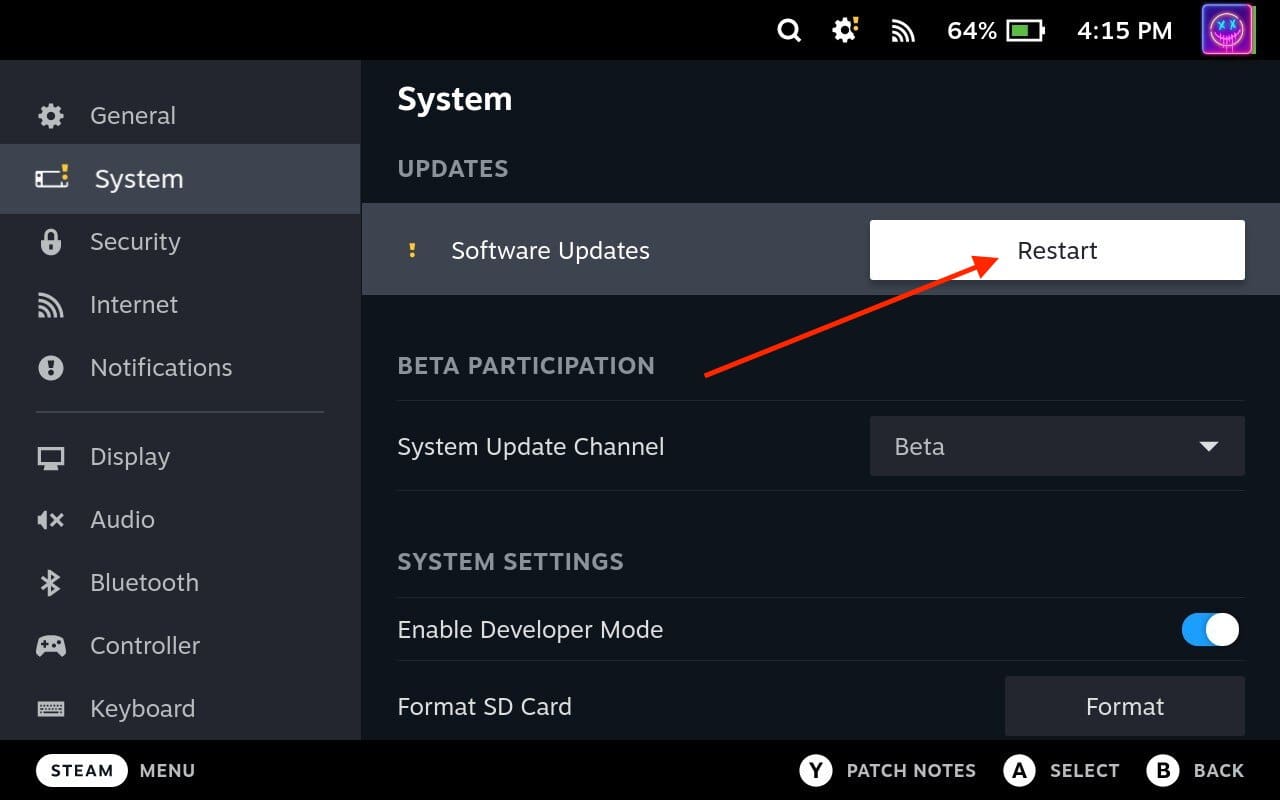
- Update Your Steam Deck: Before you start, make sure your Steam Deck is updated to the latest version. Valve is constantly releasing updates to improve compatibility and functionality, so it’s always a good idea to keep your device updated.

- Connect Your Controller: To connect your Nintendo controller to your Steam Deck, you’ll need to put your controller into pairing mode. For Nintendo Switch Joy-Cons or Pro Controller, you can do this by pressing and holding the Sync button until the LED lights start flashing.
- Pair Your Controller: On your Steam Deck, navigate to the Bluetooth settings. Here, you should see your Nintendo controller listed under available devices. Click on it to pair.
- Configure Your Controller: Once your controller is paired, you’ll need to configure it for use with Steam. Navigate to the Steam Big Picture Mode, go to ‘Settings’, then ‘Controller Settings’. Here, you can enable support for Switch Pro Controller or Generic Gamepad Configuration Support, depending on your controller.
- Customize Your Controls: In the same Controller Settings menu, you can also customize your controls. You can map the buttons on your Nintendo controller to correspond with the controls in your Steam games.

- Start Gaming: Once your controller is set up and configured, you’re ready to start gaming! Launch your favorite Steam game and enjoy playing with your Nintendo controller.


And that’s it! You’ve successfully set up and used a Nintendo controller on your Steam Deck.
Conclusion
Using Nintendo controls on your Steam Deck is a great way to enhance your gaming experience, especially if you’re already familiar with Nintendo’s innovative and comfortable controllers. With this guide, you should be able to easily set up and use your Nintendo controller with your Steam Deck.
Remember, the Steam Deck is more than just a gaming console. It’s a powerful handheld PC that allows you to do much more than just play games. So, explore, experiment, and make the most out of your Steam Deck.
Stay tuned for more tips and tricks on how to get the most out of your gaming devices. Happy gaming!
Please note that the Steam Deck’s interface and functionality may change with updates and different versions of the software. Always refer to the latest official Valve Corporation resources and your device’s manual for the most accurate, up-to-date information.