What’s worse than a computer that shuts down unexpectedly? One that fails to start properly. Yes, both prospects are pretty scary, especially when there’s so much at stake on your machine and you lack the usual GUI comforts of the operating system.
If you’re getting the “Your Computer Was Unable to Start” error, this article will provide you with a few ways to troubleshoot it and hopefully have you back to normal soon.
Contents
What Causes This Error?
There are many possible causes for this serious error, both software- and hardware-related. Some major ones include:
- Missing or corrupted system files, which also applies to boot files like Boot Configuration Data (BCD) and Master Boot Record (MBR)
- A failed or incomplete Windows Update
- Failing hardware or drivers attached to them
- Malware or viruses
With such a variety of causes and the nature of this error, you’ll need to rely on the Advanced Startup Tools.
How to Fix “Your Computer Was Unable to Start” Error
Let’s get started on the different solutions to the error. It’s worth trying each until things are back to normal.
Initial Steps
Here are some steps that might seem obvious, but are often forgotten, and save a lot of time:
- Begin by restarting your machine and see if the error persists.
- Check that all necessary hardware is properly plugged in and healthy.
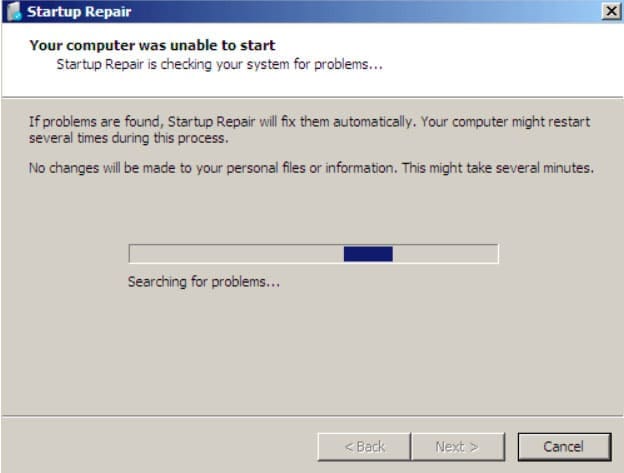
- Allow the Automatic Repair process that runs with the error message to do its thing. It might solve your issue, even if it takes a while.
Startup Repair
Now we’ll turn to Advanced Startup. To enter this mode without Windows, simply reboot your PC three times, and it will appear. Try this if the automatic repair didn’t fix things. Here’s what to do:
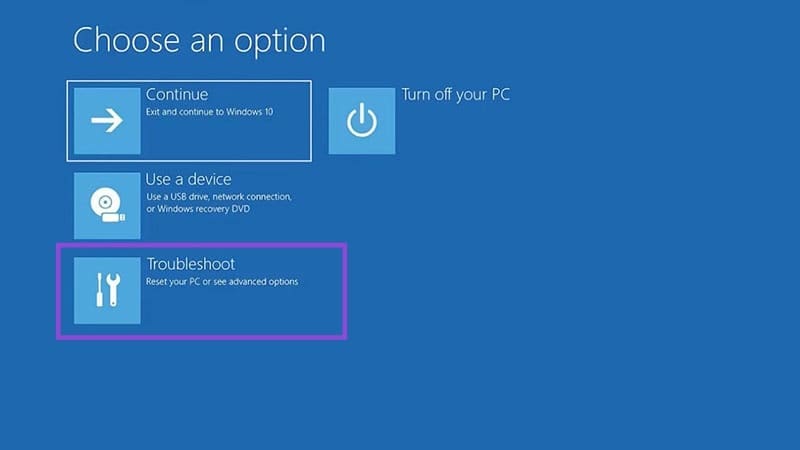
Step 1. Click the “Advanced options” button.
Step 2. Choose “Troubleshoot.”
Step 3. Select “Startup Repair.”

Step 4. The tool will try to identify problems. You’ll need to enter your login details to proceed.
Step 5. Once Startup Repair is finished, restart your device.
Safe Mode
If you suspect faulty drivers (recently installed ones might be to blame), then you can attempt to boot into Safe Mode (which keeps only system essentials running) and remove them. Here’s how:
Step 1. Choose “Troubleshoot.”
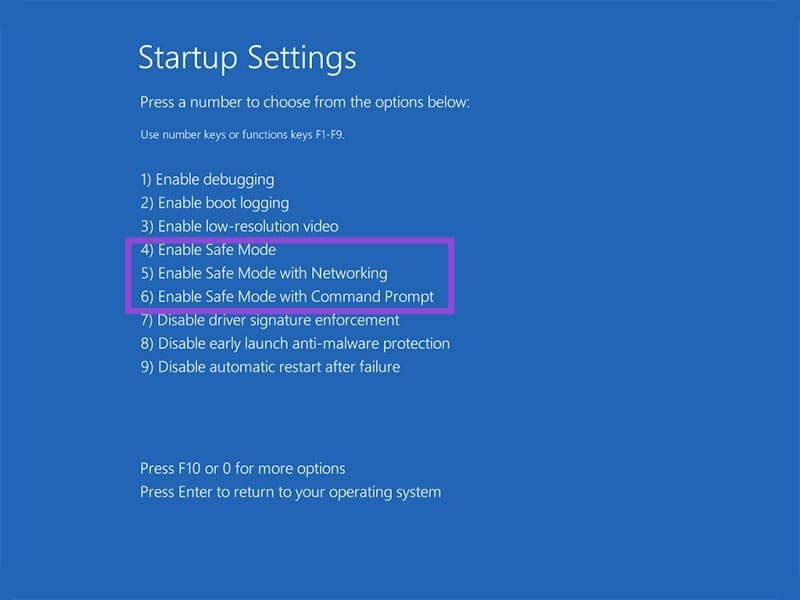
Step 2. In “Advanced Options,” choose “Startup Settings.”
Step 3. Numbers 4 through 6 of the Startup Settings will all work for the task, with 4 being the simplest form of Safe Mode. Press the one you want.
Step 4. Uninstall or roll back any recent changes to your machine and restart once done.
Repair via Command Prompt
For Boot Configuration problems, like BCD and MBR, you can try the Command Prompt to repair them. Here’s how:
Step 1. Click “Command Prompt” in “Advanced options.”
Step 2. Type the following, pressing “Enter” after each one: “bootrec/fixmbr” then “bootrec/fixboot” then “bootrec/rebuildbcd.”
Step 3. Restart your machine once done.
System Restore

If you can’t quite put your finger on what might be causing the issue, but know it’s probably software-related, you can attempt a system restore to a previous state, provided you have a backup saved:
Step 1. In the “Advanced options” menu, click the “System Restore” button.
Step 2. Any restore points will be displayed. Choose the one you want and press “Next.”
Step 3. Press “Scan for affected programs” to check for offending programs.
Step 4. Press “Finish” to begin the restore.
Reset or Get Help
If all else fails, you can then either reset your PC or take it to a professional for repair. Before attempting anything this drastic, try to recover as many important files as you can.