Any Blue Screen of Death (BSOD) is an unwelcome one, but the next step after the shock is to try and troubleshoot the issue. There are many things that’ll trigger a BSOD, but in this article, we’ll be looking at what causes it and how to fix “Page fault in nonpaged area” BSOD.
Contents
What Causes This Error?
While the reasons that cause the BSOD for “Page fault in nonpaged area” are many, the final failure is a result of a memory issue. “Error Code 0x00000050 PAGE_FAULT_IN_NONPAGED_AREA” occurs specifically when your PC tries to access memory for essential systems and processes that simply aren’t there, triggering the emergency shutdown.
Some of the causes of this error include:
- The RAM chips themselves are faulty
- System files or drivers are corrupted
- Other hardware components (like the hard disk) are failing
- Software conflicts
- A virus or other form of malware
How to Fix “Page Fault in Nonpaged Area”
Now that you know a bit more about the BSOD, let’s get on with solving it with a few fixes:
Restart Your Machine
Memory leaks are a problem on a PC that’s been running for a long time. A quick restart after the error (and occasionally when there is no error) will work wonders for resolving erratic behavior from your machine and any memory issues.
Check Your RAM
Seeing as this BSOD is primarily a RAM issue, a big culprit in the “Page Fault in Nonpaged Area” error can be the RAM chips themselves. RAM doesn’t last forever, and yours might be in need of replacement. Open up your PC and check that they aren’t too dusty either. A professional should be able to tell you whether or not your RAM needs replacing.
To check the health of your memory, you can use the Memory Diagnostic tool too. Here’s how:
Step 1. Type “Windows Memory Diagnostic” into the search bar.
Step 2. A window will pop up with two options: restart the machine now or at a later stage.
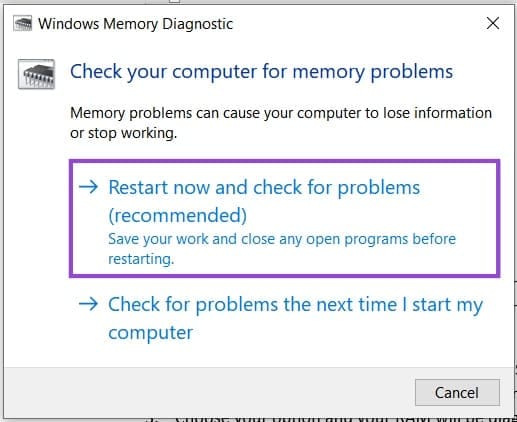
Step 3. Choose your option and your RAM will be diagnosed when you restart next.
Run a Disk Check
A faulty or corrupted hard drive can also be the source of memory problems. For a preliminary scan and repair, you can run both the Disk Checker and the SFC file scan to detect and repair. Here’s what to do:
Step 1. Open the Run Dialog (Win + R) and type “cmd” before pressing (Ctrl + Shift + Enter) to run as Admin.
Step 2. In Command Prompt, check your main OS disk by typing in the following: “chkdsk [drive letter]: /f /x /r” and pressing “Enter.” The check will run.
Step 3. In Command Prompt, begin the disk check by typing “sfc/scannow” and hitting “Enter.” The process will run, check for errors, and attempt fixes.
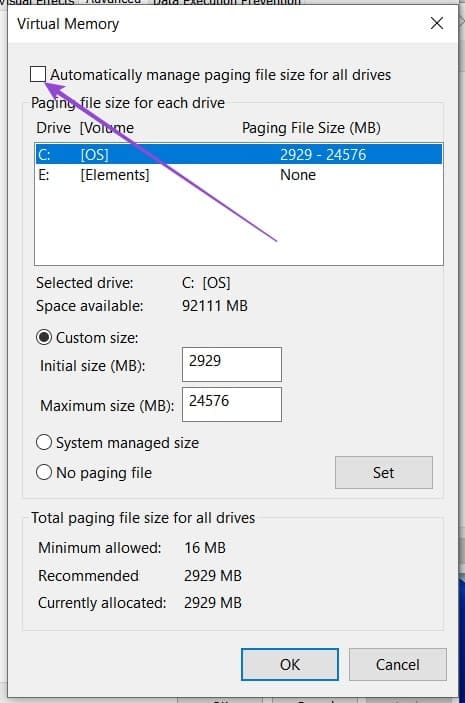
Reset Automatic Paging
The Windows OS itself might be to blame for your memory issues, as it manages memory. Resetting this automatic paging might stop the BSOD. Here’s how to do it:
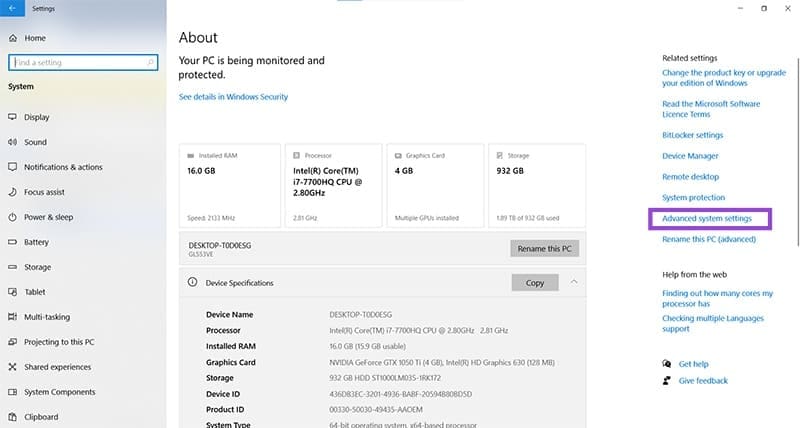
Step 1. Open Settings (Win + I) and navigate to “System.”
Step 2. Choose “About” and look for the blue underlined “Advanced system settings.” This will be on the right in Windows 10 and on the main screen in Windows 11.
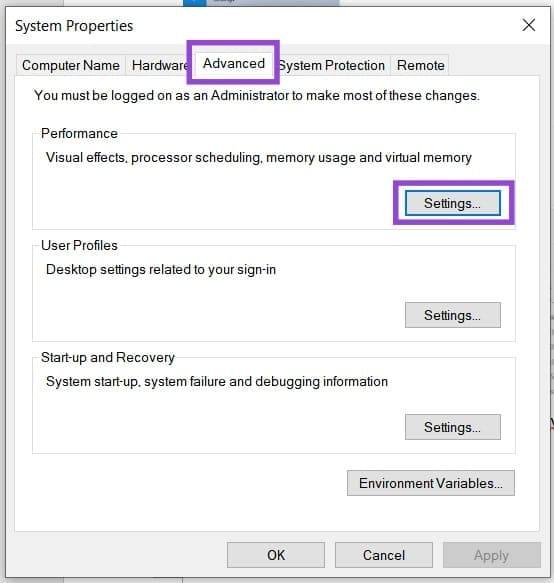
Step 3. A new window will open. Click the “Advanced” and “Settings” under the “Performance” subsection.
Step 4. In the Performance Options window that pops up, click the “Advanced” tab.
Step 5. In the “Virtual Memory” section, click the “Change” button.
Step 6. Ensure that “Automatically manage paging file size for all drives” is unchecked.
You can also set a custom size based on the system’s recommendation, which can actually be a safer method.