Thanks to Narrator, Windows users with vision problems can know what the text on their screen says. This is a huge help, but if you don’t need to have it on, or maybe you turned it on for a friend and can’t remember how to turn it off. Here are the steps to turn it off or on whether you’re using Windows 10 or 11.
Contents
How to Turn Narrator on or off on Windows 10
Even if it’s a feature you don’t use, it’s a good idea to know how to turn it off since you never know when you might activate it by mistake. Or maybe you want to make some changes to it, such as adjusting the voice speed or changing the voice from male to female. Or, perhaps you’re using another app that can do the same job and don’t want the Narrator interfering.
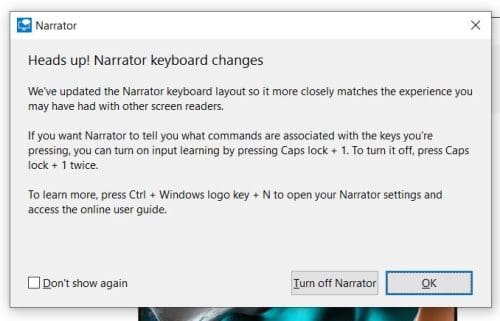
The Windows Narrator can be turned on with keyboard shortcuts by pressing Win + Ctrl + Enter. You can use this combination to turn it on or off. For example, let’s say you pressed these keys, and now Narrator is on. Press the same keys again, and you’ll turn it off.
Turning It off
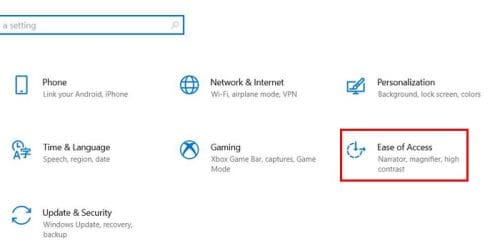
To turn Narrator off, you’ll need to go into Settings. You can do this by clicking on the Windows start menu and clicking on the cogwheel, or you can use the Win + I keys to open Settings. Once you’re in Settings, click on the Ease of Access option. It should be to the right of your screen.
Once in the Ease of Access option, click on the Narrator option on your left. The option to turn it on or off will be at the top. But if you want to make changes, you’ll need to scroll down a bit. You’ll see options to adjust the app’s behavior at startup. For example, you’ll see options to:
- Allow the shortcut key to start Narrator
- Start Narrator after sign-in for me
- Start Narrator before sign-in for everyone
- Show Narrator Home when Narrator starts
- Minimize Narrator Home to the system tray
Personalize Narrator’s Voice
When it comes to changing the voice of the Narrator, you can choose from nine options:

- Microsoft David – English (United States)
- Microsoft Pablo – Spanish (Spain)
- Microsoft Helena – Spanish (Spain)
- Microsoft Laura – Spanish (Spain)
- Microsoft Zira – English (United States)
- Microsoft Mark – English (United States)
- Microsoft David Desktop – English (United States)
- Microsoft Zira Desktop – English (United States)
- Microsoft Helena Desktop – Spanish (Spain)
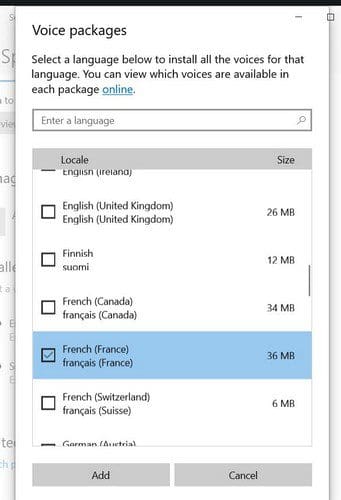
If you want to add more voices, click on the Add more voices option in blue. When you’re in the new window, scroll down a little until you come across the Manage Voices option. Click on the plus icon and choose from the list of languages.
Below these options, you can make other changes, such as voice speed, pitch, and volume. Use the sliders until the setting is correct. There will also be an option you can check the box for so Windows can lower the volume of other apps when the Narrator is speaking, so you don’t miss a single word.

To make things even more comfortable for you, you’ll also see a dropdown menu to choose where you hear the Narrator’s voice. Click on the dropdown menu and select an option.

There are many other changes you can make, such as:
- Change what you hear when you type
- Change the level of context the Narrator provides for buttons and other controls
- Adjust when Narrator provides details about buttons and other controls
- Hear hints on how to interact with buttons and other controls
- Hear the Narrator announce why an action can’t be performed
- Hear only sounds for everyday actions
- Have the Narrator be more efficient in Outlook (experimental)
- Choose keyboard settings
- Create your keyboard commands
- User the Narrator cursor
- Use braille (needs to be installed)
- Manage your data and services
How to Turn off Narrator in Windows 11
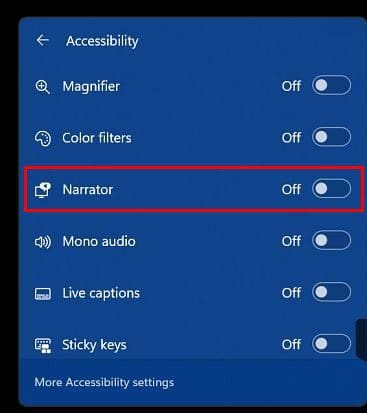
If you’re a Windows 11 user, you can turn off the Narrator by going to Settings by clicking on the Windows Start menu, or you can use the keyboard combination Win + I. Once you’re in Settings, click on Accessibility, followed by the Narrator option. At the top right, you should see the option to toggle the Narrator on or off.

When you click on the dropdown menu for the option, you can choose if you want the Narrator to start before or after you sign in. Check the box for whatever option you might be interested in using.
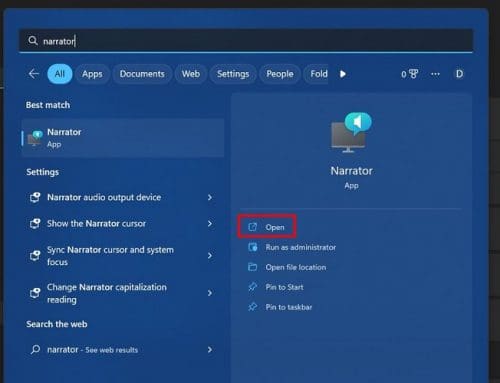
You can also access the Narrator app by searching for it in the search bar and clicking on the open option when it comes up.
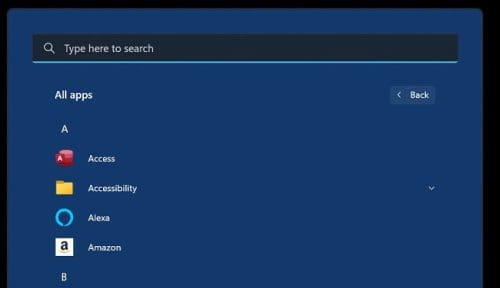
Another option for opening the Narrator app is by clicking on the Windows Start menu. Click on All apps, scroll down to Windows Ease of Access, and click on it. When the additional options appear, you should see the Narrator option.
Open the Narrator from the Quick Settings
Another option you can count on to open the Narrator is Quick Settings. To open it, you can press the Win + A keys. When it opens, click on the Accessibility option.

The Narrator option will be a few options down. All you need to do is toggle it on.
Just like in Windows 10, on Windows 11, you can also choose from different voices, five to be exact. You can choose from three males and two females. There is also the possibility of downloading other language packets. On Windows 11, you can also use the slider to adjust the voice’s volume, pitch, and speed. You can also prevent the Narrator from getting on your nerves by adjusting the in-depth controls for context and verbosity.
Conclusion
The Narrator can be very useful if you’re visually impaired. It can read everything you have on your screen, but you can also access the settings and make as many changes as you want. You can make the Narrator only read specific parts of your screen. There is also the possibility of changing the voice to female or male and in different languages. You can choose from a long list of options. How often do you use the Narrator? Share your thoughts in the comments below, and don’t forget to share the article with others on social media.