Skip to content
LogoTechnipages
LogoTechnipages
  • Topics
        • Android
        • Browsers
        • Gaming
        • Hardware
        • Internet
        • iPhone
        • Linux
        • macOS
        • Office
        • Reviews
        • Software
        • Windows
        • Definitions
        • All Recent Posts
  • Product Reviews
  • About

How to Enable and Use Windows 11 Night Light

Judy SanhzMarch 25, 2023 Comments (0)
Windows 11 22H2 Download The Ultimate Guide (Photo: Courtesy of Microsoft)

Enabling the Night Light feature on your Windows 11 computer is important. By turning it on, you protect your eyes from blue light. Even though the color blue is nice, it’s not so nice when it comes to the word light. Blue light exposure is a severe cause for concern. If you’re constantly being exposed to blue light and not taking any precautions, you can expose yourself to eye-related problems such as age-related macular degeneration. According to UC Davis, it’ll also be the culprit for cataracts and eye cancer. But you can take precautions in your eye care by using this helpful feature in your computer’s Settings.

Contents

  • 1 How to Enable the Blue Light Feature on Windows 11
    • 1.1 Further Reading
    • 1.2 Conclusion

How to Enable the Blue Light Feature on Windows 11

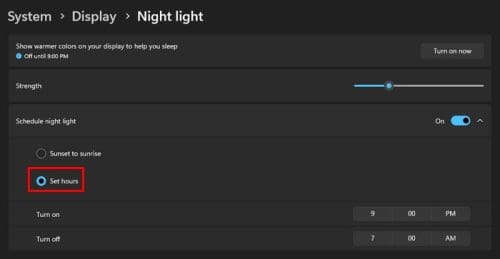
To enable the feature, you must go to Settings by pressing the Windows + I keys or clicking on the Windows Start menu and choosing Settings. Once you’re in Settings, go to System, followed by Display. The Night Light option will be in the Brightness and color section.

Night Light option Settings Windows 11
Night Light option in Settings Windows 11

Toggle on the button that’ll already be set to off. If you don’t need to turn it on now but want to schedule your hours, click the option or the right-pointing arrow for more options. You’ll see a slider where you can adjust the strength of the Night Light, but below that will be the Schedule Night Light option. You can choose from Sunset to sunrise, but you can also set up specific hours. Click on the Set hours options and set when you want the Night Light feature to start and end. Make sure that you also check the AM/PM button.

Set Night Light hours Windows 11
Custom Night Light hours in Windows 11

Once you’ve set the time, you’re good to go. There is no need to restart your computer. In the future, you can turn on the Night Light feature by using the Action Center. Press the Windows + A keys and click on Night Light. In the Action Center, you won’t see the option to adjust the intensity; you’ll need to go into Settings to change that.

Action Center Night Light Windows 11
Night Light option in Action Center

That’s all there is to it when it comes to enabling the Night Light feature. The quickest is through the Action Center if you already have it set to the strength you want.

Further Reading

The Night Light feature can also be found in Windows 10. If you see that the feature is greyed out, here are some useful tips you can try. For Android users, here are five free apps that can help you block that blue light when watching your TikTok videos before you go to sleep. If you’re curious about how night vision works, here is something to read.

Conclusion

The Night Light feature is a useful tool to help you keep your eyes healthy. What’s even better is that you can adjust the strength of the Night Light. And you can also set the hours you want it turned on. If you ever want to change that time, you can always go back to Settings and change things up again. There is also more than one way to enable it. Besides Settings, you can also enable it using the Action Center. How useful do you find the Night Light feature? Let me know in the comments below, and don’t forget to share the article with others on social media.

Categories: Windows

Author Judy Sanhz

I am a tech geek who loves technology. I have been writing about tech for over a decade, covering various devices and programs. I write about Android, Apple, and Windows devices and programs. I stay updated on the latest gadgets, upgrades, features, and news. I aim to make complicated tech information easy for everyone to read. I've been with TechniPages from the beginning to help others fix their tech issues with the easy-to-follow guides.

You Might Also Like

  • Windows Header

    Windows 11: How to Create a Folder

    Judy SanhzHardware
  • Best Free Antivirus for Windows 11 for Enhanced Security

    Best Free Antivirus for Windows 11 for Enhanced Security

    Susan SheffieldSoftware
  • Windows 11 22H2 Download The Ultimate Guide (Photo: Courtesy of Microsoft)

    How to Create a QR Code for a Site on Windows 11

    Judy SanhzWindows
  • iCloud Upgrade Failed Header

    How to Fix Upgrade to iCloud for Windows Failed Error: 6 Best Proven Methods

    Susan SheffieldWindows

Leave a Reply

Your email address will not be published. Required fields are marked *

  • unable to create notebook error in onenote

    We Were Unable to Create Your Notebook Error in OneNote – Common Fixes 

  • error code 0x800704f8 fix

    Error Code 0x800704f8 – How to Fix 

  • back button in browsers doesnt work

    What to Do if the Back Button in Browser Doesn’t Work 

  • could not find this item

    “Could Not Find This Item” When Trying to Remove Files

  • no graphics signal on first boot

    No Graphics Signal on First Boot – How to Fix

profile pic

The Experts Behind Technipages

My name is Mitch Bartlett. I've been working in technology for over 20 years in a wide range of tech jobs from Tech Support to Software Testing. I started this site as a technical guide for myself and it has grown into what I hope is a useful reference for all.

Learn More

technipages logo white
linkedin icon

Technipages is part of Guiding Tech Media, a leading digital media publisher focused on helping people figure out technology. Learn more about our mission and team here.

© 2026 Guiding Tech Media All Rights Reserved

  • About Us
  • Contact
  • Terms of Use
  • Privacy Policy

© 2026 Guiding Tech Media All Rights Reserved

Information from your device can be used to personalize your ad experience.
Do not sell my personal information.

Last Updated on March 25, 2023 by Judy Sanhz