Skip to content
LogoTechnipages
LogoTechnipages
  • Topics
        • Android
        • Browsers
        • Gaming
        • Hardware
        • Internet
        • iPhone
        • Linux
        • macOS
        • Office
        • Reviews
        • Software
        • Windows
        • Definitions
        • All Recent Posts
  • Product Reviews
  • About

How to Disable Radeon Alt + R Overlay Hotkey

Evan MercerJuly 2, 2025 Comments (0)
radeon disable overlay hotkey

The AMD Radeon Overlay is generally useful if you need to track specific statistics or rely on it to record your gameplay. However, one of the most annoying aspects of the software is the automatic “Press Alt + R for Overlay” pop-up whenever you launch a game. Here’s what you can do to disable Radeon overlay hotkey and game without interruptions.

Contents

  • 1 Accessing the AMD Radeon Software
  • 2 Method 1 – Disable Radeon Overlay Hotkey Popup
  • 3 Method 2 – Disable Radeon Overlay Hotkey by Removing Hotkeys
  • 4 Method 3 – Disable Radeon Overlay Entirely

Accessing the AMD Radeon Software

In general, AMD Radeon will automatically start up whenever you power up your PC, provided you’ve been keeping up to date with new driver versions. You’ll need to open the AMD dashboard to get to the advanced settings. There are a few ways you can do this.

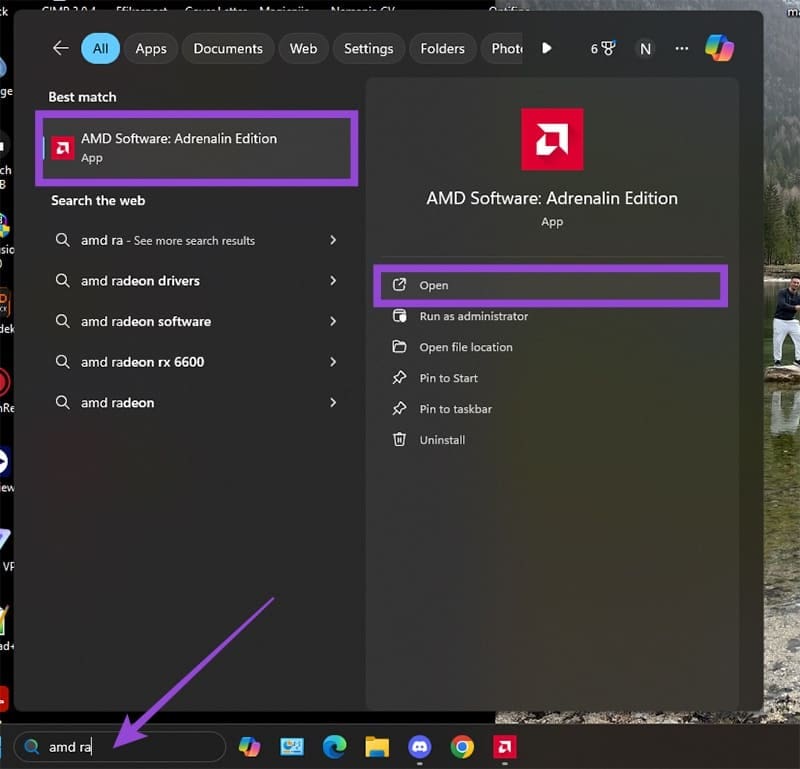
Option 1: Click to expand the toolbar icons in the bottom-left corner, as the AMD Radeon icon is typically tucked away. Then, click on AMD Radeon Software’s icon from the options.

How to Disable Radeon Alt R Overlay Hotkey 1

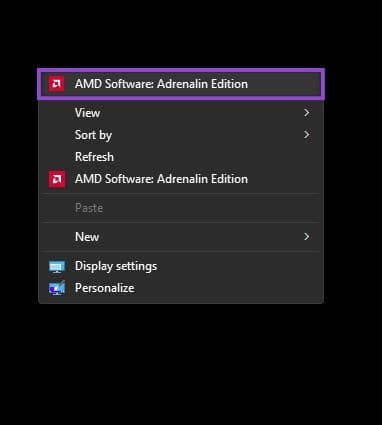
Option 2: Right-click on any empty space on your desktop, and you should get a right-click context menu that has graphics settings available. Select “AMD Software: Adrenalin Edition” or “AMD Radeon Software” from the options.

How to Disable Radeon Alt R Overlay Hotkey 2

Option 3: You can manually search for AMD Radeon software in the Windows search bar if none of the above solutions work.

How to Disable Radeon Alt R Overlay Hotkey 3

Method 1 – Disable Radeon Overlay Hotkey Popup

Technically, you can either disable the entire overlay or just the pop-up that prompts you how to access it. If you do the latter, you should still be able to access the overlay. Somewhat unintuitively, Radeon has named this option “toast notification.”

Step 1. In the AMD Radeon window, click on the search box and type in “toast.”

Step 2. When you hit “Enter,” you should get a single result, a toggle titled “Toast Notifications.”

Step 3. Switch off the toggle and close AMD Radeon.

How to Disable Radeon Alt R Overlay Hotkey 4

That’s pretty much it. You won’t get prompted to turn on the overlay or be notified as to which parts of the monitoring system are currently running whenever you launch a game.

Method 2 – Disable Radeon Overlay Hotkey by Removing Hotkeys

If you want to unbind the “Alt + R” hotkey from the overlay so it can be used for something else, you’ll need to go to hotkey settings.

Step 1. Click on the cog wheel in the top right corner of the AMD Radeon Software window.

Step 2. Go to “Hotkeys.”

Step 3. In the “Open Sidebar” option, click on the hotkey and enter a new keyboard shortcut to open the overlay. If you want to completely remove the shortcut, hit “Delete” instead of entering a new shortcut.

How to Disable Radeon Alt R Overlay Hotkey 5

Alternatively, you can toggle “Use Hotkeys” off entirely if you don’t want to use any of the 20 or so hotkeys that AMD Radeon has.

Method 3 – Disable Radeon Overlay Entirely

The last option is to completely remove the AMD Radeon overlay. While this means you won’t be able to access advanced performance metrics (if you haven’t used them so far), chances are you might not even need them.

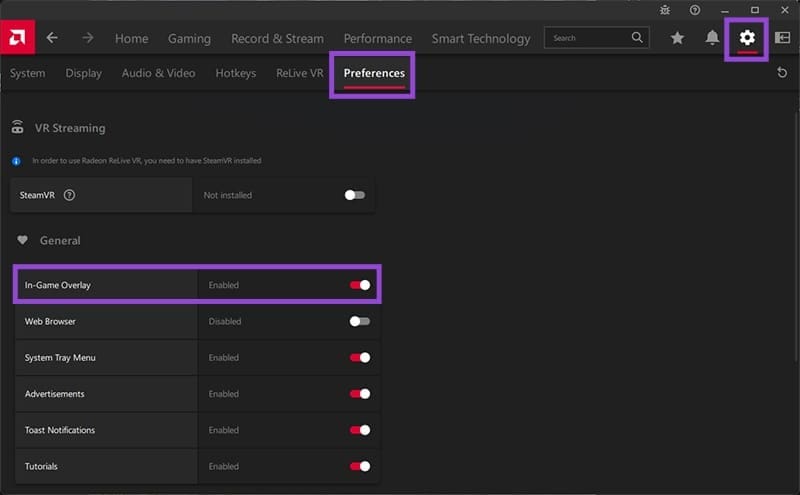
Step 1. Open “Settings” (via the cog wheel on the top-right).

Step 2. Go to “Preferences.”

Step 3. Toggle “In-Game Overlay” to “OFF.”

How to Disable Radeon Alt R Overlay Hotkey 6

And that’s pretty much it. The overlay won’t show up, and you won’t get a notification for it.

Categories: Windows

Author Evan Mercer

I’m a computer science grad who loves to tinker with smartphones and tablets in my spare time. When I’m not writing about how to fix techy problems, I like hanging out with my dogs and sipping nice wine after a tough day.

You Might Also Like

  • Fix The Disk Is Write Protected Error on Removable Disk in Windows 11

    Fix “The Disk Is Write Protected” Error on Removable Disk in Windows 11

    Mitch BartlettWindows
  • Can’t Delete Folder “You have been denied permission” Fix for Windows

    Mitch BartlettWindows
  • Fix NordPass Login Errors

    Troubleshooting NordPass Login Errors

    Madalina DinitaWindows
  • Fix-Error-0x80070490-We-Couldnt-Find-Your-Settings

    Fix Error 0x80070490: We Couldn’t Find Your Settings

    Madalina DinitaWindows

Leave a Reply

Your email address will not be published. Required fields are marked *

  • winload.efi file missing error

    Winload.EFI File Missing Error on Boot – How to Fix

  • fix error 0x9cfc7550

    How to Fix Error 0x9cfc7550 (We Couldn’t Create a New Partition) in Windows 

  • fix error code 0x3000008 1

    How to Fix Error Code 0x3000008 for Remote Desktop Connection

  • fix error code 0x80190001 1

    How to Quickly Fix Error 0x80190001 for Microsoft or Outlook Account Login 

  • fix filecoauth.exe application error

    Fix FileCoAuth.exe Application Error 

profile pic

The Experts Behind Technipages

My name is Mitch Bartlett. I've been working in technology for over 20 years in a wide range of tech jobs from Tech Support to Software Testing. I started this site as a technical guide for myself and it has grown into what I hope is a useful reference for all.

Learn More

technipages logo white
linkedin icon

Technipages is part of Guiding Tech Media, a leading digital media publisher focused on helping people figure out technology. Learn more about our mission and team here.

© 2025 Guiding Tech Media All Rights Reserved

  • About Us
  • Contact
  • Terms of Use
  • Privacy Policy

© 2025 Guiding Tech Media All Rights Reserved

Information from your device can be used to personalize your ad experience.
Do not sell my personal information.

Last Updated on July 2, 2025 by Evan Mercer