
When you have to leave the office because it’s vacation time, you set up a Vacation Reply. But, there are times when you’re in the office and find yourself replying to practically the same thing in various Emails. Instead of typing the same thing repeatedly, why not create an automatic reply in Gmail?
How to Make an Automatic Reply in Gmail
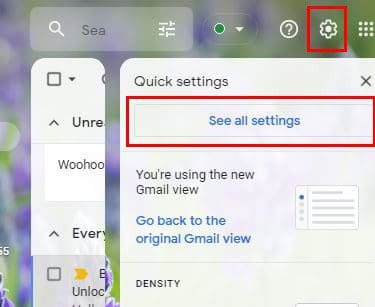
Creating an automatic reply in Gmail can save you some valuable time. The next time you get a specific type of Email, Gmail will know how to respond. But, You’ll need to turn on templates, followed by a few other things you’ll see later on. You can do this by clicking on the cogwheel and going to see all settings at the top.
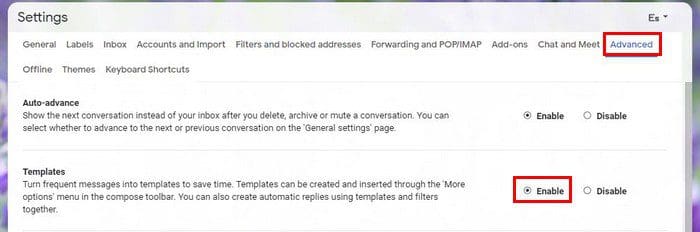
When you see all the tabs at the top, click on Advanced. Look for and make sure the Templates option is enabled. It will be one of the first ones at the top.
Don’t forget to click on Save Changes at the bottom. Once you’re done with this, it’s time to create an automatic reply. The next time you get a specific Email, you always send the same reply to them. This is what you need to do. Once you’re done typing the reply, click on the dots and place the cursor on the Templates option.
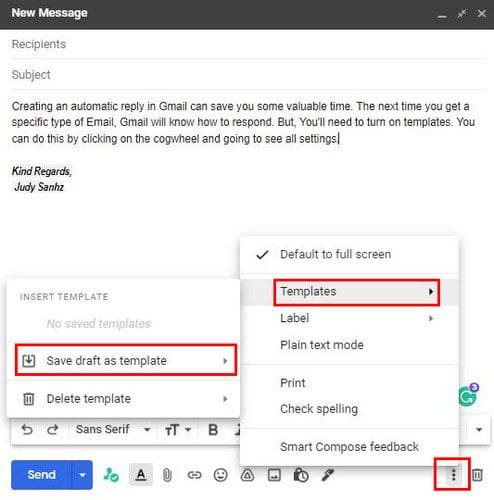
A side menu will pop up, and when it does, choose the Save draft as template. Give your template a name and save it. Now, it’s time to set up a filter so that when Gmail detects certain words in the Email you received, it will send the template you recently created.
Almost Done
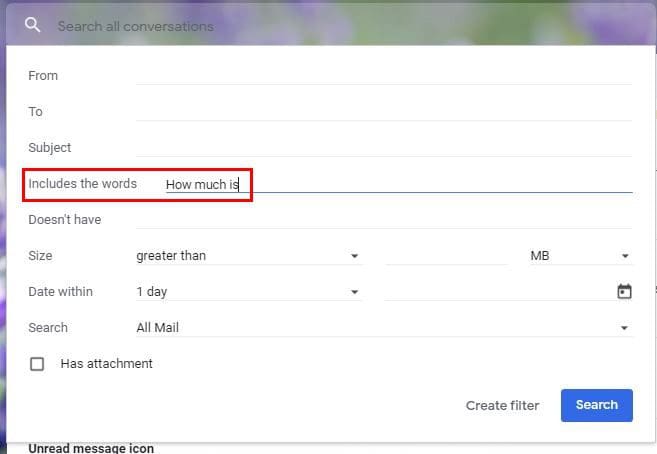
Click on the dropdown menu from the search bar at the top. It’s the uneven lines on the right of the bar. The information you add to the filter will depend on what the Email needs to have for Gmail to send the template you created earlier. For example, if some emails your business asking for prices on something, you can add something like how much is in the Includes the words option.
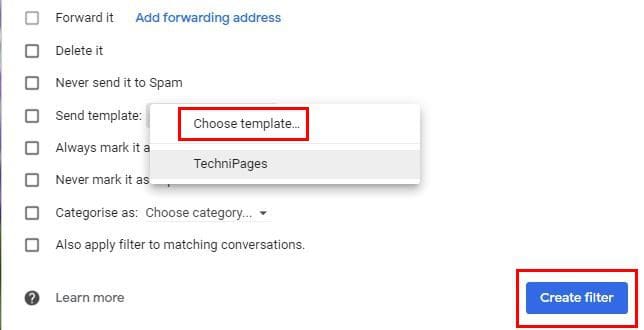
Once you’re done adding the necessary information, don’t forget to click on the Create Filter button at the bottom. In the next window, look for the dropdown menu for the Send Template option. When the window appears, choose the template you want to send. Click on the blue Create Filter button at the bottom.
To finish things off, go back to Setting, but click on Filters and Blocked Addresses this time. Check the box for the new filter you created, and don’t forget to click on the Save button at the bottom. That’s all there is to it. It may seem like a lot at first, but when you break it down, it’s easier than you thought,
Conclusion
It may take a few minutes to create, but you’ll save even more time in the long run. Now you won’t have to type the same thing repeatedly. This filter is especially useful if you’re running a business and you’re constantly being asked how much certain products cost? This way, your customers get the information they need as soon as possible. How many automatic responses do you think you’re going to create? Share your thoughts in the comments, and don’t forget to share the article with others on social media.