• Skip to main content
  • Skip to primary sidebar

Technipages

Tutorials and fixes for smartphone, gadget, and computer problems

  • Topics
    • Android
    • Browsers
    • Gaming
    • Hardware
    • Internet
    • iPhone
    • Linux
    • macOS
    • Office
    • Reviews
    • Software
    • Windows
    • Definitions
  • Product Reviews
  • Downloads
  • About
Insert and Remove a Sim Card & SD Card on Samsung Galaxy S10

Insert and Remove a Sim Card & SD Card on Samsung Galaxy S10

May 1, 2019 by Kat Armstrong 7 Comments

Do you know where your SIM card and SD cards go on this new device? Do you know how to remove and put them back in? Let me explain a bit and fill you in on the easy steps!

The Galaxy S10 uses a nano SIM card – which is much smaller than a normal SIM card. Just in case anyone does not know, a SIM card stores important data such as your identity, location, phone number and much more. For your device, the nano SIM card shares a tray with your micro-SD card if you have one. The micro-SD card can be used to store additional photos, music, files and even your contacts if you choose. Taking these cards out – or putting them in – requires a tiny tool (that comes in the box with your new phone) inserted into a hole in the tray. Here… let me show you how!

  1. First, power your device off completely. While you can theoretically do this with it turned on, it is not recommended because you could lose data or corrupt one or both cards by ejecting the tray with the phone powered on.
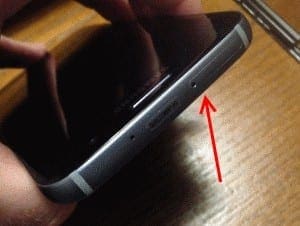
  2. Find the nano SIM / microSD tray on the top of your phone.
    Samsung Galaxy SIM Door Eject
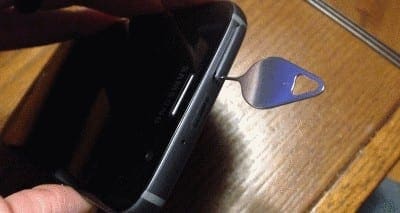
  3. Grab the little metal tool that came in the box and gently push the pointy end into the pinhole on the card tray until the tray pops out.
    NOTE: If you have lost the tool that came with your device and need to open up the tray, you can always use a paperclip.
    Samsung Galaxy SIM and SDCard slot
  4. Pull the tray out of the slot.
  5. Insert (or take out) your microSD or nano SIM card/s. Make sure that the gold contact bars are facing down towards the back of your phone.
  6. Gently slide the tray back into the slot it belongs in until you hear a soft click. The click lets you know that the tray is inserted properly and is secured.

Turn your phone back on and you are finished! If you have any questions regarding a nano SIM or microSD card, be sure to let me know!

You Might Also Like

  • How to Insert and Remove SIM Card from Samsung Galaxy S20 FE
    How to Insert and Remove SIM Card from Samsung Galaxy S20 FE
  • How to Insert and Remove SIM Card from Samsung Galaxy S21
    How to Insert and Remove SIM Card from Samsung Galaxy S21
  • How to Insert and Remove SIM Card from Samsung Galaxy S22
    How to Insert and Remove SIM Card from Samsung Galaxy S22
  • How to Insert and Remove SIM Card from Samsung Galaxy Z Fold 2
    How to Insert and Remove SIM Card from Samsung Galaxy Z Fold…
  • How to Insert and Remove microSD Card from Samsung Galaxy Tab S8
    How to Insert and Remove microSD Card from Samsung Galaxy…
  • Galaxy S8+: Insert/Remove SD Card & SIM
    Galaxy S8+: Insert/Remove SD Card & SIM

Filed Under: Android

Reader Interactions

Comments

  1. Sheila says

    October 21, 2022 at 4:25 pm

    Is the TLC10SE compatible with a Verizon sim card a.or at&t card?

  2. Marc says

    January 22, 2021 at 10:33 pm

    I have an alternate keyboard in the thai language. If the sim card is removed will i lose that keyboard or any other info?

  3. Bob says

    July 25, 2020 at 11:18 pm

    You are a great instructor, thank you!

  4. Clueless Phone User says

    June 20, 2020 at 1:28 pm

    The Samsung Galaxy S10 has both a nano-sim slot and a micro SD slot. Do I have to buy both for my phone to work?

  5. Jan says

    November 12, 2019 at 2:46 pm

    I had to do the same as Jessie above! LOL

  6. GSquared says

    September 4, 2019 at 3:20 pm

    Thank you. Quick, clear and good choice of photos to illustrate. I found it so quickly, I bet a ton of people have referenced it. Samsung’s User Manual is so vague, they could take training from you. Appreciate you doing this.

  7. Jessie says

    August 6, 2019 at 8:14 pm

    Thank you
    I had to use an earring post

Did this help? Let us know!

Your email address will not be published. Required fields are marked *

This site uses Akismet to reduce spam. Learn how your comment data is processed.

Primary Sidebar

Recent Posts

  • 3 Ways to Choose All Files in a Folder – Windows 11
  • Apple TV+: How to Erase a Show From the Up Next List
  • How to Change the Profile Picture on Disney+
  • Local Security Policy: What Is It and How to Open It in Windows 11
  • How to Create and Erase an Alarm in Windows 11
  • 10 Best NAS Storage Device for Home and Professional Use
  • PS5 NVMe Requirements You Must Fulfill to Expand PS5 Storage
  • Steam Deck Won’t Turn On: 8 Possible Fixes You Can Try

Who’s Behind Technipages?

Baby and Daddy My name is Mitch Bartlett. I've been working in technology for over 20 years in a wide range of tech jobs from Tech Support to Software Testing. I started this site as a technical guide for myself and it has grown into what I hope is a useful reference for all.

You May Also Like

  • Sound Card
  • Need a Good Sim Card for The Usa? Here's 8 You Can Buy Right…
  • Buyers Guide: 9 Galaxy Watch Bands You'll Love

© Copyright 2023 Guiding Tech Media · All Rights Reserved · Privacy