

If you go to take a photo using the Camera app on your Apple iPhone or iPad and find an error message that says “Cannot Take Photo – There is not enough available storage to take a photo. You can manage your storage in Settings.“, you might be confused about what to do. We can help you with this tutorial.
What this message is telling you is that all of the available storage on your iPhone or iPad is being used. Selecting “Settings” on this message will provide you with a list of apps and the amount of storage they are using. You can reach this screen at any time by going to “Settings” > “General” > “Usage“.
You could select an app that is taking up a large amount of space, then select “Delete app“. That would free enough storage to fit photos. You may not want to do this though if you value every single one of your apps.
Quick Fix
In most cases, you can clear unwanted music and photos from the device to free some space.
Clearing Photos
- Open the “Photos” app.
- Open the “Recently Deleted” album.
- Delete the photos from this album.
This will free space on your phone regardless of whether you use iCloud or not to store photos.
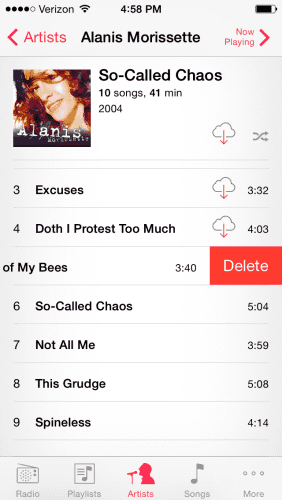
Clearing Music
You can free some space while you’re out and about by deleting unwanted music from the device. What I like to do is locate an entire album that I can live without and delete it using these steps.
- Open the “Music” app.
- Select an Artist that has songs stored on the device you would like to delete.
- Locate a music track that is stored on the device. If the track has a cloud icon, that means it is not stored on the device. You’ll have to find tracks that do not have this icon.
- Swipe left across the name of the song. A button should appear that says “Delete“.

- Tap “Delete” and the song is gone. Repeat steps 3 through 5 until you have freed enough space. Typically, I like to find about 10 songs.
- Return to the “Camera” app and attempt to take a photo. You should be able to without the “Cannot Take Photo” message appearing.
Permanent Fix
To prevent your iPhone or iPad storage from being consumed, follow these steps.
- Connect your Apple device to your PC and launch “iTunes“.
- Select your device, then select “Music“.
- Uncheck the “Automatically fill free space with songs” option.
- Select “Sync“.
If these steps don’t cure this error message from regularly appearing, you may need to remove some apps, photos, or videos from the device.


I have deleted almost all my photos, deleted all the apps and still my friken I phone will not allow me to take pictures…!!! I AM MAD AS HELL
this is unbelievable (erickas voice from stranger things) btw
Trying to take a photo with my new IPad. Front camera works but back camera is black. What am I doing wrong?
thank you so much, I deleted my ‘recently deleted’ photos and now my camera works
Thank You, exactly what I needed to know!