

After undergoing recent software updates to certain versions of Microsoft Excel in Summer 2017, Microsoft allotted Track Changes as a Legacy Feature. To facilitate ease of use, you can add it on to your Quick Access Toolbar to track every file. Alternatively, you can add the Excel ribbon via the creation of a new group and add it to this new group.
Like with Word, Microsoft updated its program with the inclusion of a new co-authoring feature in order to enable online workbook sharing and change history amid co-workers, peers, friends, family, etc. Shared workbooks have been designed to allow users to access and edit together once they receive approval.
Let’s say, for example, that you requested someone to proofread or collaborate on an Excel project with you. It’s a pretty straightforward mechanism as Excel virtually allows you to mark spelling errors (and has a spell check), insert comments in the margin, etc. electronically, and relatively alike to that of a Word document.
The only exception to take note of is that Excel will highlight the altered cells, whereas in Word you will observe alterations to words and sentences. There are, however, two things to take into consideration before we begin.
If your Excel sheet contains a table, the Track Changes feature refuses to work in a spreadsheet. To permit the use, you will be required to enable “Track Changes” on the workbooks by first selecting the pre-existing table, then select “Design Tab” and after that choose the “Convert to the Range.” If you need edits from other users, the workbooks will have to be shared in a mutually available location.
Due to the fact that versions differ with regard to the level of updates, so you may not be able to view this feature on the default Ribbon. But don’t worry. Simply add the “Track Changes” button to the Ribbon Menu by yourself by following the steps below:
- On the Ribbon Menu, use your mouse to right-click virtually anywhere and choose the “Customize the Ribbon” pop-up option.
- From the “Customize the Ribbon” dialog screen, drag your mouse to the “Choose commands from” route in the right panel: a “drop-down menu/list” should appear from which you will need to select either the “All Commands” or “Commands not in the Ribbon” option.
- From the parallel “Customize the Ribbon” command you will enter into a drop-down menu. This in itself should be set to “Main Tabs” already in default mode (i.e. the scrolling list located underneath should show the main tabs beforehand). Following this verification, click the + sign located next to “Review” in the list, continue clicking the “New Group” choice from beneath the list. This will result in the addition of a new group to the “Review” Section.
- Then, to rename this newly created group, simply right-click the “New Group” Line, change it to what you want to name it and feel free to even add-on an icon if you so desire. For the sake of demonstration, we’ll change it to “Track Changes.” (Excel will by itself add a “Custom” label after your name, only when it comes to this list though.) If you click and then drag the “XYZ Group,” you can relocate it to another area within the Review List.
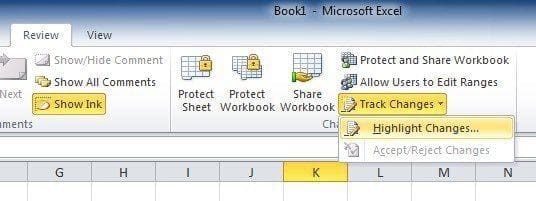
- Once you have the Track Changes Group highlighted, proceed to choose two commands from the command list available on the left-hand side:
- “Highlight Changes”
- “Accept/Reject Changes”
In order to move each of the commands to the group, you must click the “Add” Button.
You will observe that once New Group is now on the Ribbon. Next, you must:
- Hit “Highlight Changes” command.
- “Track changes while editing” will appear, use your mouse to click and check it. Repeat for “Highlight changes on the screen.”
- To finish, click “OK.”
Following the completion of these tasks, each and every alteration made within the desired Excel spreadsheet will be tracked and highlighted via a unique blue border indicator and in the upper left corner a little blue triangle that’ll appear in the edited cells. Further accommodating user-friendliness, the program allocates a different color to identify multi-user platform usage.
Furthermore, if you move the cursor of your mouse over an already edited cell you gain access to the following:
- Date
- Author
- Time when the doc was changed
- Pop-up summary of tracked changes, to review before accepting on revisions made permanently.
You should note that only the most recent alteration will be archived and presented in this pop-up summary.
Now, after every potential editor/participant has completed their part, you can move on to accept/reject proposed changes part of the task.
- Click on “Review” from the upper portion of the “Ribbon” Menu and click on the “Accept/Reject” command.
- Once Excel pop-up re-confirms with the “Save the Workbook” statement feature, click “OK.”
- Excel will mark the original edited cell and simultaneously displaying alongside this highlight the Select Changes to “Accept or Reject” dialog box.
- You will be privy to all current changes that are made within the displayed list. From the aforementioned, you are free to either select the preferred edited version or you can stick with the original one. Pick whatever makes sense to you. Once you have decided, click “Accept” after choosing from the list the best version.
However, if you feel that none of the listed versions are to your liking, repeat the process but substitute by clicking on the “Reject” option. Post-decision, following this command, the cursor will automatically move on to the next edited cell for further processing. - If the alteration you are opting for must carry through the entire spreadsheet (for example, all the ampersands being changed to a specific format), then click on the “Accept All” button. With this command, all the selected edits are corrected and accepted in that instant.
- Now, you may want to revert to turning the “Track Changes” feature off. To do so, go back to the “Review Group”, and go toward the “Track Changes” group. Click on “Highlight Changes” and simply uncheck the previously checked box labeled “Track Changes while editing…”


YES. It confirmed that it didn’t work and anything further would not be easy.
Really annoying time waster.
What a goose of an idea.
I will have a look at Google Sheets to see if it better handles changes.
I can see some smart aleck at MS deciding the plebians can use Co-authoring and BTW they will have to store files on OneDrive. This sort of naive arrogance ….well have a look at Social Media platforms and how that is working out in EU. MS, revisit your origins.
OMG! What consummate ass at MS decided that getting rid of such a basic editing tool was a swell idea?
I appreciate the effort put into researching the issue and communicating the results, although my mind is swimming a bit with the number of needed steps. I guess that, as with most things MS, there is no simple solution. I’m opting to keep a log of my changes as a separate document.
The list of changes is no longer available (greyed out for me), which is useful to keep track of changes, especially way in the past. How can one keep track of who changed what if users using different versions of the app (2016, 365, etc.) are accessing and changing the same file?
Thank a lot. Spent long time looking to resolve it until I landed in this page.
Thanks MA’AM, this will help for a myriad of things.
Thanks Sir, It is excellent. Steps to add group will help for lot of options. Thanks again.
Thank you so much!