
You may be okay with seeing a few ads here and there since you never know when you might come across something you want to buy. But, sometimes, advertisers don’t know the word enough means, and the ads get intrusive. Therefore, many want to know how to enable the ad-blocker. That’s why many browsers have features such as Ad blockers to keep those intrusive ads under control. With Edge, you can keep ads under control and add some exceptions for sites that show ads you want to see. Keep reading to see what steps to follow to turn on the integrated Ad blocker for the Edge Browser. See how to do it in less than a minute.
How to Enable the Ad-Blocker on Edge for Android
The Block Ads feature on Edge has a button you can toggle the feature on with. But it also gives you options to allow exceptions so certain sites aren’t affected. You can start using this feature by opening the Edge app and tapping the three-lined menu at the bottom right. When the menu from the bottom appears, tap on the cogwheel to go to Settings.
Under the Setting section, tap on the Privacy and Security option. In the Security section, choose Block Ads.
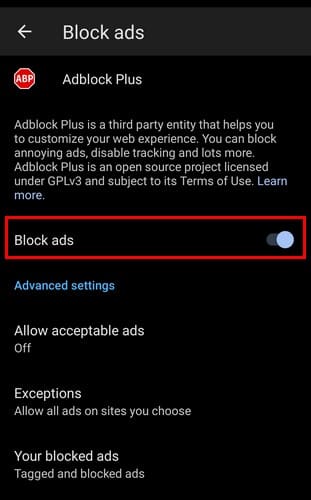
First, toggle on the Block ads option; you’re all good to go once you do that. Below the option, you’ll see more options to customize. For example, you can choose to toggle on acceptable ads. Tap on it and toggle it on or off. You’ll also find an Exceptions option where you can add the sites you don’t want to Ad block to apply to. Select the option and tap on the Add Sites option. Enter the Site address and tap on the Save button. When you make the change you’ll need to refresh the site to see or not the ads. That’s all there is to it when it comes to knowing how to enable the ad-blocker.
Further Reading
You can also block ads on other browsers. For example, here is a guide on how you can block ads on the Kiwi browser and Opera. There is also a guide for those who use the Brave browser so they can block the ads too. There is also a way you can use Ad Blocker in incognito mode on Chrome. If you’re seeing ads in your Gmail inbox, here is how to get rid of them. If you don’t see the guide you need, remember you can always use the search bar at the top right.
Conclusion
Ads can show you the products you may want to buy, but when you’ve had enough or want to take a break from them, Edge has the Ad Blocker for you to use. With a simple refresh, you can see how the ads disappear and give you a cleaner look. Whenever you’re ready to see the ads again, you can always turn the feature off. Are you going to have the AdBlocker on permanently? Let me know in the comments below, and don’t forget to share the article with others on social media.


Indeed. Stay Blessed. Help without any monatory expectations is enriching us for living cool and happy. And knowledge is to be shared.
Heaps of regards and thanks.