If there’s one thing that’ll put a strain on your computer more than running an operating system, it’s running multiple operating systems at the same time. Windows 11’s virtual machine software, which comes with certain editions of the OS, allows users to run and test multiple virtual machines.
As you might’ve guessed, this requires a lot of performance power, and can also lead to overheating and sudden shutdowns. If you find your computer heating up in Hyper-V, then this article is here to help.
Contents
What Causes This Error?
You can imagine that running three or four different versions of Linux or Windows in addition to Windows 11 would not be the lightest load on your machine. In fact, recommended system requirements start at 2GB of RAM for Hyper-V, but can quickly escalate depending on the demands of each virtual machine.
Still, if your PC meets these demands and is still frequently heating up, this could be a sign of other problems, including:
- Long-running times of Hyper-V put strain on hardware
- Potential misconfiguration of VMs themselves, and the number in use at one time
- Your machine isn’t optimally built to handle Hyper-V (cooling, CPU limitations, power plan, etc.)
- Hyper-V is running in the background even when not in use
- A dysfunctional virtual machine queue (VMQ)
Computer Is Heating Up in Hyper-V – What to Do
If you’ve got Hyper-V heating computer troubles, here are some fixes to try:
Disable Hyper-V on Startup and in the Background
Many non-essential processes and tasks run in the background in Windows, draining resources and impacting performance. You can quickly disable Hyper-V if not in use:
Step 1. Type “Windows Features” into the search bar and select the first option that pops up.
Step 2. Scroll down to “Hyper-V” and uncheck the folder.
Check Your Power
If running Hyper-V on a laptop, ensure it’s plugged in and on “High Performance” mode. You can check this in Power Options and change the power plan if need be. It’s also a good idea to ensure your computer is properly ventilated. Clean the fan, consider cooling and thermal paste, and turn things off if they’ve been running for a long time.

Press “OK” to finalize and restart your machine. You can always enable Hyper-V manually when you need it.
Disable the VMQ
The virtual machine queue has been known to have bugs that flood the CPU with network interrupts, draining resources and building heat. Disabling it can get things under control:
Step 1. Open the Run dialog (Win + R) and type “devmgmt.msc” before hitting “OK.”
Step 2. Under the “Network Adapters” section, right-click your main adapter and select “Properties.”
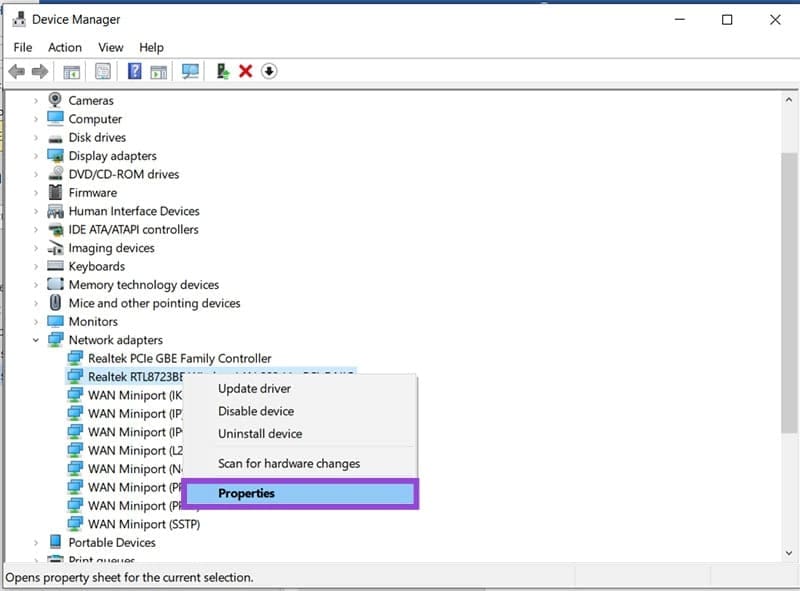
Step 3. Switch to the “Advanced” tab, ensure “VMQ” is set to “Disabled.”
Step 4. Click “OK” to finalize and restart your machine.
Change Core Parking
Core parking is designed to reduce the load on certain processor cores. But when it comes to Hyper-V, this can end up sending them into overdrive. To distribute things more evenly, you can modify these settings:
Step 1. Open the Run Dialog (Win + R) and type “regedit” before hitting (Ctrl + Shift + Enter) to run as Admin.
Step 2. In the Registry, navigate to: “HKEY_LOCAL_MACHINE\SYSTEM\CurrentControlSet\Control\Power\PowerSettings\54533251-82be-4824-96c1-47b60b740d00\0cc5b647-c1df-4637-891a-dec35c318583”

Step 3. In the main window, double-click “Attributes” and change the value to “0” before hitting “OK.”

Step 4. Restart your machine.