When trying to install a new operating system, you’ll inevitably need to change the boot order in BIOS so you can load into it. But there could be a few rare cases where you can’t change boot order in BIOS. Here’s what you can do to troubleshoot the issue and get your shiny system working again.
Contents
Fix 1. Disable Fast Startup
In general, fast startup should keep some of the data in memory so the system can boot faster. But it also means it might preemptively pick the operating system that was in use during the last session, never prompting you to choose if you have multiple.
Step 1. Open the Control Panel (accessible via the search bar).
Step 2. Go to “Power Options,” then select “Choose what the power buttons do” on the left panel.
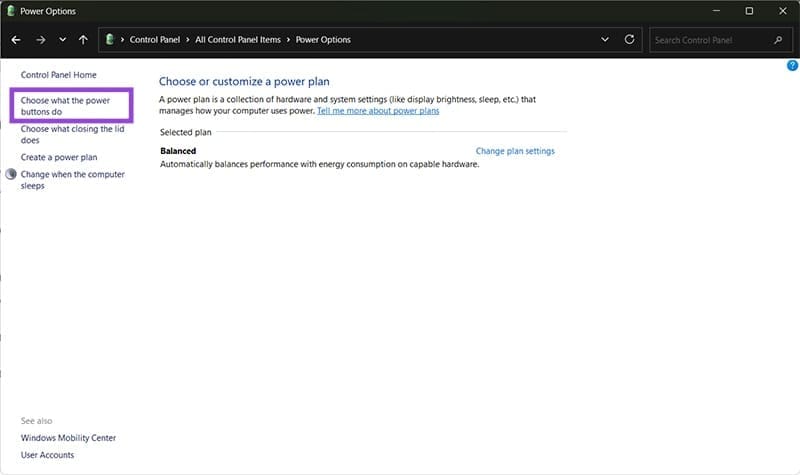
Step 3. If the checkboxes on the screen are locked, click on “Change settings that are currently unavailable.”

Step 4. Untick “Turn of fast startup” and click on “Save changes” on the bottom.
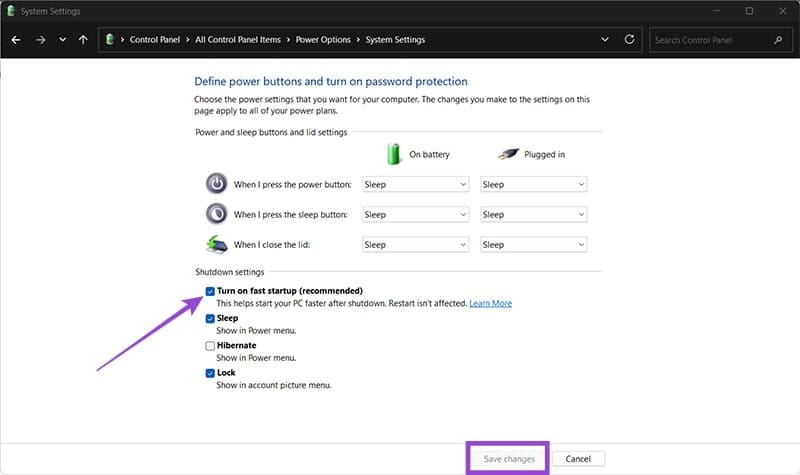
Step 5. You may need to restart the PC for the changes to take effect.
Fix 2. Reset the BIOS/UEFI Settings
If your BIOS won’t change boot order, it might be misconfigured. Performing a settings reset should unlock the boot order change. In most cases, resetting BIOS to factory settings shouldn’t compromise your PC if you haven’t altered it significantly.
Step 1. Go into the BIOS by restarting the PC and clicking on the button that is prompted on the screen during boot. Alternatively, you can go to Settings, then to “System” and “Recovery,” and click on “Advanced startup.” This loads into UEFI, where you’ll need to select “Troubleshoot,” then “Advanced options,” and finally “UEFI Firmware Settings.”

Step 2. In the BIOS, find a setting that says “Restore Defaults” or something similar to it. Click on it and confirm the choice.
Step 3. Find the settings for the boot order and try to change them again.
Fix 3. Check Secure Boot
Secure Boot is a new feature of Windows 8 and later systems that help them boot up and recognize trusted software. These systems require it, but others like Linux might lead to the issue where you can’t change boot order in BIOS.
Step 1. Enter the BIOS (see Step 1 in Fix 2 for more details if needed).
Step 2. Find the option called Secure Boot.
Step 3. If you’re only using Windows versions 8, 10, or 11, make sure the setting is enabled. Otherwise, you can try disabling it. Note that once disabled, you might need to factory reset all systems to get it enabled again.
Step 3b. In some cases, the BIOS will let you choose between Secure Boot and CSM. Choose the latter.
Fix 4. Ensure the Boot Manager Boots First in Command Prompt
In rare cases, Windows itself might overwrite the boot order to enforce control. This can be rewritten via console commands.
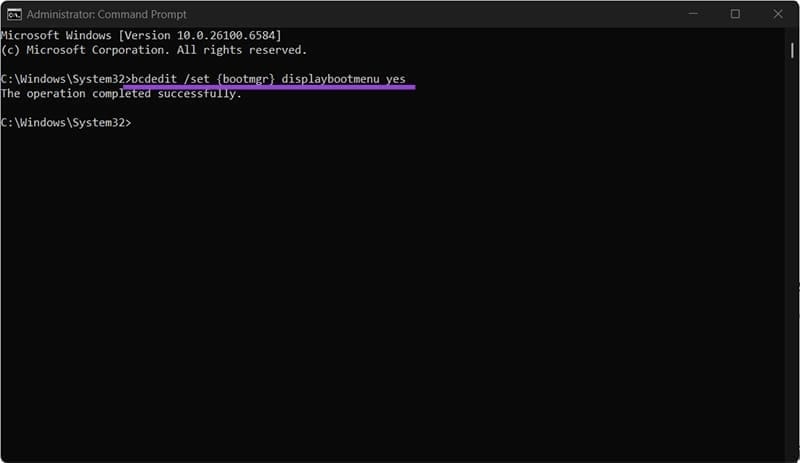
Step 1. Open the Command Prompt as an administrator (you can search for it in the search bar and select the “Run as administrator” option). Confirm the User Account Control when prompted.
Step 2. Enter the following command:
bcdedit /set {bootmgr} displaybootmenu yes
This will overwrite the current boot settings to display the boot manager, which gives you the choice of what OS to boot into.
Final Fix – Update BIOS
A complete BIOS update should reset boot settings. However, this is dependent on the motherboard manufacturer, so check their website for more details.