One of the most difficult shapes to create with a 3D printer is a sphere. Spheres are difficult for several reasons. Firstly, spheres have a tiny contact point with the print bed, making them hard to adhere in place. Secondly, spheres have a lot of overhangs that need support. Thirdly, FDM printers end up leaving visible layer lines when printing curves that cross the Z-axis. It is possible to address these issues; however, each fix comes with its own compromise too.
Contents
Add Support Structures and a Brim or Raft
By adding a combination of support structures and a brim or raft, you can address two issues in one. The brim or raft helps to secure your print while the support structures keep the overhangs from drooping.
A raft is a thin sheet of print material printed first, underneath the print, upon which the print sits. A brim is almost identical, but it only touches the print at the edges and doesn’t go underneath.
Rafts and brims work by increasing the contact area with the print bed, which increases the adhesion force holding the print in place. A raft is typically more difficult to remove due to the increased contact area. Both options are intended to be cut away during post-processing.
Support structures work well with rafts and brims as they can connect to them easily. They are designed to provide support to extreme overhangs to prevent drooping. Typically overhangs greater than 45 degrees from the vertical need support, although this can vary from printer to printer. Again, these need to be removed during post-processing.
Support structures, rafts, and brims all leave some artifacts on the sphere’s surface where they contact. Even if they’re removed carefully, the artifacts will need to be smoothed.
Cut It in Half
This may sound a little extreme, but you can then print the two halves face down if you cut your sphere perfectly in half. This eliminates the need for a raft, brim, or support structures. Unfortunately, it does mean that you need to glue the two pieces back together once they’re printed.
We highly recommend that you triple-check that your sphere is perfectly cut in half before printing, as otherwise, you’ll be more likely to end up with uneven weight distribution. The type of glues you can use vary by filament type, but superglue generally offers the best finish as so little needs to be used for a solid connection.
You will generally need to smooth any unevenness that you see at the joint of the sphere. If your print bed was slightly too hot, you might see a slight elephant’s foot effect, resulting in an equatorial ridge. It’s a good idea to print the two halves separately. Otherwise, you can end up with retraction-related issues such as stringing and blobbing between the two halves.
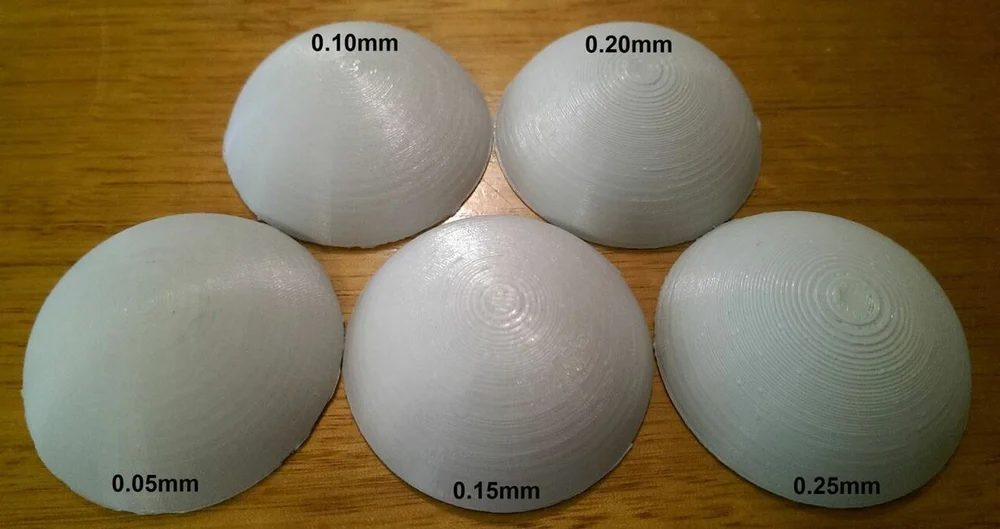
Use a Low Layer Height
Any curve that crosses the Z-axis will end up with a stair-stepping appearance. This is an inherent part of FDM printing but can be minimized by printing with the lowest layer heights possible. Doing so reduces the height of each step, making them less distinct and needing less smoothing in post-processing. Unfortunately, reducing the layer height also increases the print time as the print head has to make more passes to reach the final print height.
Conclusion
Following the suggestions above will help you be able to create great-looking spheres with your 3D printer. If you’ve got any other tips about printing great spheres, let us know down below.