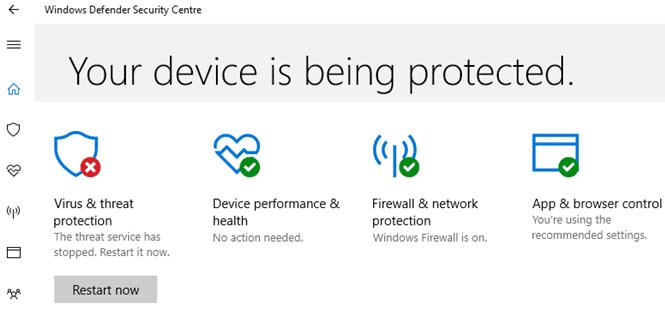
If Windows Security is your antivirus of choice, please don’t panic when the threat service stops working. Hitting the “Restart now” button should quickly fix the problem for most users. However, if the issue persists and you can’t restart the service, pursue the troubleshooting steps below.
How Do I Restart the Windows Security Threat Service?
Uninstall Third-Party Security Software
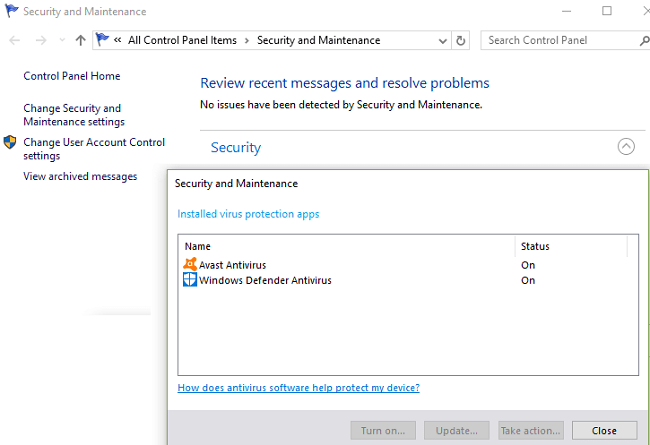
Make sure Windows Security is the only antivirus running on your computer. If you also installed a third-party antivirus, make sure to uninstall as it could be interfering with Windows Security. If you’re running two antivirus solutions on your computer, neither will run properly and your machine will remain unprotected. Additionally, disable or uninstall third-party antimalware tools, even if in theory, they’re compatible with Windows Security.
Check your DisableAntiSpyware Settings
Set the value of DisableAntiSpyware entry to zero and check the results.
- Launch the Registry Editor and navigate to
HKEY_LOCAL_MACHINE\SOFTWARE\Policies\Microsoft\Windows Defender. - Click on the Windows Defender folder and locate DisableAntiSpyware.
- Double-click on the entry and set its value to 0 (zero).

- Restart your computer and check the results.
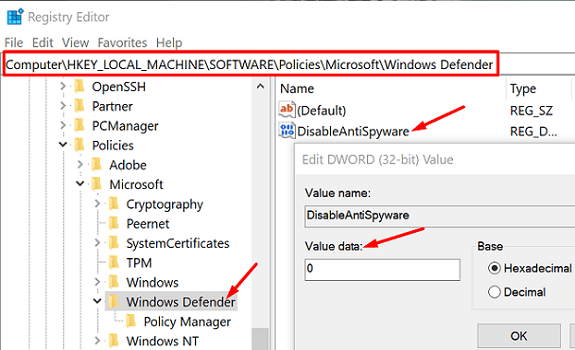
By the way, if there’s no entry for DisableAntiSpyware, you’ll need to create it yourself. Right-click on an empty area in the right-hand pane, click on New, and select DWORD (32-bit). Name the new entry “DisableAntiSpyware” and set its value data to zero.
Restart the Security Center and Windows Security Services
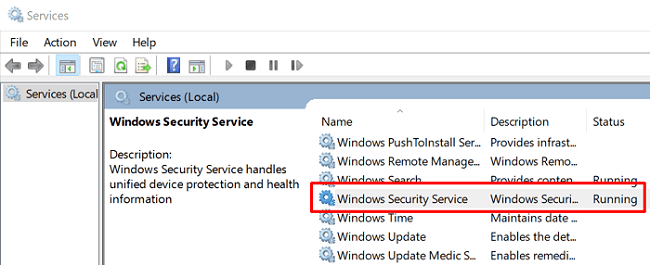
- Type services in the Windows Search field and double-click on the Services app.
- Locate the Security Center service, and then the Windows Defender Antivirus service.
- The Security Center service should be running and the Startup option should be set Automatic (Delayed Start).
- Windows Security should be running with the Startup option set to Automatic.

- If either of these services is stopped, try restarting it.
If either of these services is missing, you can either perform a Repair Upgrade or import the missing service from another Windows computer.
How to Perform a Repair Upgrade
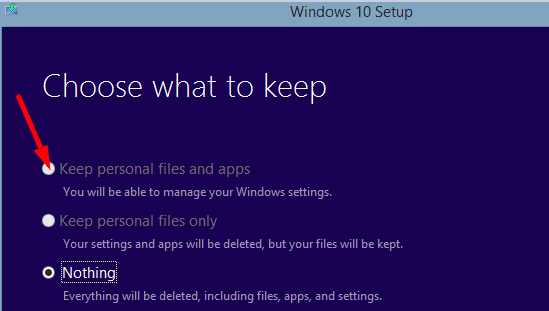
This procedure usually requires an hour to complete and automatically renews your OS while keeping your apps and files intact. However, you should only use this option if your computer configuration is HDD only. If you’re using the SSD and HDD combo, scroll down to the second option.
Also, back up your data and create an image of your OS before you start, just in case something goes wrong. Make sure your computer meets the hardware requirements for running the latest Windows version.
- First, download the Update Assistant from Microsoft.
- Then, right-click on the downloaded file and select Run As Administrator.
- Click on Upgrade This PC Now to launch the process.
- Answer the on-screen questions regarding the update. When asked what to keep, check the files and apps checkbox.

- Your machine will restart several times. Be patient and do not interrupt the process.
- Sign-in when prompted. You should now be running the latest Windows 10 version available on your computer.
- Check if Windows Security is working properly.
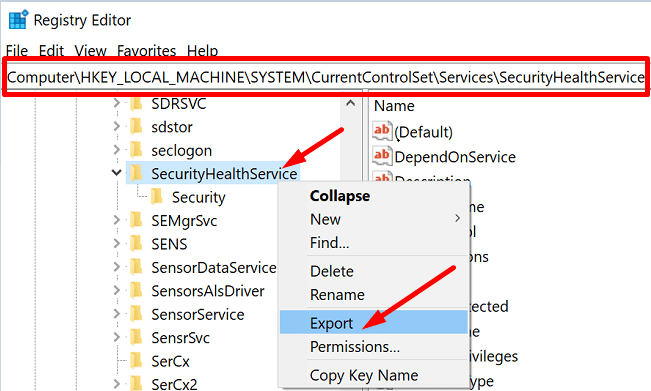
Export the Missing Security Service From Another PC
Make sure that the Windows 10 computer you’re going to export the security services from is running the same OS version as yours. You’re going to use a USB drive to export the security services.
- On the second PC, go to your Registry Editor, and check the following path:
HKEY_LOCAL_MACHINE\System\CurrentControlSet\Services.- For Security Center, scroll down to SecurityHealthService.
- For Windows Defender Antivirus Service, scroll down to WinDefend.
- Right-click on the service that’s missing from your PC and select Export.

- Name it appropriately, and use the WinDefend and Security Center service names, respectively.
- Eject the USB drive and plug it into your main computer.
- Then copy the .reg file from your USB drive to your desktop.
- Double-click the .reg file on your desktop to merge it into your Registry.
- Restart your computer and check if Windows Security is working properly.
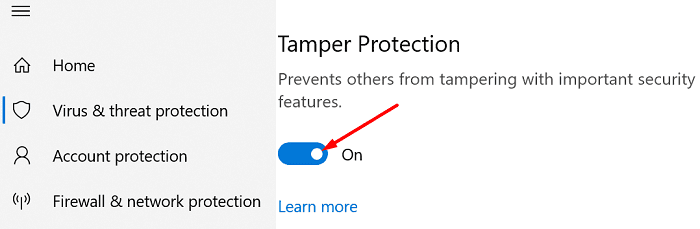
If nothing happens or you get an error code, disable Windows Security Tamper Protection. Launch Windows Security, go to Virus and threat protection settings, and toggle off Tamper protection. Try exporting the missing security service to your computer again.
Conclusion
If the Windows Security threat service stopped working, turn off AntiSpyware, and uninstall third-party security software. Then make sure the Security Center and Windows Security services are running on your machine. If they’re missing, perform a repair upgrade keeping your files and apps. Which of these solutions helped you fix the problem? Do let us know in the comments below.