Configuring your computer to look the way you want is an important part of making a new computer feel like it’s really yours. Changing the appearance of your desktop icons is a way to do this that few people know about. While most people are used to the default icons for apps like Recycle Bin on their desktop, you can change the icon.
Windows includes a set of default icons that you can choose from, it’s also possible to import your own icons if you prefer. This guide will walk you through the process of changing the icon for Recycle Bin in Windows 10.
To change the icon for Recycle Bin you need to open the Settings app to the Themes settings in the Personalisation section. To do so, press the Windows key, type “Themes, and related settings” and hit enter. The link to “Desktop icon settings” is on the far right of the page at the top of the “Related Settings” settings.

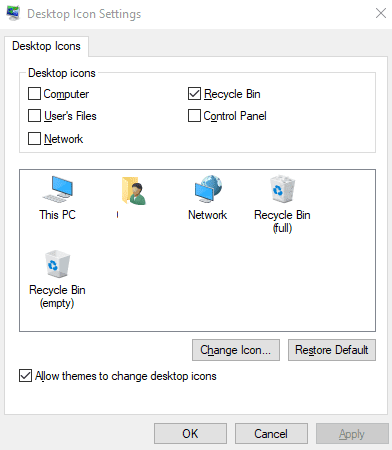
The Desktop Icon Settings window allows you to configure which desktop icon is displayed on the desktop. To change the actual icon used to represent Recycle Bin, highlight one of the Recycle Bin icons, and click “Change Icon…”.
Tip: There are two different icons for Recycle Bin, “full” and “empty”. The “full” icon is used when the Recycle Bin has files in it, whereas the “empty” icon is used when there’s nothing in it.
The Change Icon window contains a list of default icons you can choose from. This list contains generic icons which are mostly designed for other purposes. If you don’t want to use any of those icons, you can import your own icon file by clicking “Browse…”.
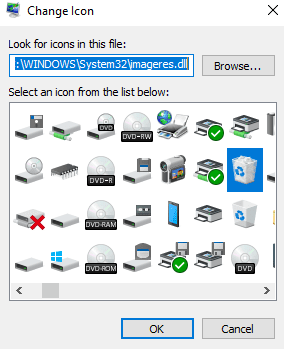
Once you’ve selected the icon you want to use, click “OK” to confirm your selection. You’ll need to click “Apply” in the Desktop Icon Settings window to apply the change.
Tip: You can disable the Recycle Bin desktop icon entirely if you want. You can do so by unticking the Recycle Bin checkbox at the top of the Desktop Icon Settings window and then clicking the “Apply” button.

When I follow these steps only the empty is changed and when I put something in the recycle bin the full icon does not appear, the empty still shows.
This was great. I knew it couldn’t be that hard but apparently, using Save As on the web page creates a shortcut that does not allow you to change the icon even though it is a better shortcut.
I am attempting to create a shortcut for my staff to use to enter our new webpage url only accessible to us. If I use the Save As on the web page, I am stuck with the default browser icon. If I follow your guidelines, I get a shortcut only useable on the PC I created it on. What is the best method to create a shortcut with icon that I could make available to my staff no matter what machine they choose to use it on?
This article help me.
Please ignore my two previous comment.
Thank you.